Steering Wheels
This page covers driving RCC with a racing wheel: the shipped Logitech G920 bindings, adding bindings for any other wheel, tuning steering feel, and wiring an H-pattern shifter.
Quick Start
Logitech G920: the bindings ship in RCC's input asset. Plug the wheel in and press Play in any demo scene.
Any other wheel (G29, G923, Thrustmaster…) reports a different device name, so the G920 bindings do not match it. Add your own:
- Plug in the wheel. Open Window → Analysis → Input Debugger and check that the wheel is listed.
- Double-click
Assets/RealisticCarControllerV4/Resources/RCC_InputActions.inputactions. - In the Vehicle map, select Steering → + → Add Binding.
- Click the binding's Path field → Listen, then turn the wheel. Pick the control that appears.
- Repeat for Throttle and Brake (press each pedal while listening).
- Click Save Asset and press Play.
If a pedal or the steering works backwards, see Tuning.
Shipped G920 bindings
The input asset has a G920 control scheme. All bindings below use the device <HID::Logitech G920 Driving Force Racing Wheel for Xbox One>, except Throttle, which uses the generic <Joystick> device.
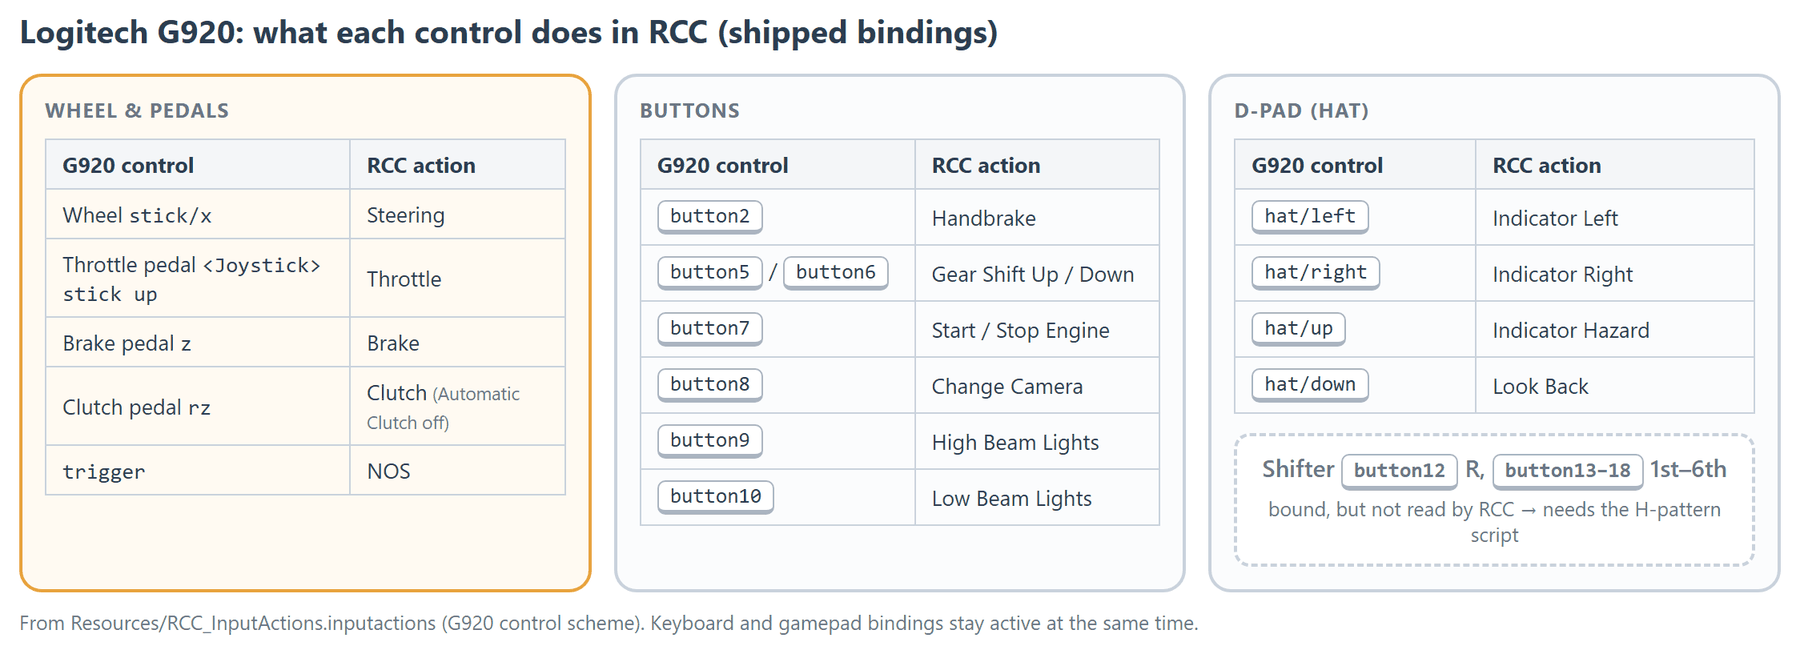
| Map | Action | G920 control | Processors / notes |
|---|---|---|---|
| Vehicle | Throttle | Composite G29/920 (1D Axis, Min Value 0): negative <Joystick>/stick/down, positive <Joystick>/stick/up |
— |
| Vehicle | Brake | Composite G29/920 (1D Axis, Min Value 0): negative z, positive unbound |
Scale (factor 2) on the composite |
| Vehicle | Steering | stick/x |
Scale (factor 1) |
| Vehicle | Clutch | rz |
Normalize (min 1, max -1, zero 1) |
| Vehicle | Handbrake | button2 |
— |
| Vehicle | Start/Stop Engine | button7 |
— |
| Vehicle | Low Beam Lights | button10 |
— |
| Vehicle | High Beam Lights | button9 |
— |
| Vehicle | Indicator Left / Right | hat/left / hat/right |
— |
| Vehicle | Indicator Hazard | hat/up |
— |
| Vehicle | Gear Shift Up / Down | button5 / button6 |
— |
| Vehicle | NOS | Composite (1D Axis, Min Value 0): positive trigger |
— |
| Vehicle | N Gear | Binding in the G920 scheme with an empty path | Not bound |
| Vehicle | 1stGear – 6thGear | button13 – button18 |
Not read by RCC — see H-pattern shifter |
| Vehicle | RGear | button12 |
Not read by RCC |
| Camera | Change Camera | button8 |
— |
| Camera | Look Back | hat/down |
— |
Interior Lights, Trailer Detach, Orbit, Zoom and the Optional map have no G920 binding. Keyboard and gamepad bindings are in Input System.
RCC does not filter bindings by control scheme: keyboard, gamepad and wheel bindings are all active at once.
Adding bindings for another wheel

- With the wheel plugged in, open Window → Analysis → Input Debugger and double-click the wheel. Turn the wheel and press each pedal to see which control changes.
- Open
Resources/RCC_InputActions.inputactionsand add a binding per action (Quick Start steps 3–5). RCC reads these actions from the wheel:
| Action | Expected value |
|---|---|
| Steering | -1 (full left) to 1 (full right) |
| Throttle | 0 released, 1 fully pressed |
| Brake | 0 released, 1 fully pressed |
| Clutch | 0 released, 1 fully pressed (used only when Automatic Clutch is off) |
| Handbrake, NOS | 0 released, 1 pressed |
- Bind buttons to the button actions (Start/Stop Engine, lights, Gear Shift Up / Down, Change Camera…) the same way.
- If a pedal reads 1 when released, add an Invert or Normalize processor to its binding and check the value again in the Input Debugger.
- Click Save Asset. Saving also regenerates
Scripts/Inputs/RCC_InputActions.cs, the C# class RCC reads the actions through.
Updating RCC replaces
RCC_InputActions.inputactionsandRCC_InputActions.cs. Note your bindings and re-apply them after an update.
Tuning

Steering range. RCC maps full steering input (-1 or 1) to the vehicle's current maximum steer angle. On a wheel with a large rotation range, a small turn gives very little steering. Set a smaller rotation range in the wheel maker's software, and keep the Steering binding's Scale at 1.
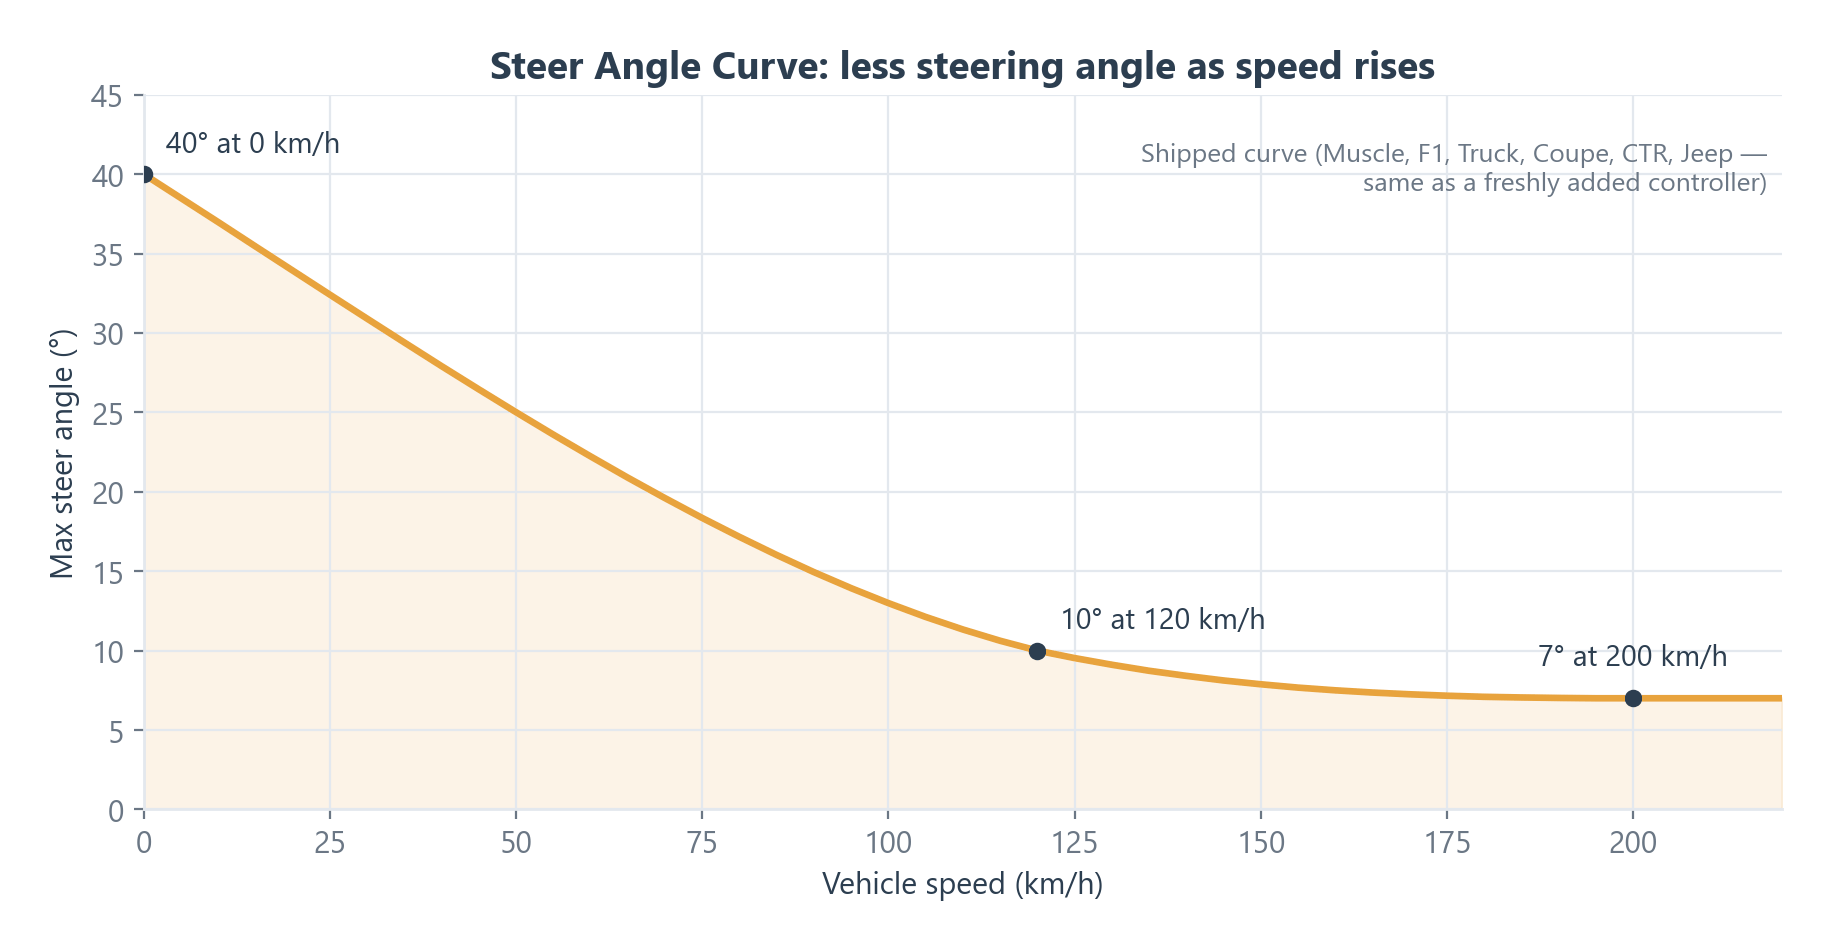
Steer angle. The maximum steer angle comes from Steer Angle Curve (vehicle inspector → Steering tab, when Steering Type is Curve). A freshly added controller's curve is 40° at 0 km/h, 10° at 120 km/h and 7° at 200 km/h. Raise the curve for more steering at speed.
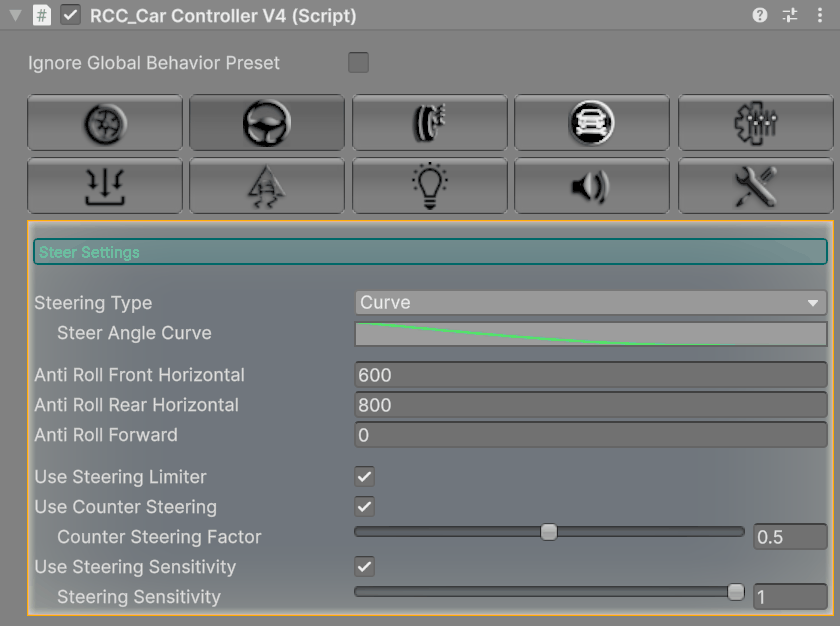
Steering helpers. Use Steering Sensitivity limits how fast the steering follows your input, and Use Counter Steering adds steering while drifting. Turn both off (Steering tab) if the car should follow the wheel exactly. When the global behavior preset is on, it overwrites these and the Steer Angle Curve; tick Ignore Global Behavior Preset on the vehicle to keep your values (Behavior Presets).
Reversed axis. Add an Invert processor to the binding.
Center dead zone. Add an Axis Deadzone processor to the Steering binding and raise Min until the car stops steering with the wheel centered.
Clutch pedal. The vehicle reads the Clutch action only when Automatic Clutch is off (vehicle inspector → Engine & Gears tab).
H-pattern shifter
The input asset has 1stGear – 6thGear and RGear actions (bound to G920 button13–button18 and button12), but RCC does not read them, so the shifter does nothing out of the box. Add this script to any GameObject in the scene to connect them to the player vehicle:
using UnityEngine;

/// <summary>
/// Connects the 1stGear - 6thGear and RGear input actions (H-pattern shifter) to the player vehicle.
/// </summary>
public class RCC_HShifterExample : MonoBehaviour {

    private RCC_InputActions inputActions;

    private void Awake() {

        inputActions = new RCC_InputActions();

        // Gear indexes are 0-based: 1st gear = 0. Reverse = -1.
        inputActions.Vehicle._1stGear.performed += context => ShiftTo(0);
        inputActions.Vehicle._2ndGear.performed += context => ShiftTo(1);
        inputActions.Vehicle._3rdGear.performed += context => ShiftTo(2);
        inputActions.Vehicle._4thGear.performed += context => ShiftTo(3);
        inputActions.Vehicle._5thGear.performed += context => ShiftTo(4);
        inputActions.Vehicle._6thGear.performed += context => ShiftTo(5);
        inputActions.Vehicle.RGear.performed += context => ShiftTo(-1);

    }

    private void OnEnable() {

        inputActions.Vehicle.Enable();

    }

    private void OnDisable() {

        inputActions.Vehicle.Disable();

    }

    private void OnDestroy() {

        inputActions.Dispose();

    }

    private void ShiftTo(int gear) {

        RCC_CarControllerV4 vehicle = RCC_SceneManager.Instance.activePlayerVehicle;

        if (!vehicle || !vehicle.canControl || vehicle.externalController)
            return;

        // The automatic gearbox would shift away from the selected gear.
        vehicle.automaticGear = false;

        // In reverse, GearShiftTo(0) is ignored (reverse also uses gear index 0). GearShiftUp() goes from reverse to 1st.
        if (gear == 0 && vehicle.direction == -1)
            vehicle.GearShiftUp();
        else
            vehicle.GearShiftTo(gear);

    }

}
GearShiftTo(int)ignores gears the vehicle doesn't have (6th on a 5-speed does nothing).- The first shift turns off Automatic Gearbox. With it off, the brake no longer engages reverse: select R to reverse.
- Moving the lever back to the middle keeps the last gear engaged.
- For another shifter, bind its buttons to the same actions.
See Also
- Input System — full controls table and rebinding.
- How to Override Inputs — feed your own input values to a vehicle.
- Behavior Presets — global presets that replace steering settings.
- Troubleshooting