Customization
This page covers the runtime customization system: paint, wheels, spoilers, sirens, decals, neons, performance upgrades and suspension tuning, and how the result is saved.
Quick Start
Make a vehicle customizable in 4 steps:
- Select the vehicle. In the
RCC_CarControllerV4inspector, open the Customizer tab and click Add Customizer Component. - In the new
RCC_Customizercomponent, set Save File Name to a name no other vehicle uses (for exampleMyCar). - Click Create next to each manager you want (Paint, Wheel, Upgrade, …). Each one is added as a child of the vehicle.
- Paint only: click Select next to Paint Manager, select its painter child (
Paint_1) and drag the vehicle's body material into Paint Material.
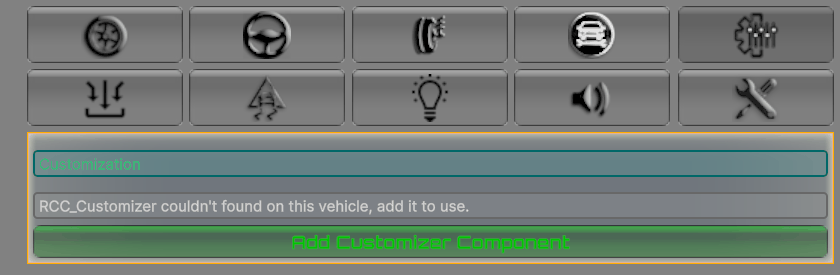
The vehicle now loads its saved look and upgrades on start, and saves every change. Call the manager methods from your own UI (Code Samples) or use the ready-made menu (Built-in Menu and Demo Scene).
The Customizer Component
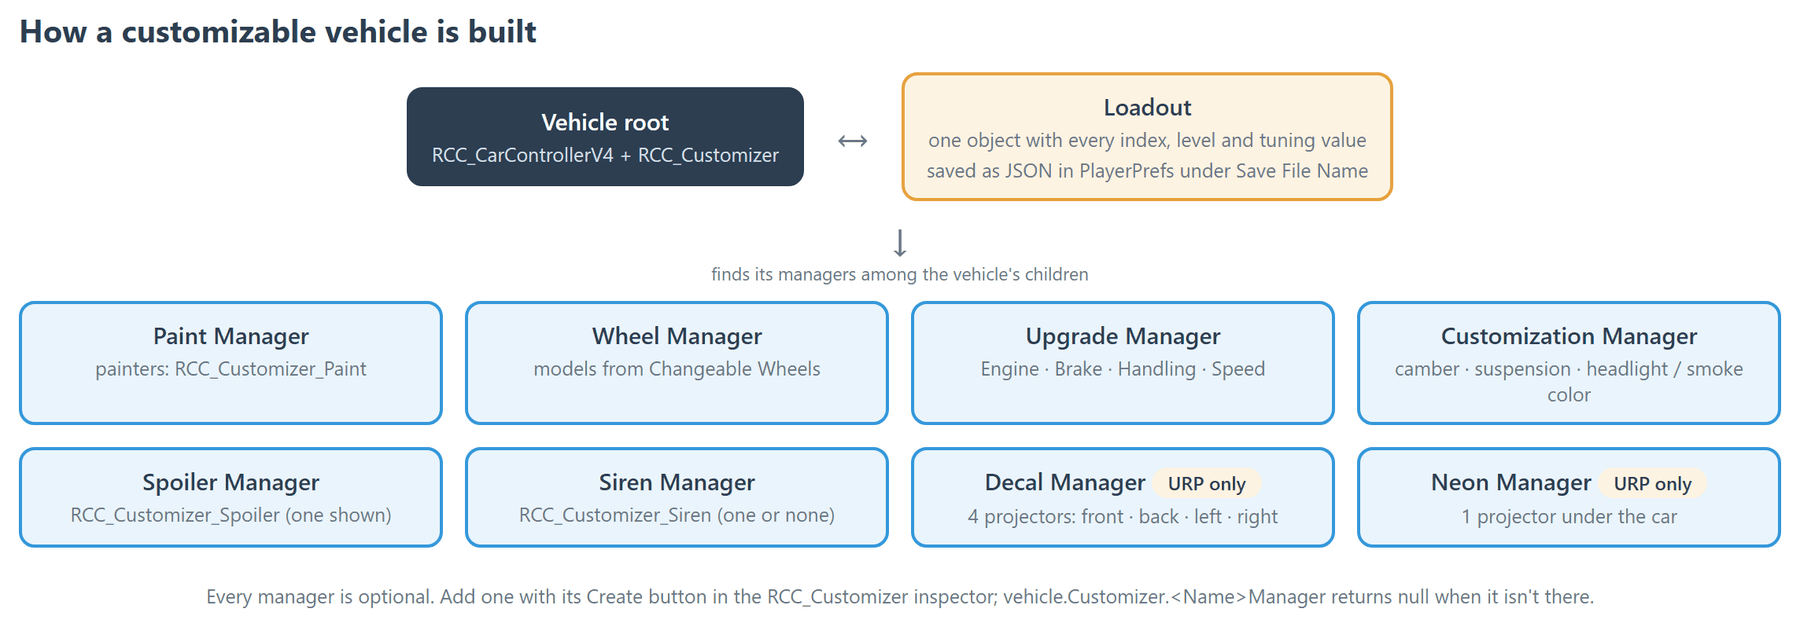
RCC_Customizer must be on the same GameObject as RCC_CarControllerV4 (the vehicle root). It finds its managers among its children and stores the whole state in one loadout.
| Inspector label | What it does | Shipped default |
|---|---|---|
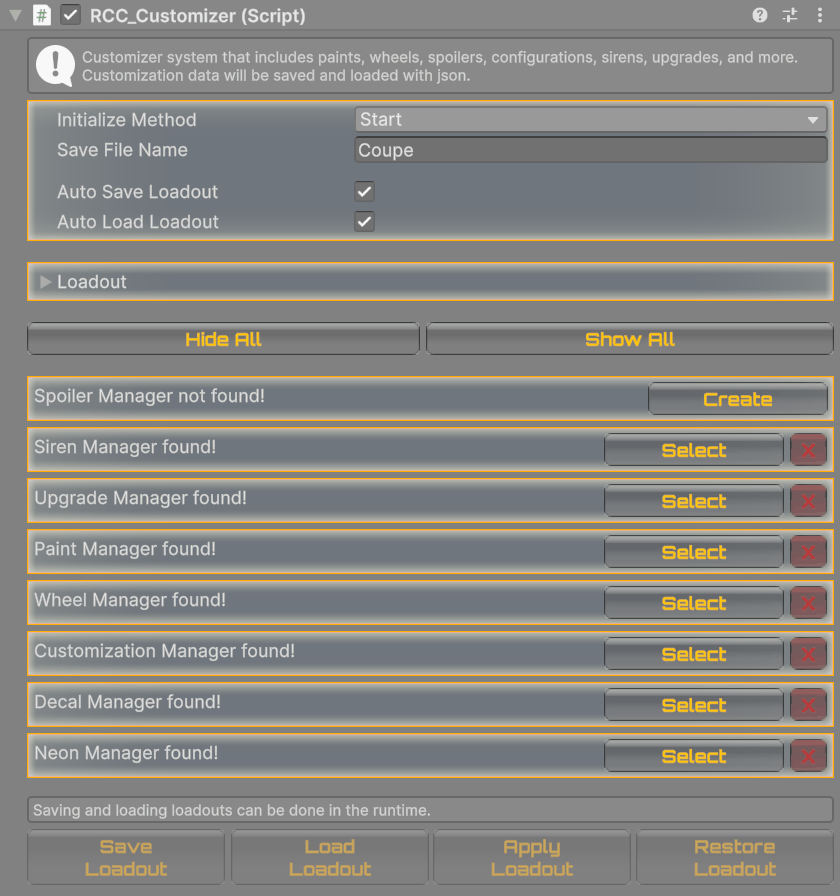
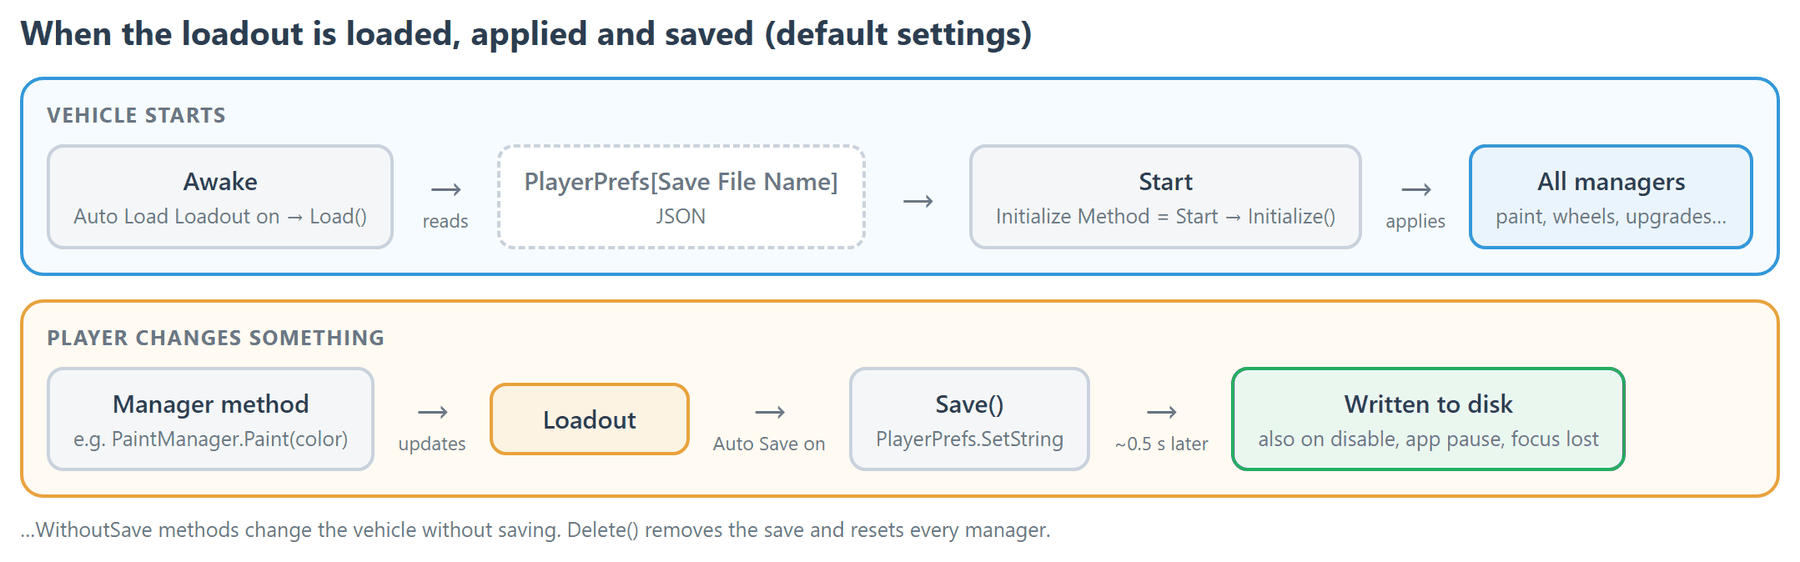
| Initialize Method | When the managers apply the loadout: Awake, On Enable, Start, Delayed With Fixed Update, or None. With None, nothing is loaded or applied automatically — call Load() and Initialize() yourself. |
Start |
| Save File Name | The PlayerPrefs key the loadout is saved under. |
The vehicle's name (e.g. Coupe) on the demo vehicles |
| Auto Save Loadout | Saves the loadout after every change. | On |
| Auto Load Loadout | Loads the saved loadout before the managers initialize. | On |
| Loadout | The current state (paint, wheel, spoiler, siren, decal and neon indexes, upgrade levels, tuning). | — |
Buttons:
- Create / Select / X (one row per manager) — add a manager from its setup prefab, select it, or delete it.
- Hide All / Show All — hide or show every spoiler, siren, decal and neon, handy while editing.
- Save Loadout / Load Loadout / Apply Loadout / Restore Loadout — Play mode only. Restore Loadout deletes the saved loadout and resets the vehicle.
Save File Name must be unique. Vehicles with the same name share one save; an empty name is also one shared key. Two copies of the same prefab in a scene therefore share their customization.
Managers
| Manager | What it changes | Main method |
|---|---|---|
| Paint Manager | Body color | Paint(Color color) |
| Wheel Manager | Wheel models, from the Changeable Wheels list | UpdateWheel(int index) |
| Upgrade Manager | Engine, brake, handling and speed levels (0–5) | UpgradeEngine(), UpgradeBrake(), UpgradeHandling(), UpgradeSpeed() |
| Spoiler Manager | Which spoiler is shown (one at a time) | Upgrade(int index) |
| Siren Manager | Which siren is shown (one at a time, -1 = none) |
Upgrade(int index) |
| Decal Manager | Decals on front, back, left and right (URP only) | Upgrade(int location, Material material) |
| Neon Manager | Underbody neon glow (URP only) | Upgrade(Material material) |
| Customization Manager | Camber, suspension, headlight color, wheel smoke color | SetFrontCambers(float), SetRearSuspensionsSpringForce(float), … |
Reach them through the vehicle: vehicle.Customizer.PaintManager, .WheelManager, .UpgradeManager, .SpoilerManager, .SirenManager, .DecalManager, .NeonManager, .CustomizationManager. A property returns null when that manager isn't on the vehicle.
Every change method saves when Auto Save Loadout is on. For previews that must not be saved, use the …WithoutSave versions: PaintWithoutSave(Color), UpdateWheelWithoutSave(int), UpgradeWithoutSave(int) (spoiler, siren), UpgradeWithoutSave(int, Material) (decal), UpgradeWithoutSave(Material) (neon), UpgradeEngineWithoutSave(int level) and its Brake / Handling / Speed versions (levels of 5 or more are ignored).
Paint Manager
- Each painter (
RCC_Customizer_Paint) colors one material. Every mesh renderer on the vehicle that uses Paint Material gets the color. - Id is the shader color property,
_Colorby default. Use_BaseColorfor URP / HDRP; the painter switches to it automatically when the URP or HDRP define is set. - More than one paintable material: click Create New Painter, assign its material, then click Get All Painters.
Changed in V6: if a material has no property named Id, the painter uses
_BaseColoror_Colorinstead, so painting keeps working after a render pipeline switch.
Wheel Manager
- The wheels come from the Changeable Wheels list, shared by all vehicles: Tools → BoneCracker Games → Realistic Car Controller → Configure → Configure Changeable Wheels (the Wheel Manager's Configure Wheels button opens it too). 7 wheels ship, indexes 0–6.
- To add a wheel, add an element to Wheels and assign your wheel prefab to Wheel. The prefab must be active.
- The new model replaces the model on every wheel (mirrored on the right side), and each WheelCollider radius is recalculated from the model's size.
Upgrade Manager
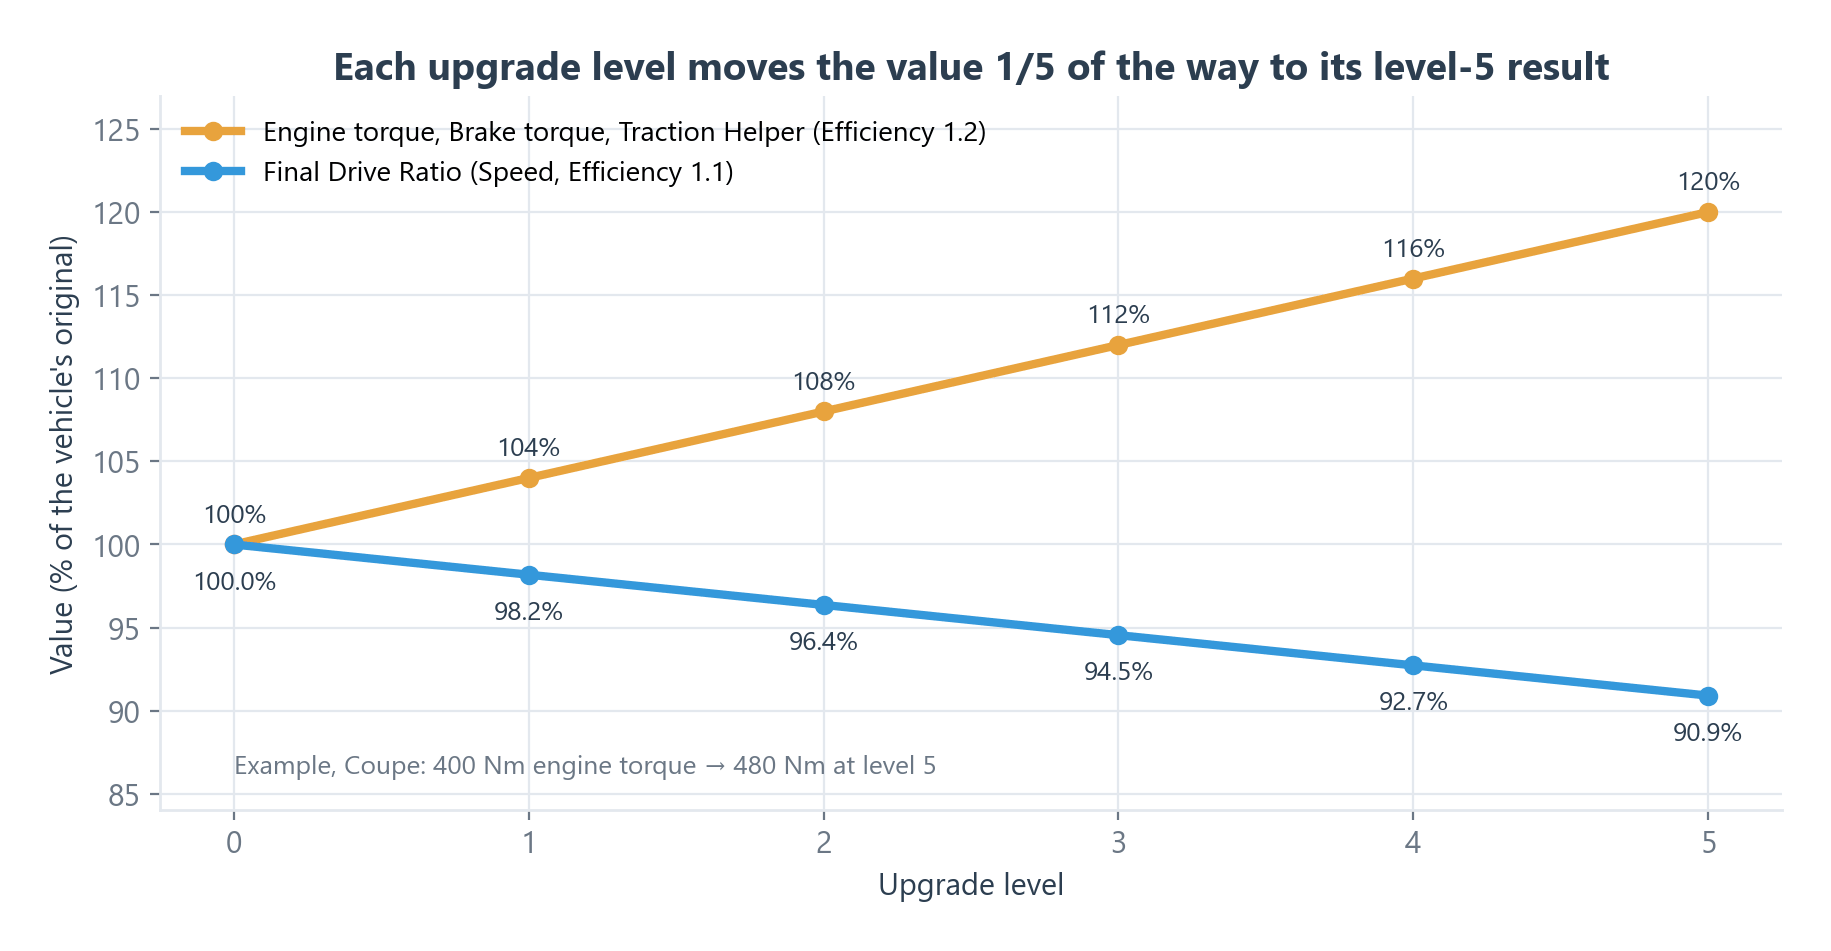
Each call raises the level by 1, up to 5. The level scales a value on the vehicle between its original value (level 0) and the level-5 result:
| Upgrade | Vehicle value it changes | At level 5 | Efficiency on the demo vehicles |
|---|---|---|---|
| Engine | Maximum Engine Torque | original × Efficiency | 1.2 |
| Brake | Maximum Brake Torque | original × Efficiency | 1.2 |
| Handling | Traction Helper Strength | original × Efficiency | 1.2 |
| Speed | Final Drive Ratio | original ÷ Efficiency (higher top speed) | 1.1 |
Efficiency (range 1–2) is set on the Engine, Brake, Handling and Speed children of the Upgrade Manager. Handling has no effect while the vehicle's Traction Helper is off.
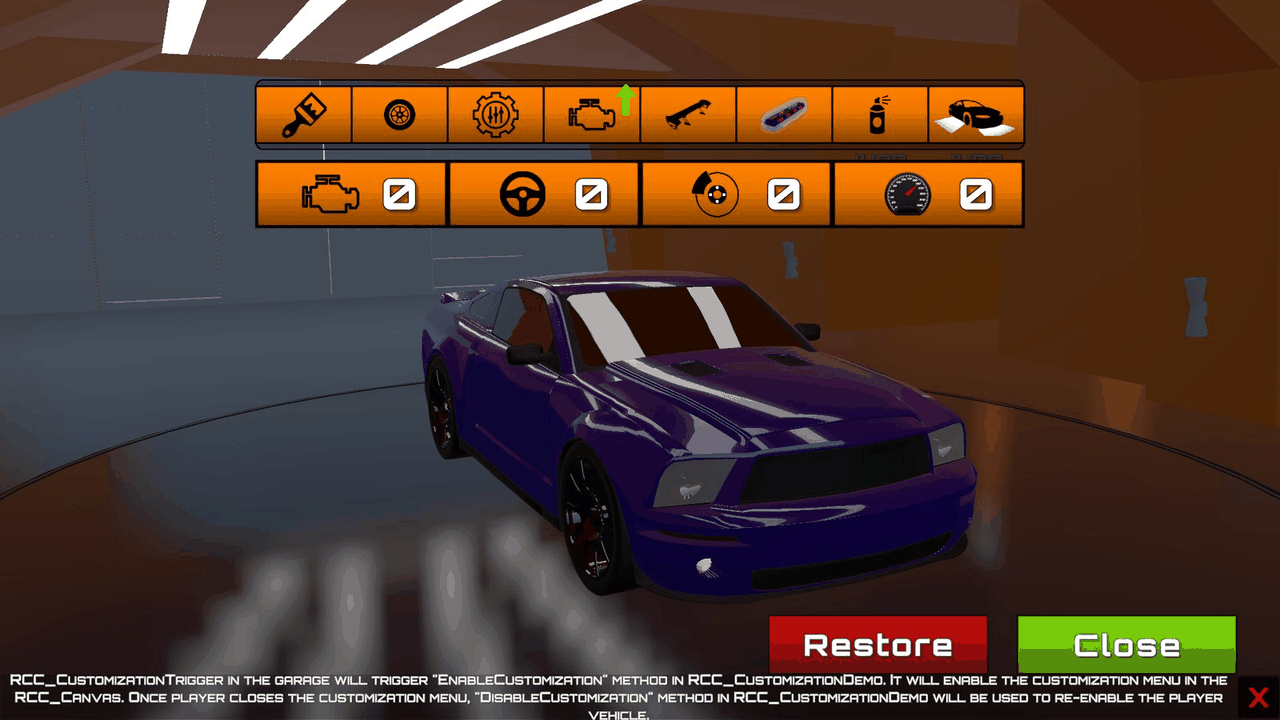
Spoiler and Siren Managers
- Put each spoiler / siren model under its manager and add
RCC_Customizer_Spoiler/RCC_Customizer_Sirento it. - Click Get All Spoilers / Get All Sirens. The list order is the index you pass to
Upgrade(int). - Spoilers only: to paint a spoiler with the body color, assign Body Renderer and set Index to the material slot to paint (
-1= not paintable).
Decal and Neon Managers
- The Decal Manager has four projectors: Decal Front, Decal Back, Decal Left, Decal Right. Place them on the body. Put your decal materials in the Decals list.
Upgrade(int location, Material material)— location0= front,1= back,2= left,3= right. Pass a material from the Decals list; it is saved by its position in that list.- The Neon Manager has one Neon projector under the car. Put your neon materials in the Neons list and pass one of them to
Upgrade(Material). - Both work in URP only — see Render Pipeline Notes.
Customization Manager (tuning)
Front and rear axles are set separately; each method applies to both wheels of that axle.
| Method | Changes |
|---|---|
SetFrontCambers(float) / SetRearCambers(float) |
Camber angle, degrees |
SetFrontSuspensionsDistances(float) / SetRearSuspensionsDistances(float) |
Suspension distance, meters (values of 0.01 or less become 0.05) |
SetFrontSuspensionsSpringForce(float) / SetRearSuspensionsSpringForce(float) |
Spring force |
SetFrontSuspensionsSpringDamper(float) / SetRearSuspensionsSpringDamper(float) |
Damper |
SetFrontSuspensionsTargetPos(float) / SetRearSuspensionsTargetPos(float) / SetAllSuspensionsTargetPos(float) |
Suspension target position, 0–1 |
SetHeadlightsColor(Color) |
Color of all headlights |
SetSmokeColor(Color) |
Wheel smoke color |
Repair() |
Repairs damage (when the vehicle uses damage) |
Code Samples
Attach this to any GameObject, assign Vehicle, and call its methods from UI buttons.
using UnityEngine;

public class MyGarage : MonoBehaviour {

    public RCC_CarControllerV4 vehicle;

    RCC_Customizer Customizer {
        get { return vehicle ? vehicle.Customizer : null; }
    }

    public void PaintRed() {

        if (!Customizer || !Customizer.PaintManager)
            return;

        Customizer.PaintManager.Paint(Color.red);

        // Paint the active spoiler with the same color.
        if (Customizer.SpoilerManager && Customizer.SpoilerManager.paintSpoilers)
            Customizer.SpoilerManager.Paint(Color.red);

    }

    // Index into the Changeable Wheels list (0-6 with the shipped list).
    public void ChangeWheel(int index) {

        if (Customizer && Customizer.WheelManager)
            Customizer.WheelManager.UpdateWheel(index);

    }

    public void UpgradeEngine() {

        if (Customizer && Customizer.UpgradeManager)
            Customizer.UpgradeManager.UpgradeEngine();

    }

    public void LowerFront() {

        if (Customizer && Customizer.CustomizationManager)
            Customizer.CustomizationManager.SetFrontSuspensionsDistances(.1f);

    }

    // Deletes the save and resets every manager.
    public void ResetAll() {

        if (Customizer)
            Customizer.Delete();

    }

}
Saving and Loading
- The loadout is saved as JSON in
PlayerPrefsunder Save File Name. - With the default settings, nothing else is needed: changes save automatically and load on the next start.
Method on RCC_Customizer |
What it does |
|---|---|
Save() |
Writes the loadout to PlayerPrefs. |
Load() |
Reads the saved loadout. Does not apply it. |
Initialize() |
Applies the current loadout to all managers. |
Delete() |
Deletes the save and resets every manager to the vehicle's original setup. |
GetLoadout() |
Returns the current loadout (RCC_Customizer_Loadout). |
Changed in V6: saves are written to disk about half a second after a change, and also when the vehicle is disabled or the app is paused or loses focus. Changes now survive on WebGL and on mobile apps that are closed from the background.
To save manually (for example only when the player presses Apply), turn Auto Save Loadout off and call Save(). To keep the loadout in your own save system:
using UnityEngine;

public class MyLoadoutStorage : MonoBehaviour {

    public RCC_Customizer customizer;

    public string Export() {

        return JsonUtility.ToJson(customizer.GetLoadout());

    }

    public void Import(string json) {

        customizer.loadout = JsonUtility.FromJson<RCC_Customizer_Loadout>(json);
        customizer.Initialize();

    }

}
Built-in Menu and Demo Scene
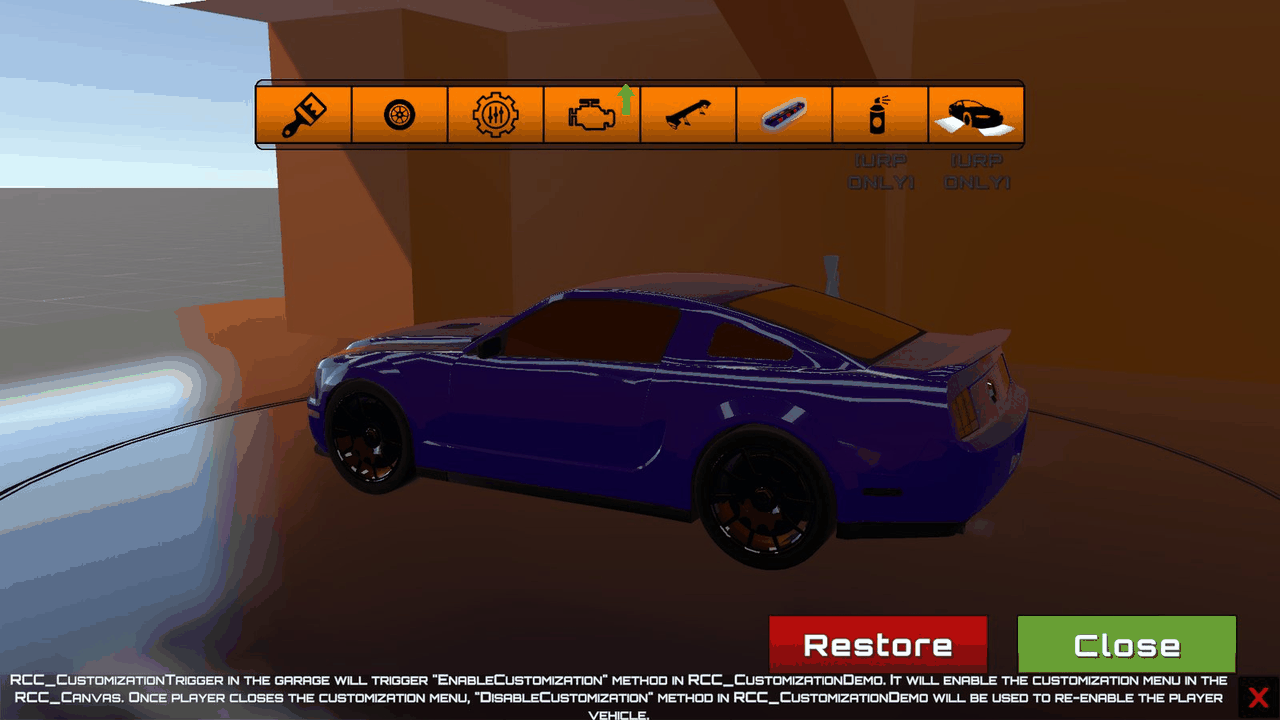
- RCC_Canvas (Tools → BoneCracker Games → Realistic Car Controller → Create → UI → Add RCC Canvas To Scene) contains a customization menu. Open it for the player vehicle with
RCC_Customization_API.SetCustomizationMode(vehicle, true); this also takes control away and switches the camera to TPS.falsegives control back. - The menu's color, wheel, spoiler and siren buttons go through the scene's
RCC_CustomizationManager, which follows the active player vehicle. It is created automatically when first needed; to add it yourself use Tools → BoneCracker Games → Realistic Car Controller → Create → Managers → Add RCC Customization Manager. - RCC_Blank_Customization is a garage: drive into the
RCC_CustomizationTriggerto open the menu. See Demo Scenes.
RCC_Customization_API also has static helpers that change a vehicle directly, such as SetFrontCambers(vehicle, angle), SetABS(vehicle, state) and SetMaximumTorque(vehicle, value). They are separate from the Customizer: their changes are not part of the loadout. SaveStats(vehicle) / LoadStats(vehicle) store them in their own PlayerPrefs keys, named after the vehicle's GameObject.
Render Pipeline Notes
| Feature | Built-in | URP | HDRP |
|---|---|---|---|
| Paint, wheels, spoilers, sirens, upgrades, tuning | Yes | Yes | Yes |
| Decals, neons | No (the methods do nothing) | Yes | No (the methods do nothing) |
- Decals and neons use URP's
DecalProjector. They need theBCG_URPdefine (set automatically when URP is active) and a Decal renderer feature on your URP renderer. - Converting materials and pipelines: Render Pipelines.