Damage System
This page covers mesh deformation, wheel damage and detachment, breakable lights, detachable body parts, and repairing a vehicle. Damage settings live on the vehicle itself, in the Damage tab of the RCC_CarControllerV4 inspector. There is no separate damage component to add.
Quick Start
- In the Project window, select the car's model asset. In the Model tab, enable Read/Write and click Apply. Meshes without Read/Write are skipped, and Unity logs an error in the Console.
- Select the vehicle, open the Damage tab of its inspector and check that Use Damage is on.
- Leave Auto Install on. RCC then collects the vehicle's meshes, lights, detachable parts and wheels on its own.
- Enter Play mode and drive into a wall at more than 5 m/s (18 km/h). The body dents where it hit.
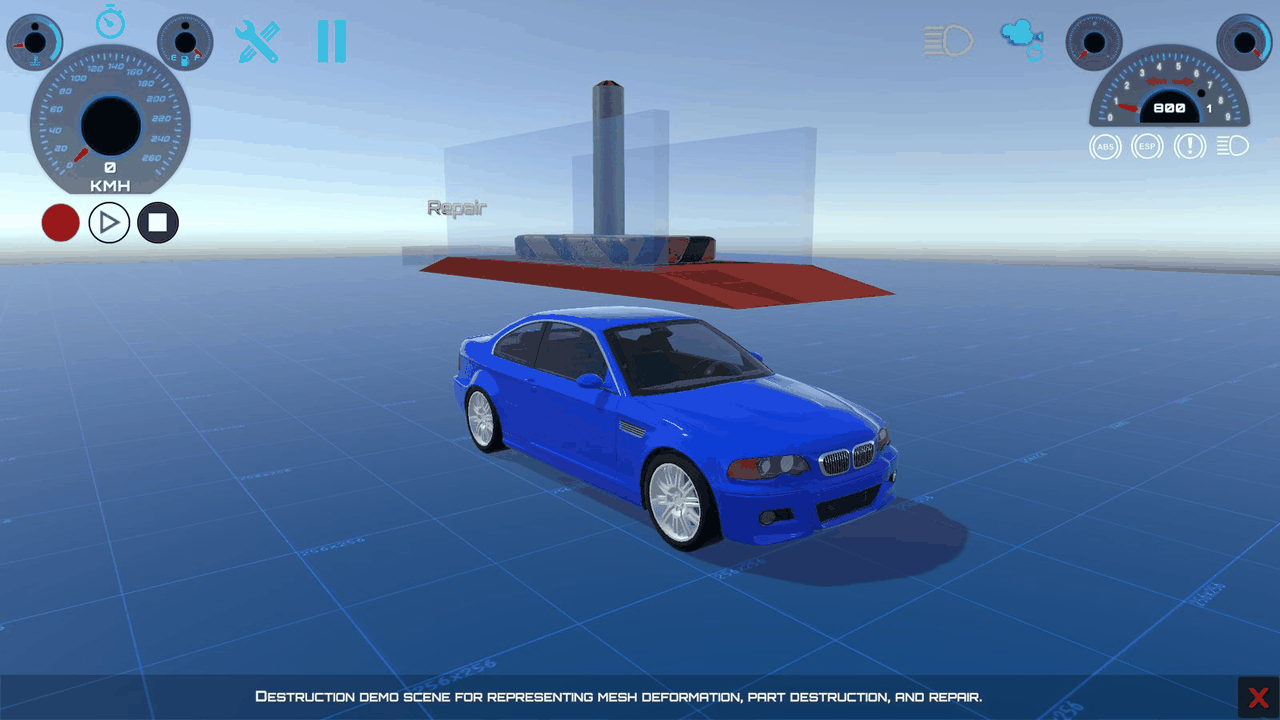
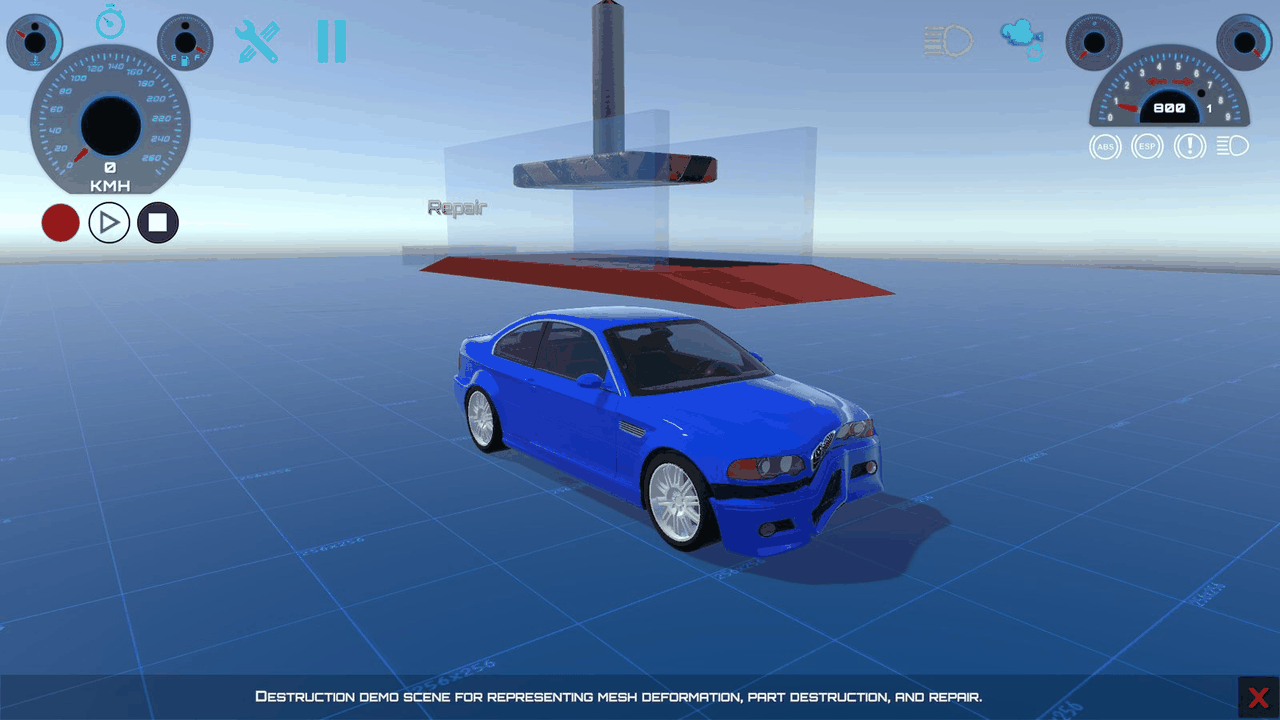
To try damage on a ready-made setup, open the RCC_Damage demo scene (see Demo Scenes).
Damage Tab Settings
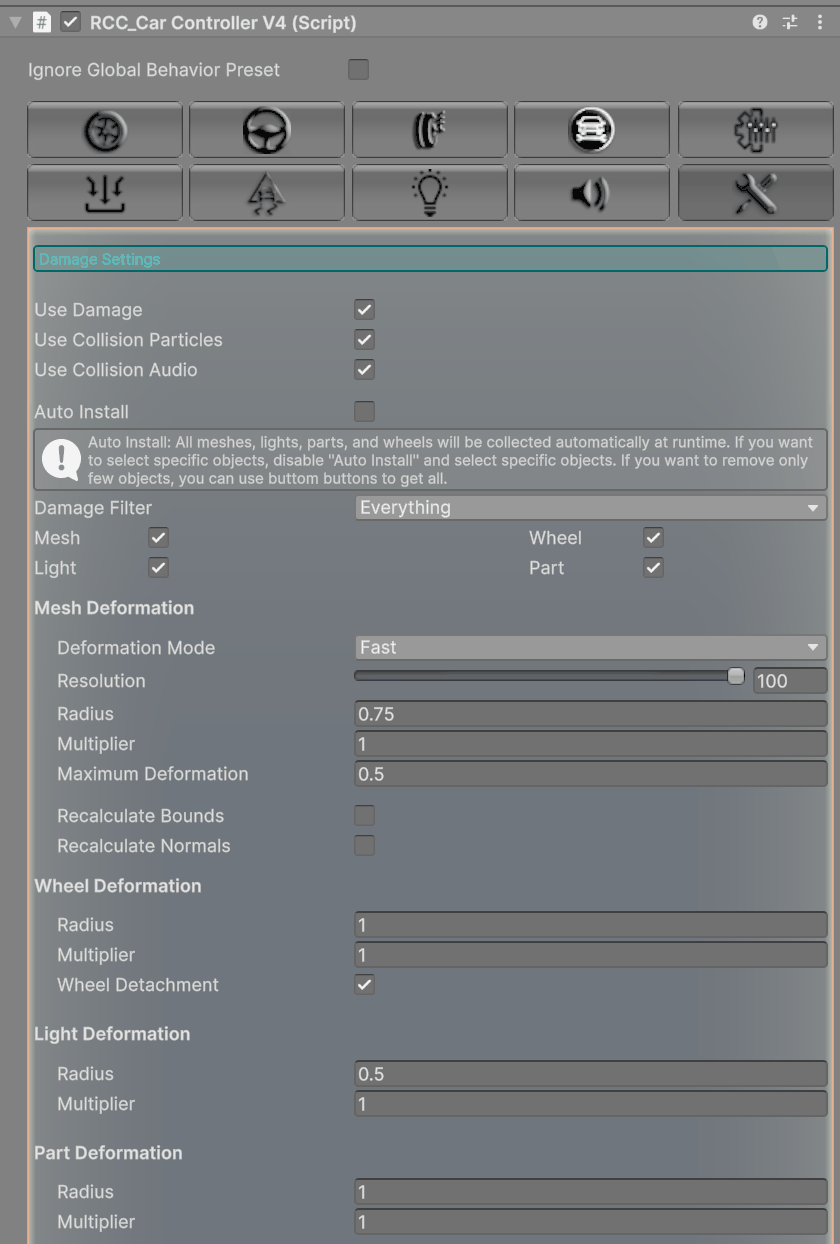
| Inspector label | What it does | Shipped default |
|---|---|---|
| Use Damage | Master switch. Turning it off disables all damage and repair, and hides the rest of the tab. | On |
| Use Collision Particles | Spawns spark particles on impacts and scrapes. | On |
| Use Collision Audio | Plays a crash sound on impacts. | On |
| Auto Install | Collects all meshes, lights, parts and wheels automatically. Turn it off to pick them by hand (see Choosing Parts by Hand). | On |
| Damage Filter | The layers that can damage this vehicle. Crash sounds and sparks use the same filter. | Everything |
| Mesh / Wheel / Light / Part | Turn each damage type on or off. Each one shows its own settings below. | On |
Mesh Deformation
| Inspector label | What it does | Shipped default |
|---|---|---|
| Deformation Mode | Fast: dents appear instantly and repair instantly. Accurate: dents ease in over about 1 second, and repairs ease out too. | Fast |
| Resolution | Slider from 1 to 100. The current damage code does not use it. | 100 |
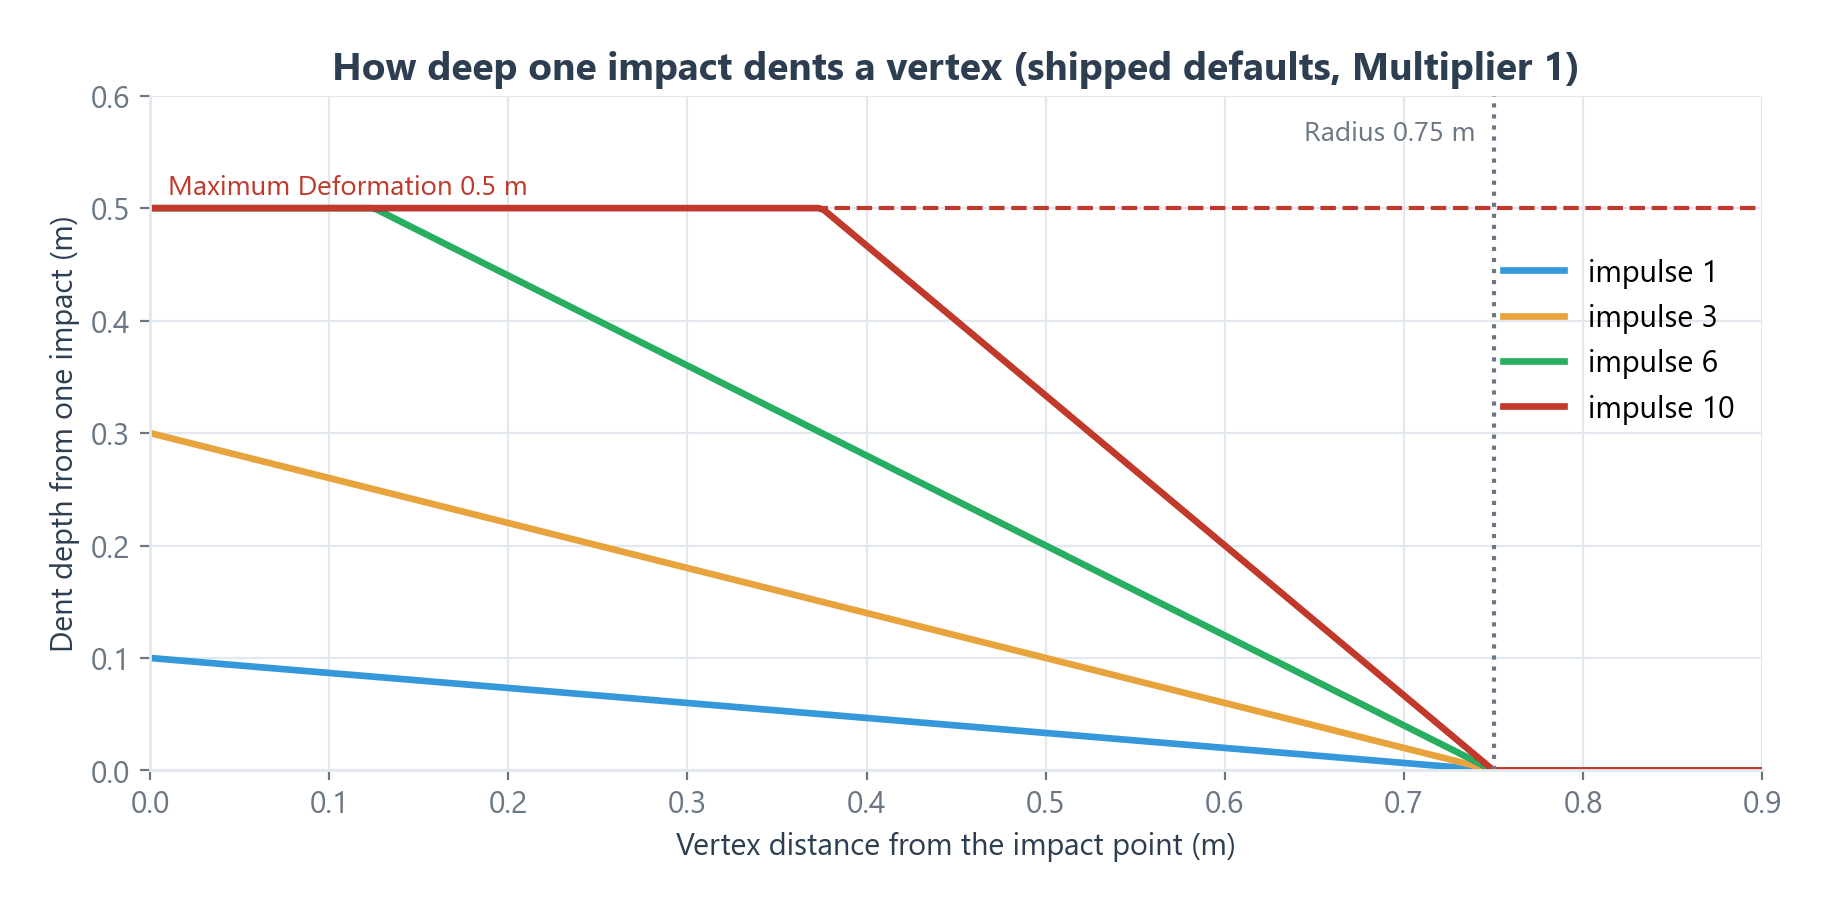
| Radius | Vertices within this distance (m) of the impact point get dented. | 0.75 |
| Multiplier | Scales how deep dents are. | 1 |
| Maximum Deformation | The farthest (m) a vertex can move from its original position. It is also the distance a wheel must be pushed before it detaches. Set it to 0 to remove the limit, which also stops wheels from ever detaching. | 0.5 |
| Recalculate Bounds | Recalculates mesh bounds after each dent or repair step, so culling stays correct. | On |
| Recalculate Normals | Recalculates normals after each dent or repair step, so lighting stays correct. This is expensive on high-poly meshes. | On |
Wheel Deformation
| Inspector label | What it does | Shipped default |
|---|---|---|
| Radius | Impacts within this distance (m) of a wheel collider push the wheel out of place. | 1 |
| Multiplier | Scales how far the wheel is pushed. | 1 |
| Wheel Detachment | Lets a wheel fall off once it has been pushed farther than Maximum Deformation. | On |
Light Deformation and Part Deformation
| Inspector label | What it does | Shipped default |
|---|---|---|
| Radius | Impacts within this distance (m) of a light (or part) damage it. | Light 0.5 · Part 1 |
| Multiplier | Scales how much strength each impact removes from the light (or part). | 1 |
The defaults above are for a freshly added controller. Most demo vehicles ship with Auto Install off and their part lists already filled in.
How Damage Works
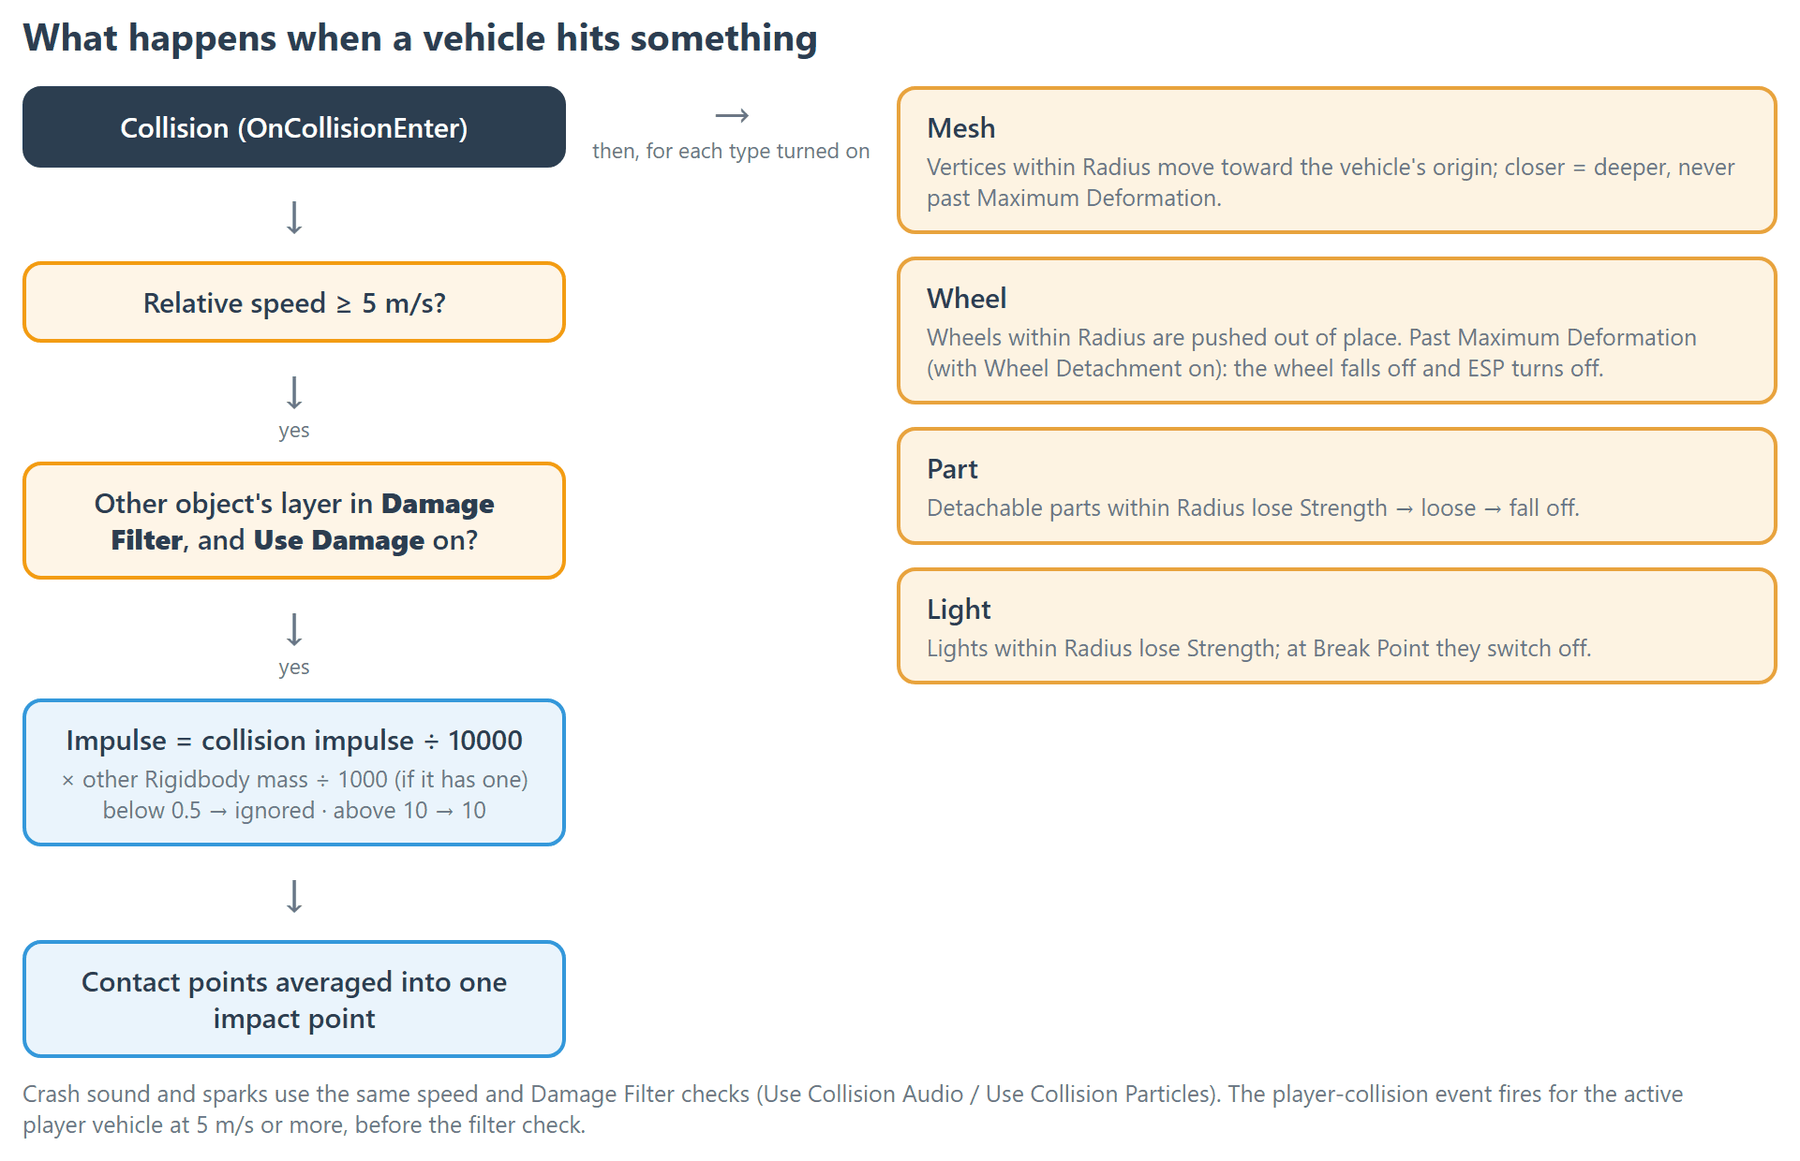
- An impact counts only when the relative speed is at least 5 m/s and the other object's layer is in Damage Filter. Impact strength comes from the collision impulse, scaled by the other object's mass ÷ 1000 when it has a Rigidbody (heavier than 1000 kg hits harder, lighter hits softer). Very weak impacts are ignored.
- All contact points of an impact are averaged into one impact point.
- Each vertex within Radius moves toward the vehicle's origin (the root pivot). Vertices closer to the impact point move more, and no vertex moves farther than Maximum Deformation.
- Deformation is applied in
Update, on a per-vehicle copy of each mesh, so the mesh asset itself never changes. - The first impact on each mesh builds a vertex lookup structure (an octree) for that mesh.
- Only
MeshFiltermeshes can be deformed. Meshes under the four main wheel models (Front Left / Front Right / Rear Left / Rear Right) are excluded. - The dent direction is worked out in the vehicle root's space. A mesh rotated differently from the root dents the wrong way. See Fix Axis below.
Wheels: an impact near a wheel shifts its wheel collider, which knocks the wheel out of alignment. If the wheel has moved farther than Maximum Deformation and Wheel Detachment is on, the wheel falls off:
- The wheel collider is disabled and its wheel model is hidden.
- A loose copy of the wheel model is spawned with a 20 kg Rigidbody. It gets a convex Mesh Collider if the mesh has Read/Write enabled, and a Sphere Collider otherwise.
- ESP is turned off until the vehicle is repaired.
Choosing Parts by Hand
When Auto Install is off, the tab shows four lists: Mesh Filters, Wheels, Lights and Parts. Click X to remove an entry.
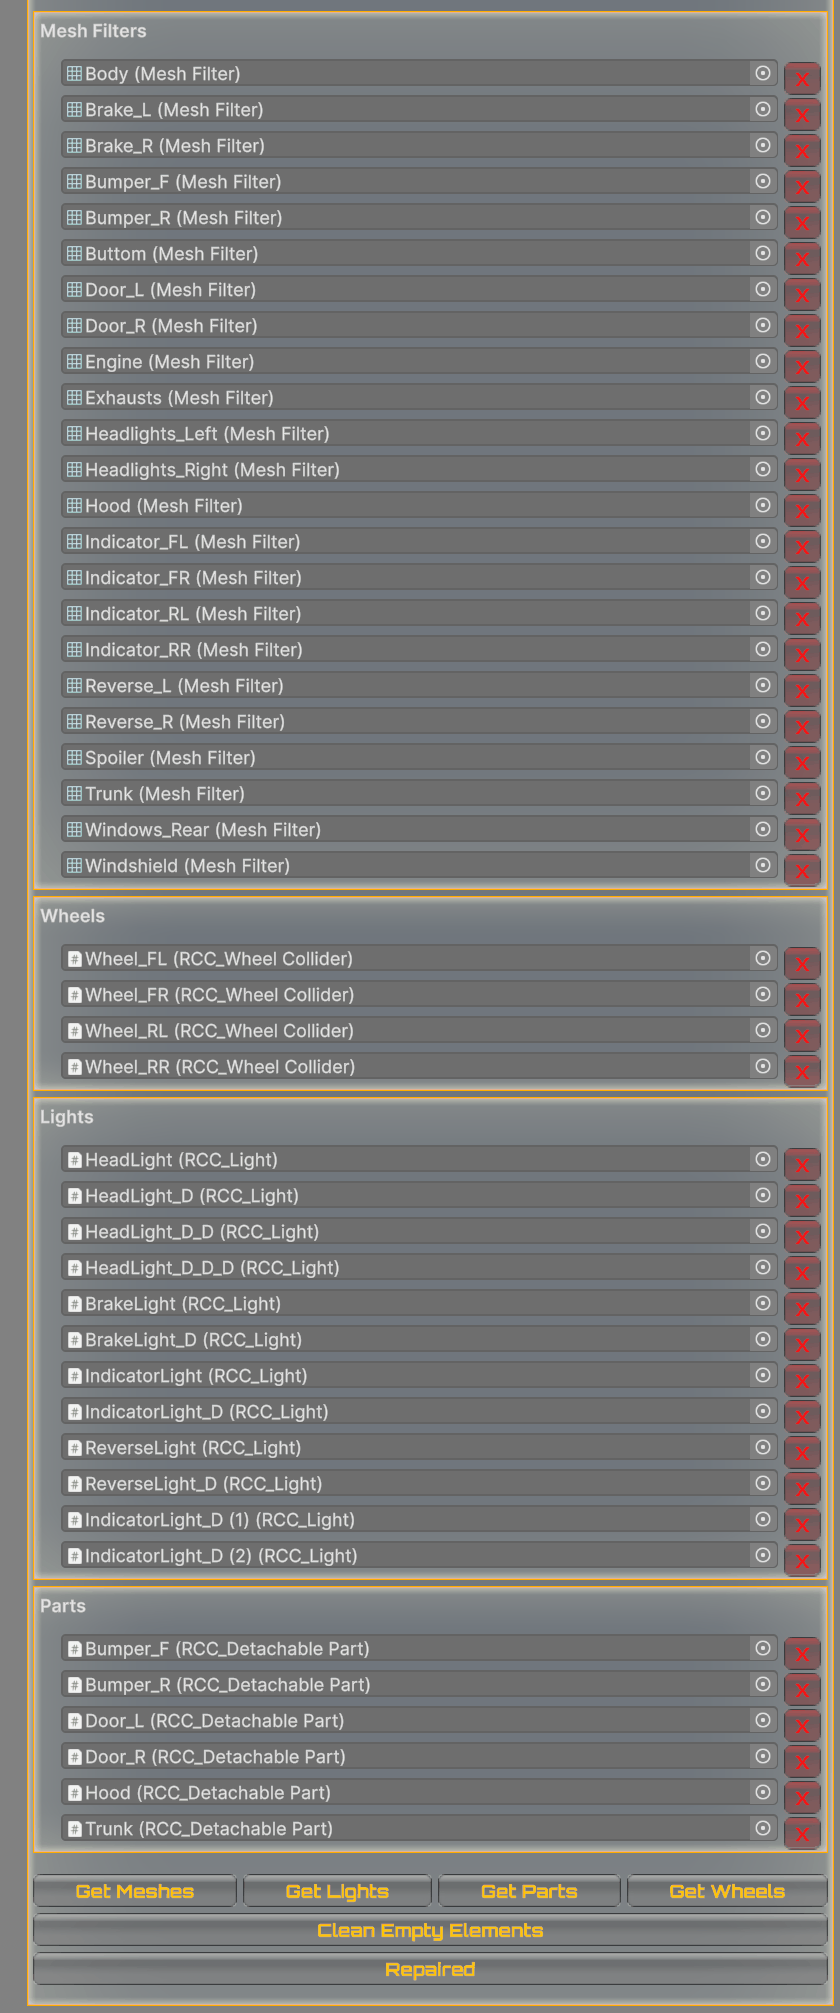
| Button | What it does |
|---|---|
| Get Meshes | Fills Mesh Filters with every readable mesh on the vehicle, except the wheel meshes. It logs an error for each mesh that does not have Read/Write enabled. |
| Get Lights | Fills Lights with every RCC_Light on the vehicle. |
| Get Parts | Fills Parts with every RCC_DetachablePart on the vehicle. |
| Get Wheels | Fills Wheels with every RCC_WheelCollider on the vehicle. |
| Clean Empty Elements | Removes empty entries from all four lists. |
| Fix Axis | Appears next to a mesh marked Axis is wrong! (its rotation differs from the vehicle root). It opens a window for fixing that mesh's axis. |
Detachable Parts
A detachable part is a hood, door, trunk or bumper that goes loose and then falls off after enough hits. The CTR, Coupe, Jeep, M3_E36, M3_E46_New and Pickup demo vehicles include ready-made parts you can copy.
- Make the part a separate child GameObject of the vehicle, with its own mesh and collider (a Box Collider or a convex Mesh Collider).
- With the part selected, click Add Component, search for RCC_DetachablePart and add it. Adding it automatically:
- moves the part to the
RCC_DetachablePartlayer (set in RCC Settings), which does not collide with the car body or wheel colliders; - adds a Rigidbody (35 kg), a ConfigurableJoint connected to the vehicle's Rigidbody, and aCOMchild; - picks up the collider from step 1. - On the ConfigurableJoint, set the motions and limits the part should have once it is loose. For example, a hood can swing on a hinge at its front edge. Leave every motion Locked for a part that should only fall off.
- If Auto Install is off on the vehicle, click Get Parts in the Damage tab.
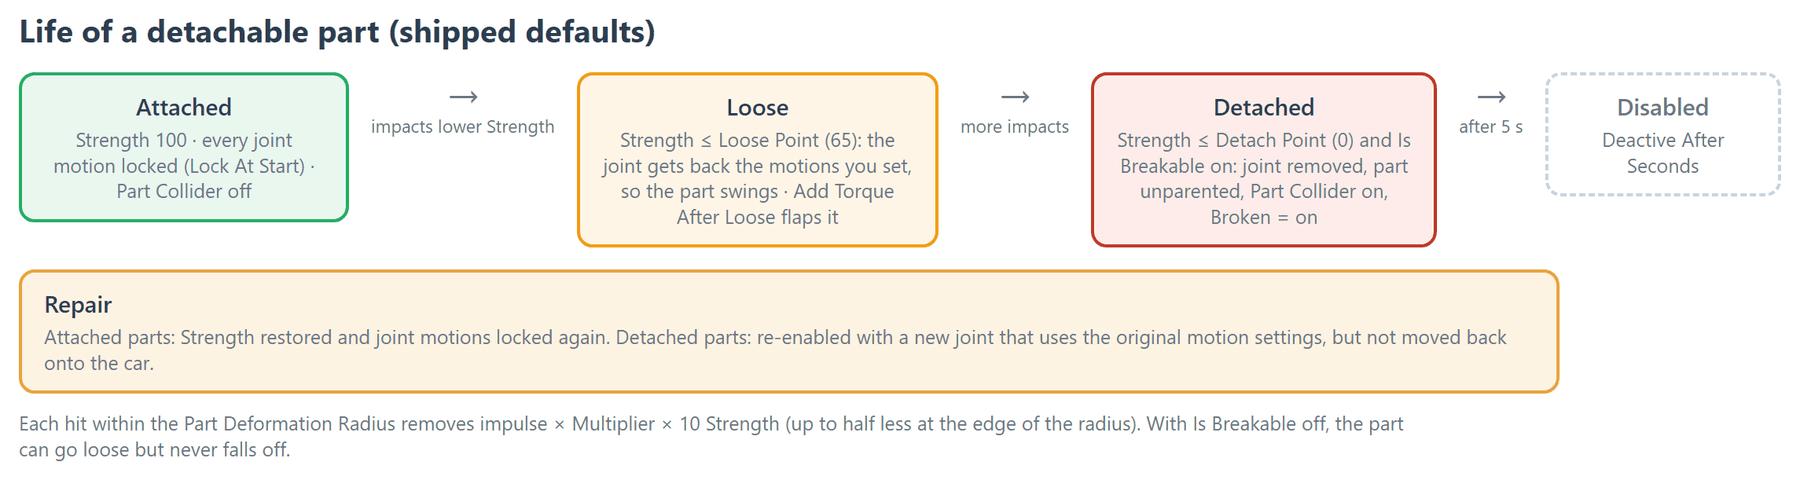
Each impact lowers the part's Strength. Lock At Start keeps the part rigid until then. When Strength drops to Loose Point, the joint gets back the motions you set in step 3, so the part swings. When Strength drops to Detach Point, the joint is removed and the part falls off. It is disabled after Deactive After Seconds.
| Inspector label | What it does | Shipped default |
|---|---|---|
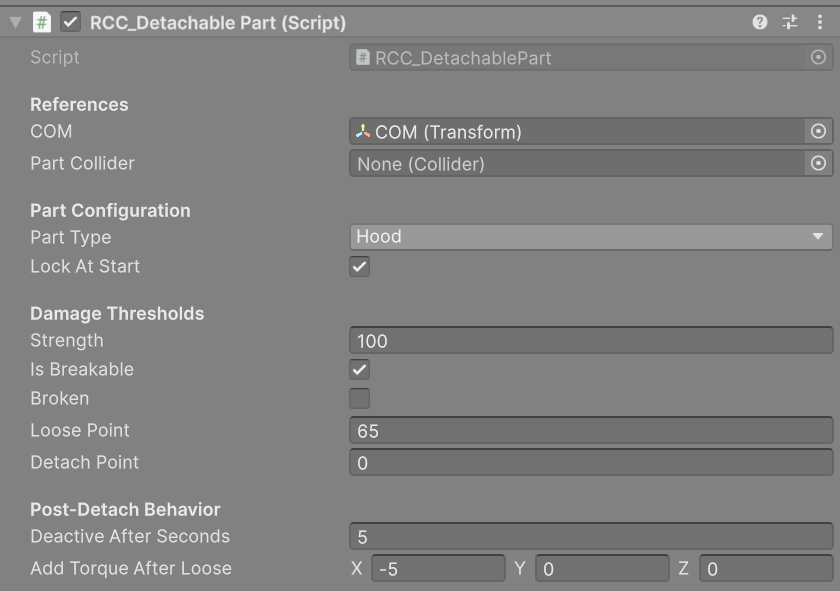
| COM | Optional centre of mass for the part's Rigidbody. | COM child created when the component is added |
| Part Collider | The part's collider. It is turned off while the part is attached and turned on when the part falls off. If left empty, RCC finds one in the part's children. | Found automatically |
| Part Type | A label only (Hood, Trunk, Door, Bumper_F, Bumper_R). It does not change how the part behaves. | Hood |
| Lock At Start | Locks every joint motion when the game starts, so the part stays rigid until it goes loose. | On |
| Strength | The part's health. Impacts lower it, and repair restores it. | 100 |
| Is Breakable | When off, the part can go loose but never falls off. | On |
| Broken | Turns on once the part has fallen off. | Off |
| Loose Point | When Strength reaches this value or lower, the part goes loose. | 65 |
| Detach Point | When Strength reaches this value or lower, the part falls off. | 0 |
| Deactive After Seconds | How long a part stays in the scene after falling off before it is disabled. | 5 |
| Add Torque After Loose | Torque applied to a loose part, multiplied by its forward speed, to make it flap. | (0, 0, 0) |
Breakable Lights
Each RCC_Light has Is Breakable (default on), Strength (100) and Break Point (35). Impacts within the light damage Radius lower its Strength. At Break Point or lower, the light switches off and stays off until the vehicle is repaired. Light setup is covered in Lights System.
Repairing
Any of these starts a repair:
| Method | Repairs |
|---|---|
RCC.Repair() |
The active player vehicle |
RCC.Repair(vehicle) |
The given RCC_CarControllerV4 |
vehicle.Repair() |
That vehicle |
| Repair Now button (Damage tab, Play mode) | The selected vehicle. The button shows Repaired when there is nothing to fix. |
Prefabs/RCC_RepairStation.prefab |
Any RCC vehicle that drives into its trigger |
A repair restores every dented mesh and resets wheel positions. It re-enables detached wheels, re-inflates their tyres and turns ESP back on. It also restores the strength of parts and lights, relocks loose parts and switches broken lights back on. In Fast mode the repair is instant. In Accurate mode it eases back gradually.
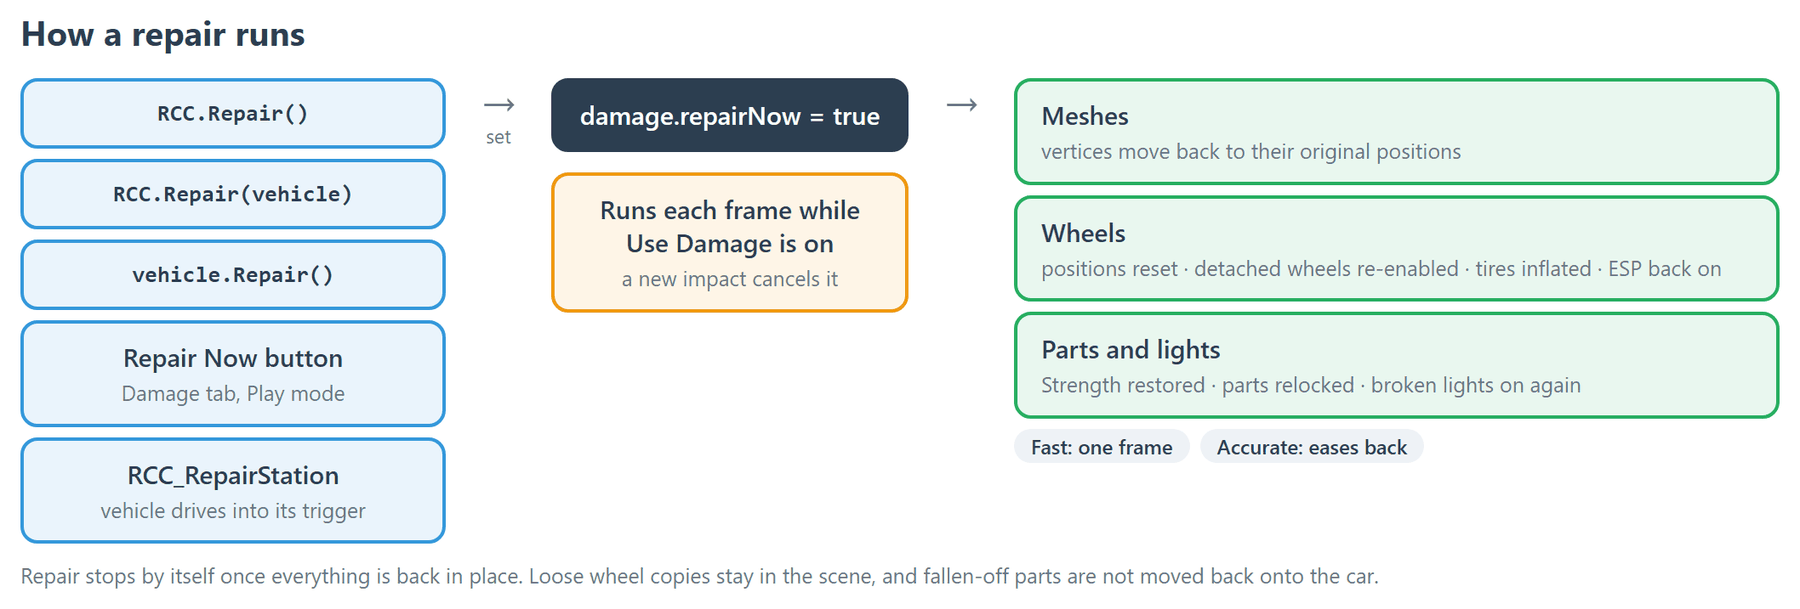
Limits: - Repair only runs while Use Damage is on. - A new impact cancels a repair that is still in progress. - A part that has already fallen off is re-enabled, but it is not moved back onto the car. - The loose wheel copies stay in the scene.
Scripting
This sample logs crashes of the player vehicle and exposes a repair method you can connect to a UI button. The collision event fires only for the active player vehicle, and only for impacts of 5 m/s or more. Don't call RCC.Repair inside the collision handler, because the damage from that same impact cancels the repair. The full event list is in Events System.
using UnityEngine;

public class CrashLogger : MonoBehaviour {

    private void OnEnable() {
        RCC_Events.OnRCCPlayerCollision += OnPlayerCollision;
    }

    private void OnDisable() {
        RCC_Events.OnRCCPlayerCollision -= OnPlayerCollision;
    }

    private void OnPlayerCollision(RCC_CarControllerV4 vehicle, Collision collision) {
        Debug.Log(vehicle.name + " crashed at " + collision.relativeVelocity.magnitude.ToString("F1") + " m/s");
    }

    // Hook this to a UI Button's OnClick.
    public void RepairPlayer() {
        RCC.Repair();
    }

}
To damage a vehicle without a physics collision (a bullet or explosion, for example), use damage.OnCollisionWithRay(RaycastHit hit, float impulse). Impulses below 0.5 are ignored, and anything above 10 is treated as 10. The damage system only sets itself up on the vehicle's first real collision, so set it up yourself first, as shown below:
using UnityEngine;

public static class VehicleHit {

    public static void Apply(RaycastHit hit, float impulse) {

        RCC_CarControllerV4 vehicle = hit.collider.GetComponentInParent<RCC_CarControllerV4>();

        if (!vehicle)
            return;

        if (!vehicle.damage.carController)
            vehicle.damage.Initialize(vehicle);

        vehicle.damage.OnCollisionWithRay(hit, impulse);

    }

}