Render Pipelines (Built-in, URP, HDRP)
This page shows how to set up RCC for the Universal Render Pipeline (URP) or the High Definition Render Pipeline (HDRP) with the RCC Render Pipeline Converter. RCC ships set up for the Built-in Render Pipeline.
Supported Pipelines
| Pipeline | What you need to do |
|---|---|
| Built-in | Nothing. RCC works out of the box. |
| URP | Run the six converter steps once (see Quick Start). Needs URP 17 or newer (Unity 6). |
| HDRP | Run the six converter steps once (see HDRP Differences). Needs HDRP 17 or newer (Unity 6). |
Open the converter from Tools → BoneCracker Games → Realistic Car Controller → Render Pipeline Converter. It also opens by itself when RCC detects that the project switched to URP or HDRP.
Back up first. The conversion changes RCC materials, prefabs and (HDRP) demo scenes. It cannot be undone. Commit your project to version control or make a backup before step 1.
Quick Start: Convert to URP
- Install URP and assign a URP Asset in Project Settings → Graphics.
- Open Tools → BoneCracker Games → Realistic Car Controller → Render Pipeline Converter. Check that Detected Render Pipeline shows URP. If a warning says RCC's render pipeline settings are not updated yet, click Update RCC Render Pipeline Settings and wait for the scripts to compile.
- Click 1. Open Render Pipeline Converter. In Unity's converter, select the Built-in to URP material converter (Material Upgrade in Unity 6.0, Material Shader Converter in newer versions), click Initialize Converters (Scan in newer versions), then click Convert Assets.
- Back in the RCC window, click 2. Convert RCC Lens Flares to SRP.
- Click 3. Import URP Shaders and import the package.
- Click 4. Convert RCC Custom Shaders, then 5. Remove Old Shaders, then 6. Enable Post Processing on All RCC Cameras.
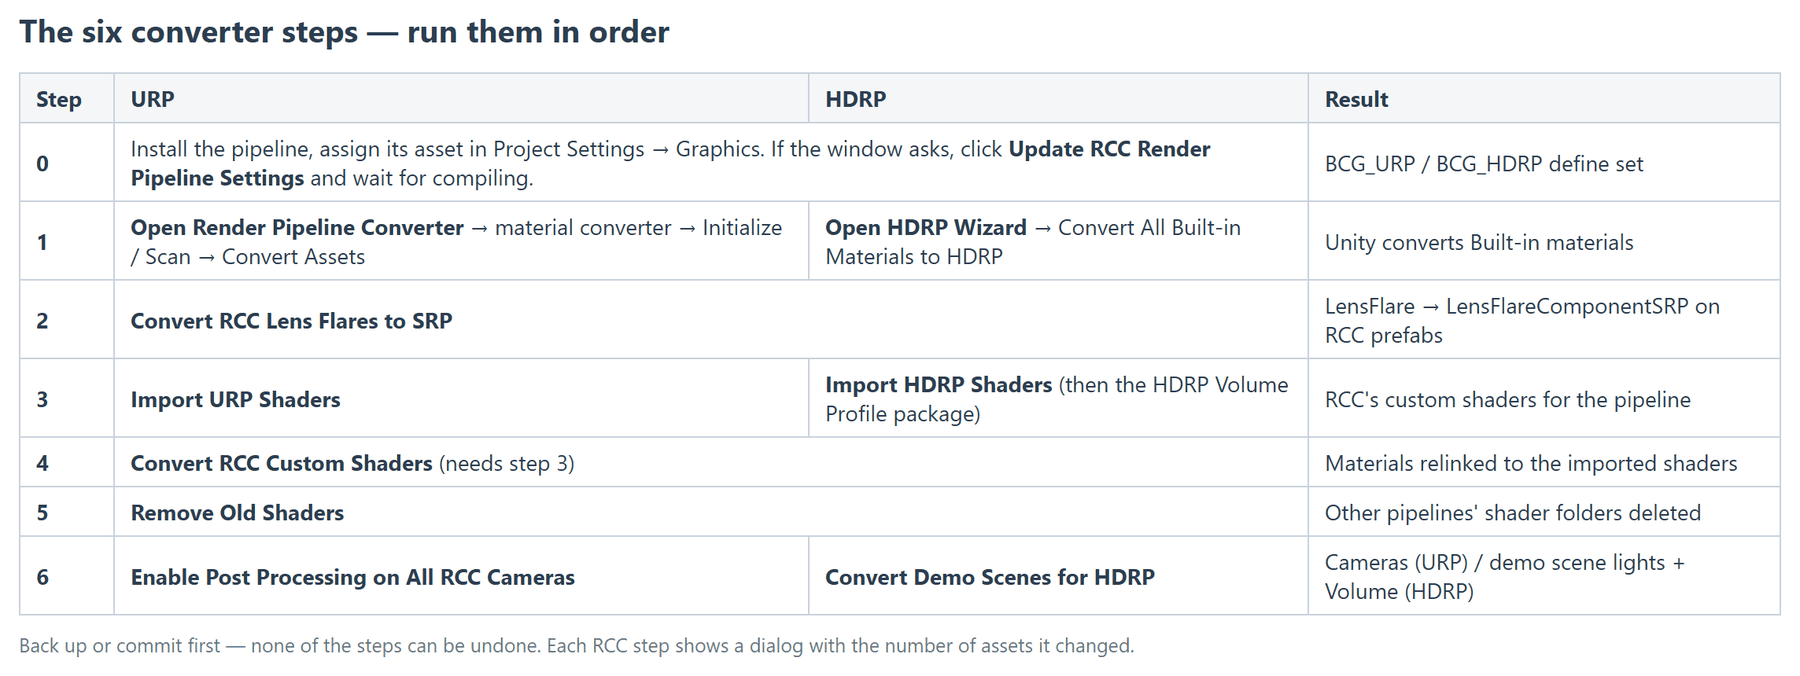
Run the steps in order. Each RCC step shows a dialog with the number of prefabs or materials it changed.
What Each Step Does
| Button | What it does |
|---|---|
| 1. Open Render Pipeline Converter (URP) | Opens Unity's Window → Rendering → Render Pipeline Converter. Unity converts the Built-in materials. |
| 1. Open HDRP Wizard (HDRP) | Opens Unity's Window → Rendering → HDRP Wizard. In the wizard, click Convert All Built-in Materials to HDRP. |
| 2. Convert RCC Lens Flares to SRP | On every prefab in the RCC folder, replaces the legacy LensFlare component on lights with a LensFlareComponentSRP that uses the lens flare data set in RCC Settings. |
| 3. Import URP Shaders / 3. Import HDRP Shaders | Imports RCC's custom shaders for the active pipeline. On HDRP it then imports the HDRP Volume Profile package as well. |
| 4. Convert RCC Custom Shaders | Switches materials that use RCC's custom shaders to the imported URP / HDRP versions, and relinks the decal and neon materials to the imported Shader Graphs. Run step 3 first. |
| 5. Remove Old Shaders | Deletes the shader folders of the other pipelines under Shaders/. |
| 6. Enable Post Processing on All RCC Cameras (URP) | On every camera in RCC's prefabs: turns on HDR and MSAA, sets the rendering path to Use Player Settings, and turns on URP post-processing (adds the URP camera data component if missing). |
| 6. Convert Demo Scenes for HDRP (HDRP) | Opens every scene in the RCC folder and: replaces directional lights whose name contains "Directional" with a new "Sun" light (same angle, soft shadows), adds HDRP light data to the other non-vehicle lights, adds the HDRP Volume Profile prefab if the scene has no Volume, and saves the scene. It asks you to save your open scene first. |
Steps 2, 4 and 6 also process Assets/BCG Shared Assets when the Enter-Exit addon is installed.
Shader packages shipped in Addon Packages/Shaders/:
RCC_Shaders_URP.unitypackageRCC_Shaders_HDRP.unitypackageRCC_VolumeProfile_HDRP.unitypackage
HDRP Differences
Follow the URP Quick Start with these changes:
- Step 1 is 1. Open HDRP Wizard. In the wizard, click Convert All Built-in Materials to HDRP.
- Step 3 is 3. Import HDRP Shaders. When that import finishes, the HDRP Volume Profile package import opens. Import it too; step 6 needs it.
- Step 6 is 6. Convert Demo Scenes for HDRP. If it reports that the HDRP Volume Profile prefab is missing, run step 3 again.
With HDRP active, RCC_Light raises low light intensities when the component is validated in the Editor (for example, when you edit it in the Inspector): an intensity of 1 or less becomes 600, and a headlight at 600 or less becomes 1600. It also switches its emission color property to HDRP's _EmissiveColor.
Unity 6.6: "Missing Signature"
On Unity 6.6, importing one of RCC's bundled packages (step 3, or an addon) shows Unity's Missing Signature notice. This is expected: the packages ship inside RCC. Click Import Anyway (or Reimport Anyway). RCC shows a short explanation before the first import of each editor session.
URP-Only Features
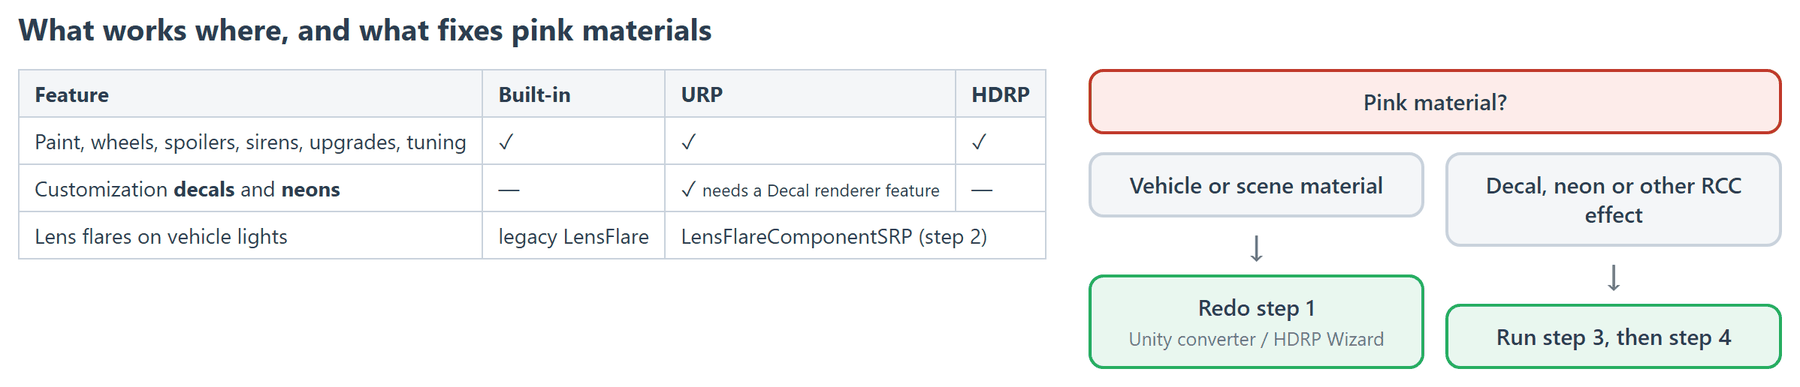
Customization decals (RCC_Customizer_Decal) and neons (RCC_Customizer_Neon) use URP's Decal Projector. They work only in URP. In Built-in and HDRP they do nothing. See Customization.
Changed in V6: Rear-view mirrors (
RCC_Mirror) no longer render inside-out in URP and HDRP, and paint customization keeps working after you switch to URP or HDRP.
Going Back to Built-in
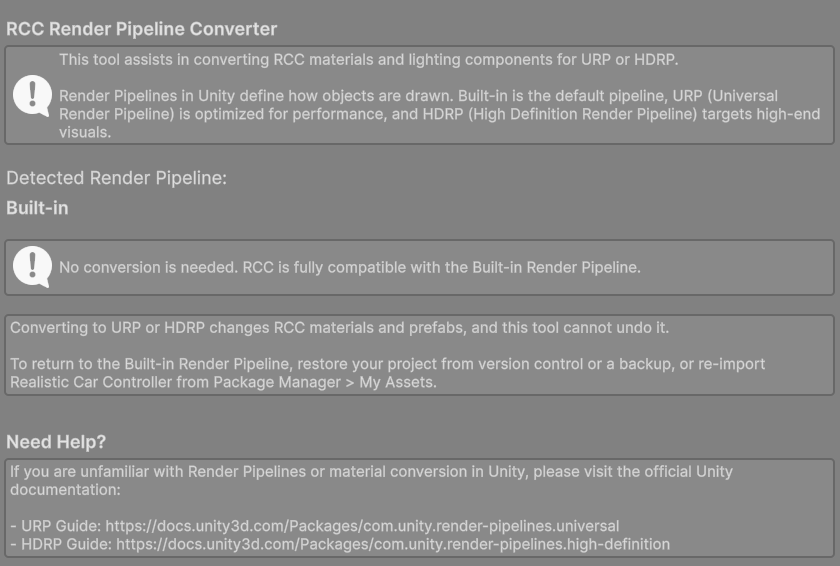
The converter cannot undo a conversion. With Built-in active, the window shows "No conversion is needed" and explains the options:
- Restore your project from version control or a backup, or
- Re-import Realistic Car Controller from Package Manager → My Assets.
Scripting Defines (Automatic)
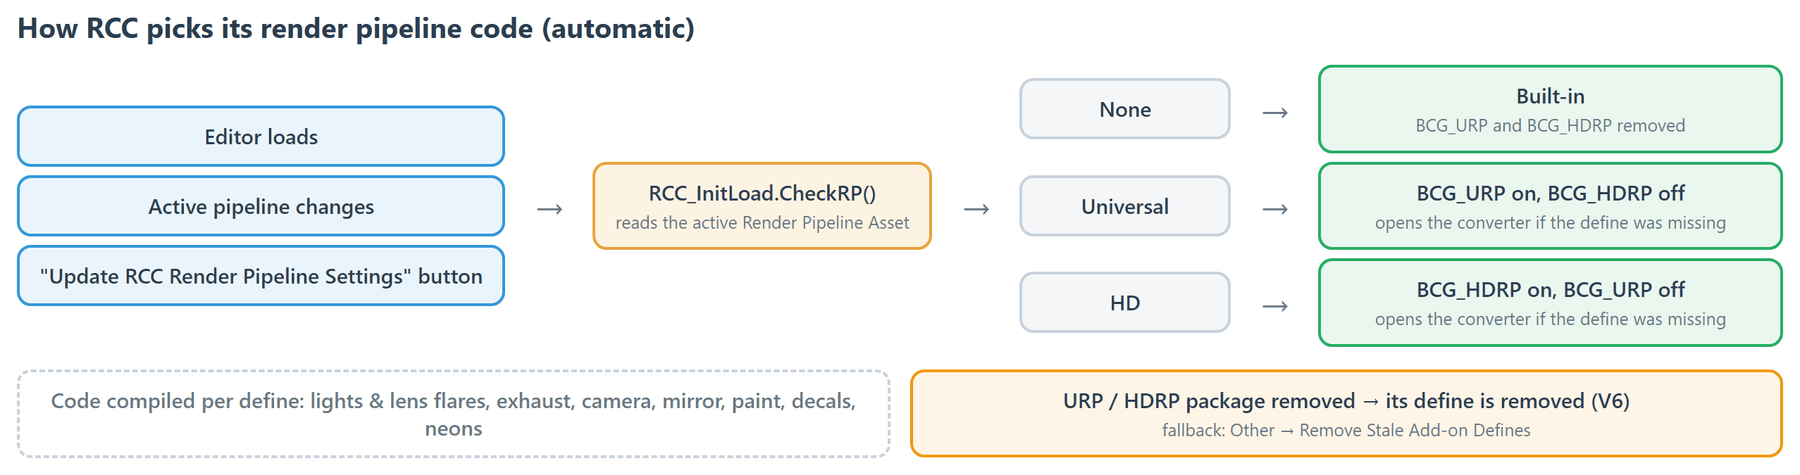
RCC uses the BCG_URP and BCG_HDRP scripting define symbols. You do not need to edit them:
- On editor load and whenever the active pipeline changes, RCC sets
BCG_URPfor URP,BCG_HDRPfor HDRP, or removes both for Built-in. - If the defines are behind (for example, right after you switched pipelines), the converter shows Update RCC Render Pipeline Settings. Click it and wait for compiling to finish.
- New in V6: Removing the URP or HDRP package in Package Manager removes the matching define so the project keeps compiling. If the package was removed outside Unity, use Tools → BoneCracker Games → Realistic Car Controller → Other → Remove Stale Add-on Defines, or remove the define by hand in Edit → Project Settings → Player → Scripting Define Symbols if that menu isn't available.
After Updating RCC or Importing an Addon
Newly imported RCC content arrives with Built-in materials. Run the converter steps again after updating RCC or importing an addon. The Photon PUN 2 addon offers to open the converter after import.
Pink Materials
Pink means a material's shader does not exist in the active pipeline.
- Vehicle or scene materials pink: redo step 1 (Unity's converter or HDRP Wizard).
- Decals, neons or other RCC effects pink: run step 3, then step 4.
More fixes: Troubleshooting.