Input System
This page covers how player input reaches an RCC vehicle, the full default controls table, how to rebind controls, and how to read RCC's input values from your own scripts. RCC uses Unity's Input System package only.
Quick Start
Rebind a control (example: move Handbrake from Space to another key):
- In the Project window, double-click
Assets/RealisticCarControllerV4/Resources/RCC_InputActions.inputactions. - Select the Vehicle map → Handbrake action → the Space binding (for a composite, select its positive part).
- In Binding Properties, click the Path field → Listen, then press the new key.
- Click Save Asset and enter Play mode.
Updating RCC replaces this asset. Note your changes and re-apply them after an update.

How input flows
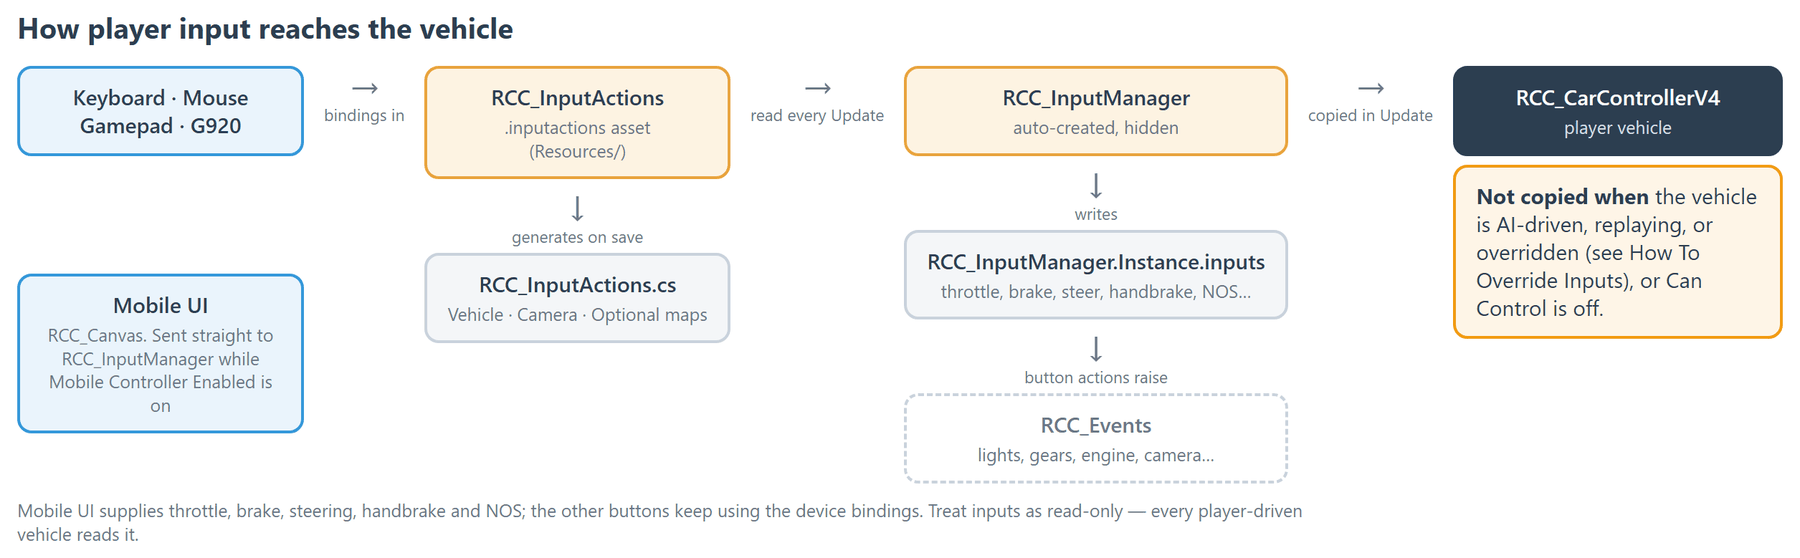
Resources/RCC_InputActions.inputactionsholds every action and binding.Scripts/Inputs/RCC_InputActions.csis the C# class the Input System generates from that asset. Saving the asset regenerates it.RCC_InputManager(created automatically, hidden in the Hierarchy) creates its ownnew RCC_InputActions(), enables the Vehicle, Camera and Optional maps, and everyUpdatewrites the current values intoRCC_InputManager.Instance.inputs. Button actions raise events.RCC_CarControllerV4copies those values in its ownUpdate, unless the vehicle is AI-driven, replaying, or overridden.
When Mobile Controller Enabled is on in RCC Settings, step 3 takes throttle, brake, steering, handbrake and NOS from the on-screen controls instead (see Mobile Setup).
Controls
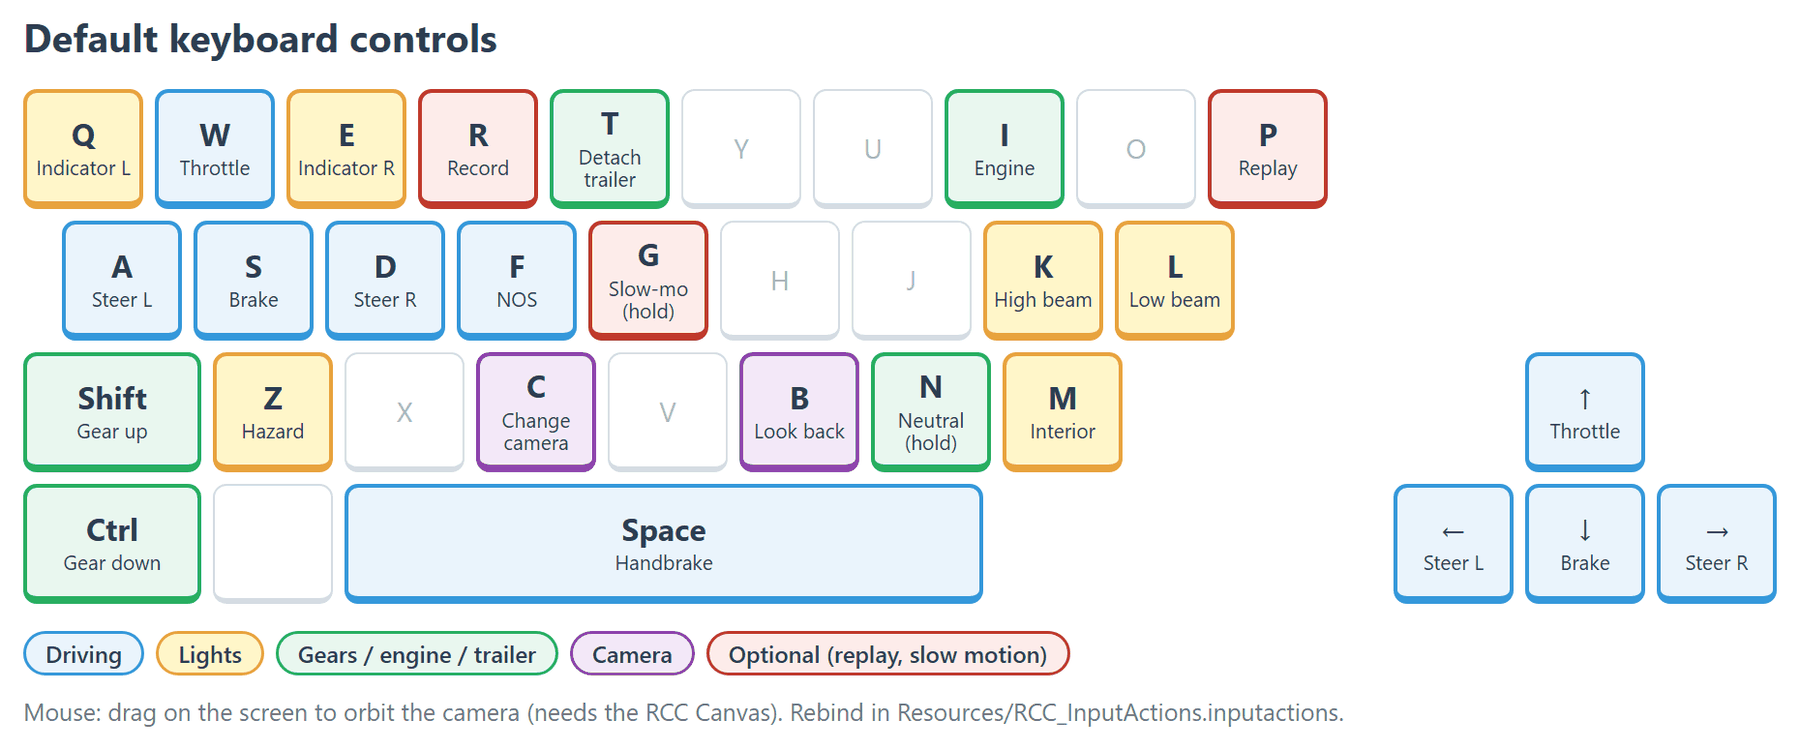
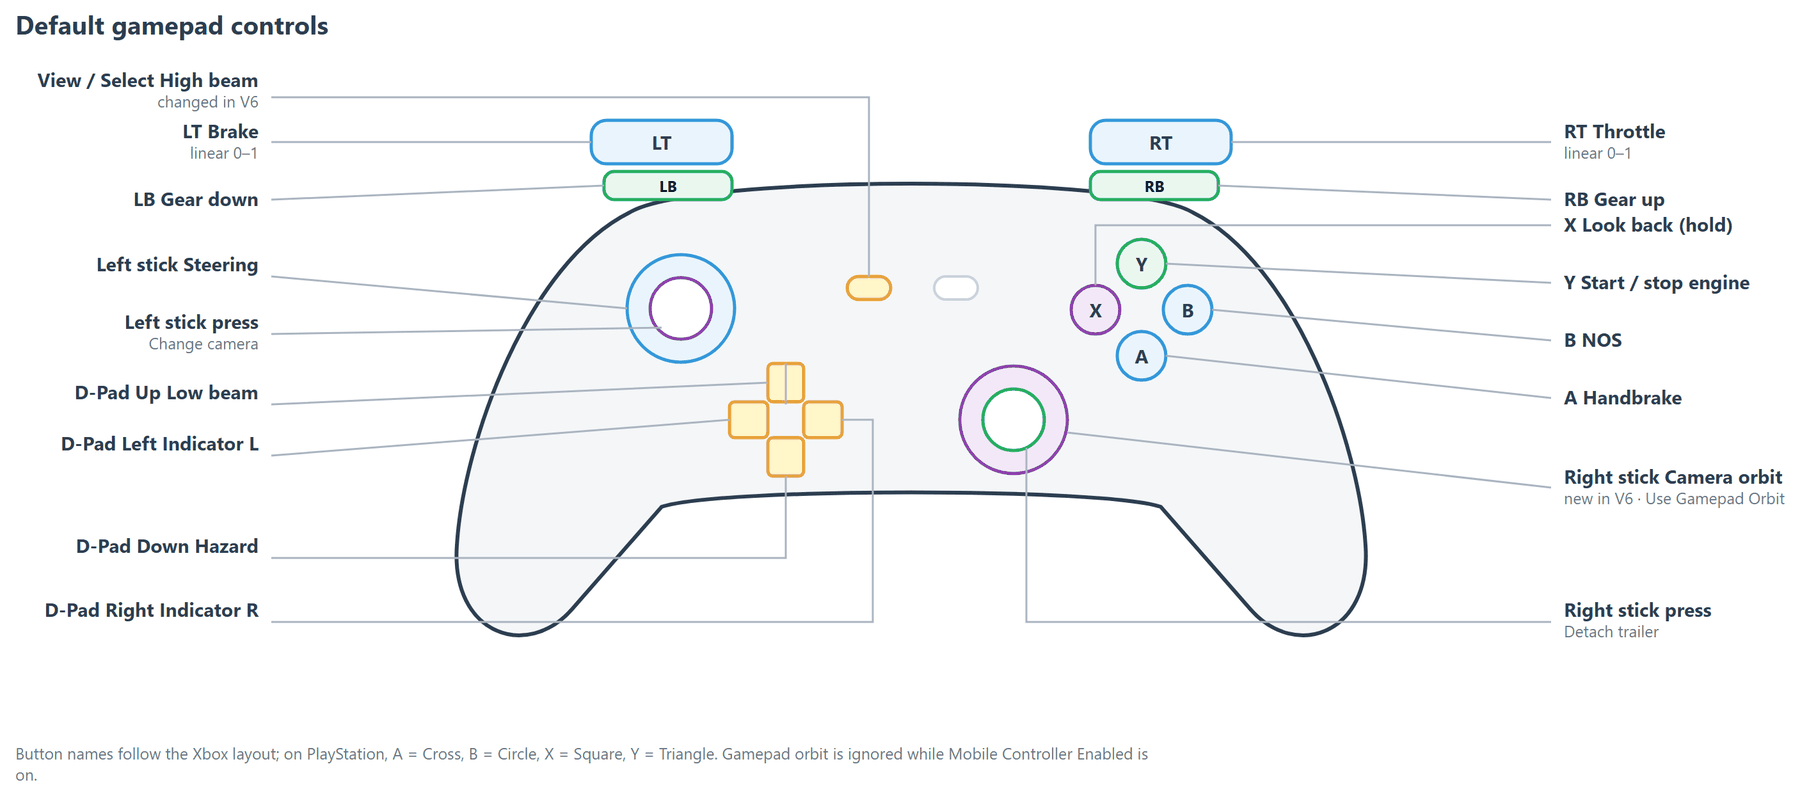
Default bindings in RCC_InputActions.inputactions. "—" means no binding.
Vehicle map
| Action | Keyboard / Mouse | Gamepad | Logitech G920 |
|---|---|---|---|
| Throttle | W / Up Arrow | Right Trigger | stick/up |
| Brake | S / Down Arrow | Left Trigger | z axis |
| Steering | A, D / Left, Right Arrow | Left Stick (left / right) | stick/x (wheel) |
| Handbrake | Space | South (A / Cross) | button2 |
| Start/Stop Engine | I | North (Y / Triangle) | button7 |
| Low Beam Lights | L | D-Pad Up | button10 |
| High Beam Lights | K | View / Select (changed in V6) | button9 |
| Interior Lights | M | — | — |
| Indicator Left | Q | D-Pad Left | hat left |
| Indicator Right | E | D-Pad Right | hat right |
| Indicator Hazard | Z | D-Pad Down | hat up |
| Gear Shift Up | Shift | Right Bumper (RB / R1) | button5 |
| Gear Shift Down | Ctrl | Left Bumper (LB / L1) | button6 |
| NOS | F | East (B / Circle) | trigger |
| N Gear (hold) | N | — | — |
| Trailer Detach | T | Right Stick Press | — |
| 1stGear – 6thGear | — | — | button13 – button18 |
| RGear | — | — | button12 |
| Clutch | — | — | rz axis |
Camera map
| Action | Keyboard / Mouse | Gamepad | Logitech G920 |
|---|---|---|---|
| Change Camera | C | Left Stick Press | button8 |
| Look Back (hold) | B | West (X / Square) | hat down |
| Orbit | Drag on screen (RCC Canvas) | Right Stick (new in V6) | — |
| Zoom | Mouse Scroll | — | — |
Optional map
| Action | Keyboard / Mouse | Gamepad | Logitech G920 |
|---|---|---|---|
| Slow Motion (hold) | G | — | — |
| Record | R | — | — |
| Replay | P | — | — |
Notes:
- 1stGear – 6thGear and RGear exist in the asset but RCC does not read them.
- Clutch is used only when the vehicle's Automatic Clutch is off.
- Zoom is read into
inputs.scroll, but no RCC component uses it. - Orbit: mouse / touch orbit goes through the
Drag (Orbit)panel inRCC_Canvas. The gamepad stick orbits through the Orbit action; turn it off with Use Gamepad Orbit on the RCC Camera (Camera System). - The asset also contains Oculus Quest bindings.
Changed in V6: gamepad throttle and brake triggers are now linear from 0 to 1 (they never went below 50% before). High Beam moved from Left Stick Down to View / Select.
Remapping
- Change a binding: follow the Quick Start.
- Add a second binding: click + on the action, add a binding, set its path, Save Asset.
- Don't rename actions or maps. The generated class uses their names (
Vehicle.Throttle, …), andRCC_InputManagerstops compiling if they change. - Runtime rebinding is not supported.
RCC_InputManagerkeeps its action instance private, so your scripts cannot rebind it or enable / disable single maps. Edit the asset instead. - Old Input System versions: Tools → BoneCracker Games → Realistic Car Controller → Other → Input System Version Checker warns if the installed package is 1.11.0 or older and offers to open the Package Manager. It also runs once per editor session.
Steering feel
Steering smoothing is per vehicle, on the RCC_CarControllerV4 inspector:
| Inspector label | What it does | Shipped default | Range |
|---|---|---|---|
| Use Steering Sensitivity | Moves the steering toward the input over time instead of instantly. | On | — |
| Steering Sensitivity | How fast the steering follows the input. Higher = quicker. | 1 | 0.05 – 1 |
On-screen button ramp-up (UI Button Sensitivity / UI Button Gravity) is covered in Mobile Setup and RCC Settings.
Reading inputs from code
RCC_InputManager.Instance.inputs holds this frame's values. It is updated in Update.
using UnityEngine;

public class ThrottleMonitor : MonoBehaviour {

    private void Update() {

        RCC_InputManager manager = RCC_InputManager.Instance;

        if (manager == null)
            return;

        if (manager.inputs.throttleInput > 0.9f)
            Debug.Log("Full throttle");

    }

}
RCC_Inputs fields:
| Field | Meaning |
|---|---|
throttleInput |
Accelerator, 0 – 1. |
brakeInput |
Brake, 0 – 1. |
steerInput |
Steering, -1 (left) to 1 (right). |
clutchInput |
Clutch, 0 (engaged) to 1 (disengaged). |
handbrakeInput |
Handbrake, 0 – 1. |
boostInput |
NOS, 0 – 1. |
gearInput |
Not set or read by RCC. |
orbitX, orbitY |
Raw Orbit action value (mouse delta or right stick). RCC Camera does not read these. |
scroll |
Raw Zoom action value (mouse wheel). Not used by RCC. |
RCC_InputManagerdoes not clamp these values; the vehicle clamps its own copies.RCC_InputManager.Instance.GamepadOrbitis the Orbit value when it comes from a gamepad, otherwise zero.- Treat
inputsas read-only. To drive a vehicle from your own values, use Override Inputs.
Input events
Button actions (engine, lights, indicators, gears, N Gear, trailer detach, camera, look back, slow motion, record / replay) raise static events on RCC_Events, such as OnGearShiftUp. The full list with handler signatures and the subscribe pattern is in Events System.
Stopping input
| Goal | Do this |
|---|---|
| One vehicle ignores the player | carController.SetCanControl(false); Throttle, brake, steering and NOS drop to 0 and the handbrake is held on. Override inputs are ignored too. |
| All RCC input stops (driving, camera, button events) | RCC_InputManager.Instance.enabled = false; Set it back to true to resume. |
inputs keeps its last values while the manager is disabled, so pair it with SetCanControl(false) if a vehicle must stop.
Changed in V6: disabling and re-enabling
RCC_InputManagerrestores input correctly.
Custom actions
You can add an action (for example Horn) to RCC_InputActions.inputactions and save; the generated class then has it. But updating RCC overwrites that asset, so keep your own actions in a separate asset:
- Project window → Create → Input Actions, name it (e.g.
MyGameInput). - Add a map, an action Horn (Action Type Button), and a binding (e.g. Keyboard H). Save Asset.
- Add the script below to the vehicle (with an
AudioSourceholding your horn clip). - Drag the Horn action from the asset onto Horn Action.
using UnityEngine;
using UnityEngine.InputSystem;

[RequireComponent(typeof(AudioSource))]
public class MyHorn : MonoBehaviour {

    [Tooltip("The Horn action from your own Input Actions asset.")]
    public InputActionReference hornAction;

    private AudioSource hornSource;

    private void Awake() {

        hornSource = GetComponent<AudioSource>();

    }

    private void OnEnable() {

        if (hornAction == null)
            return;

        hornAction.action.performed += OnHorn;
        hornAction.action.Enable();

    }

    private void OnDisable() {

        if (hornAction == null)
            return;

        hornAction.action.performed -= OnHorn;
        hornAction.action.Disable();

    }

    private void OnHorn(InputAction.CallbackContext context) {

        hornSource.Play();

    }

}
Steering wheels
The G920 bindings above are the defaults. Setup for Logitech and other wheels: Steering Wheels.
Mobile
On-screen controls replace the device bindings for driving when Mobile Controller Enabled is on: Mobile Setup.
Override
To feed your own values to a vehicle (AI, networking, cutscenes): How To Override Inputs.