Find and fix a problem
Goal: find the cause of a problem and fix one thing at a time.
Select the symptom that agrees with what you see. If the vehicle drives but handles badly, start with Tuning Recipes.
A script reports CS0246 for an RCCP type
Add using BoneCrackerGames; at the top of the script, before its class declaration.
RCCP core types use this namespace. See the complete example.
If the error continues, examine the type name and correct the earlier compiler errors.
If your script uses an .asmdef, follow the assembly definition guidance.
First checks
- Read the first red Console error. Open Window > General > Console. Copy the message before you clear the Console. Fix the error and wait until Unity finishes compiling. Then try again.
- Open the scene report. Select Tools > BoneCracker Games > Realistic Car Controller Pro 2 > Scene Tools > Open Window, then select Diagnostics. To examine missing parts, click the Select button of a vehicle.
- Watch the inputs. In RCCP Settings, enable Show the input panel during the test. If the throttle stays at zero when you press W, examine input and player registration. Do not change the engine power first.
Check: after each fix, do the action that failed again. Stop Play Mode before you edit scene settings that you want to keep. Then save the scene.
If necessary, enable Show the telemetry panel for speed, RPM and gear values. Enable Extra console messages for more log messages. Disable these development aids after the test.
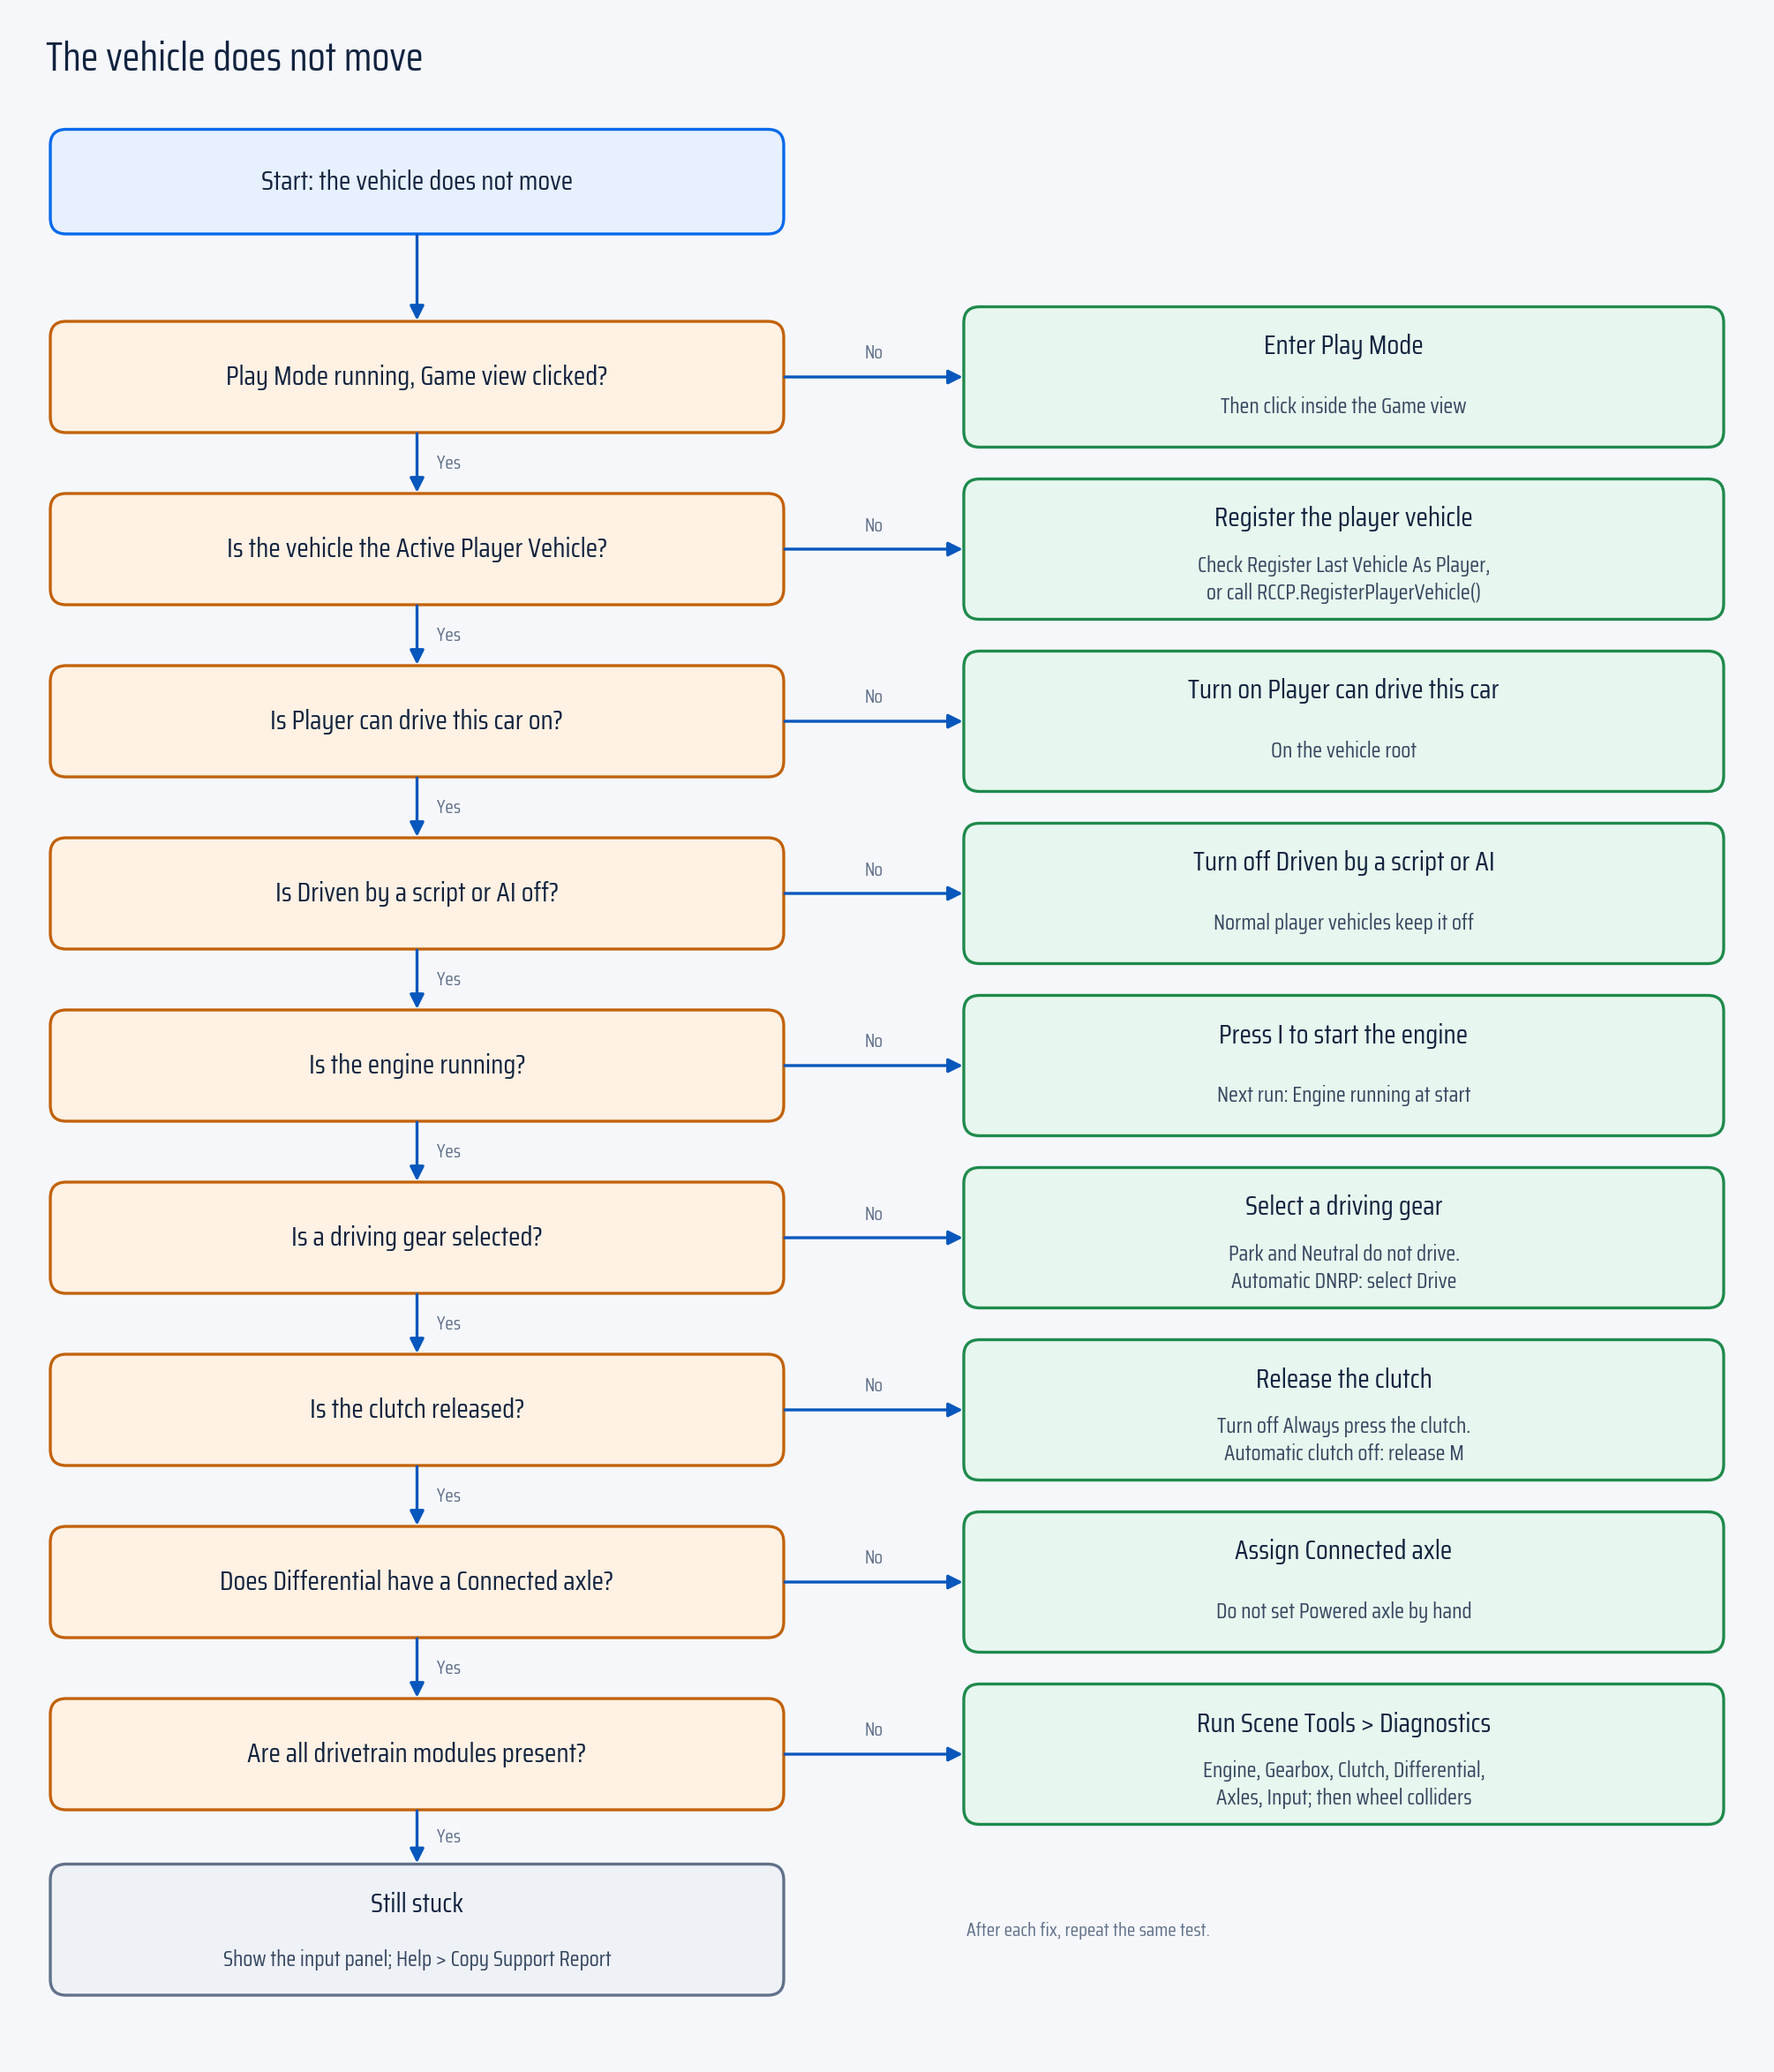
The vehicle does not move
Make sure that Play Mode is running. Click in the Game view. Then examine these items:
| Item | Where to look |
|---|---|
| Player vehicle | On the scene's RCCP_SceneManager, Active Player Vehicle must reference the vehicle. Another vehicle can register after your vehicle. |
| Player control | On the vehicle, enable Player can drive this car. |
| Other control | For a normal player vehicle, disable Driven by a script or AI. |
| Engine | If the engine is stopped, press I once. For the next run, examine Engine running at start on the Engine component. |
| Gear | Examine the Gearbox. Park and Neutral do not drive the wheels. An Automatic DNRP transmission must be in Drive. |
| Clutch | On the Clutch, disable Always press the clutch. If Automatic clutch is off, a held M key or a stuck clutch pedal keeps the clutch pressed. Then no power goes to the wheels. |
| Power to an axle | On the Differential, assign Connected axle. Do not set the Powered axle readout of an axle manually. |
| Drivetrain modules | Use Diagnostics to find a missing engine, clutch, gearbox, differential, axle or input module. Then examine the wheel colliders on each axle. |
An enter/exit vehicle stays uncontrollable until a character enters it; see Enter and Exit.
For more information about registration, see Scenes and Spawning.
A module logs "Couldn't find RCCP_CarController in parent"
The module is outside the vehicle hierarchy. Put the module on the object that has RCCP_CarController, or on a child of that object. For module positions, see Vehicle setup.
The wheels spin but the vehicle accelerates slowly
- Examine the road surface in RCCP_GroundMaterials. If a collider has no physics material, RCCP uses the first surface entry.
- Examine Grip under power and Cornering grip of that surface. Then examine the Grip multiplier of each wheel.
- Watch if traction control decreases the power.
- Examine if a behavior preset replaces the value that you edited.
Check: change one value, then do the same acceleration test again. More engine torque usually does not help wheels that already spin.
See Surfaces and Effects and Assists and Presets.
The vehicle rolls over or stays on its roof
If the vehicle rolls in corners, use Tuning Recipes to examine the center of mass and the anti-roll settings.
For recovery after a rollover, examine Flip the car back over and Wait before flipping on the Dynamics component of the vehicle. RCCP does not use the Auto reset (legacy) field in RCCP Settings.
If vehicles spin too much after impacts, examine Apply maximum angular velocity and Maximum angular velocity in RCCP Settings. These settings affect all vehicles. After a change, test normal driving and crashes again.
The vehicle jitters, shakes or falls through the road
- Make sure that the road has a collider and the vehicle has body colliders.
- Use Diagnostics to find missing vehicle parts. The body collider tool is at Tools > BoneCracker Games > Realistic Car Controller Pro 2 > Vehicle Setup > Body Colliders.
- Compare the scale and the wheel positions of the imported model with Vehicle setup.
- Examine the physics timestep. See Performance and Platforms.
Change one setting at a time. A smaller physics timestep gives more simulation work. Measure the performance and the stability.
There is no sound
- Make sure that the Game view audio and the system volume are not muted.
- Make sure that the scene has an active AudioListener. Usually, the AudioListener is on the camera.
- On the Audio component of the vehicle, examine Mixer group. Make sure that the volume of that group is audible. If that group is the Audio mixer of RCCP Settings, also examine the Engine, Tires, Impacts and Other groups. See Sound groups.
- Examine Engine layers for sound clips. A layer with empty powered and coasting clip slots cannot play.
- Move the listening camera near the vehicle. Engine layers have hearing distance limits.
If the sound is muffled only in the hood or wheel view, examine the Muffle audio inside the car setting of the camera.
If the sound has the wrong pitch or sounds rough, see Engine Audio.
The camera does not follow the vehicle
- Make sure that the scene has an RCCP camera. To add one, select Tools > BoneCracker Games > Realistic Car Controller Pro 2 > Add to Scene > RCCP Camera.
- Examine Active Player Vehicle of the scene. The camera follows only a registered player vehicle.
- Find other enabled cameras that render the same view.
- If only the hood or wheel view fails, make sure that the vehicle has that camera.
- If URP shows camera component errors, complete the camera step in Render Pipelines.
See Cameras.
Materials are pink or textures are missing
Pink materials usually show a missing, unsupported or failed shader.
Open Tools > BoneCracker Games > Realistic Car Controller Pro 2 > Welcome Window > Shaders. Examine the detected pipeline. Complete the applicable Render Pipelines steps, then click Rescan materials.
If a material renders but has no texture, select the material and examine its texture slots.
The interface is blank or the gauges do not move
| What you see | What to check |
|---|---|
| No dashboard | Select Tools > BoneCracker Games > Realistic Car Controller Pro 2 > Add to Scene > UI Canvas. |
| The gauges do not move | Make sure that Active Player Vehicle has a vehicle. |
| The dashboard hides when there is no player vehicle | Examine Disable UI When No Player Vehicle on the scene manager. |
| Numbers or button text are missing | Select Window > TextMeshPro > Import TMP Essential Resources. |
| UI artwork is missing | Examine Project Settings > Editor > Sprite Packer and the Sprite Atlas V2 setting. |
| Buttons and sliders do not respond | Examine the scene's EventSystem and the input configuration. |
See UI and HUD.
The keyboard or gamepad does not respond
- Make sure that Play Mode is running. Then click in the Game view.
- Click away from all text fields. RCCP stops driving input while you type in a text field.
- Make sure that the Unity Input System package is installed and enabled. See Installation.
- Examine player registration and player control. Use the first vehicle checklist on this page.
- Examine Use mobile controller in RCCP Settings. Keyboard tests and touch control configuration are different workflows. See Mobile.
- If only some keys fail, examine the saved key changes in Controls. Remember key bindings can restore the earlier key changes of a player.
Check: make sure that the input panel responds before you examine the drivetrain settings.
Errors appear after import
| What you see | What to do |
|---|---|
| Errors name a missing Unity package | Read the first error. Install the named package in Package Manager. RCCP uses Input System, Editor Coroutines and uGUI. |
| Errors about missing RCCP layers | RCCP adds six layers when the Editor starts and after each script compile. If all user layers are in use, the Console names each layer that RCCP cannot add. Empty one user layer for each named layer, then restart Unity. The layers keep vehicle bodies, wheels and parts on the correct collision layers. |
| Errors after you remove an addon manually | In Welcome Window > Symbols, find a symbol whose addon is not in the project. Follow the removal instructions of that integration. |
| What you see | What to do |
|---|---|
| A running demo menu cannot load another scene | Use Welcome Window > Demos > Add Demo Scenes to Build Settings. |
| Errors naming missing demo content | Finish the Demo Content import from the Demos tab. |
See Installation and Demo Content.
Installation or an upgrade stops
| What you see | Where to continue |
|---|---|
| The installer stops or shows a failed step | Follow Retry or Restore. |
| The installer names missing Unity packages | Open Window > Package Manager. Use + > Install package by name for each listed package ID. Click Install for each package. Wait until Unity finishes importing and compiling. Return to the installer. See Retry or Restore. |
| Files are missing after an upgrade | See where the installer moves files. |
You cannot edit the new wheel settings
Before you edit the new settings, follow Old wheel data.
Native wheel readouts are empty or do not change
RCCP 2 reads physics results from its custom solver. New wheels have no native Wheel Collider component. Use the active wheel readouts in Wheel API.
Scene Panels show the wrong vehicle or no vehicle
| What you see | What to check |
|---|---|
| The panels show on a different vehicle | If you select several objects, Scene Panels follow the active object. The active object is the object that you clicked last. Click +N on the chip and select the vehicle. You can also Ctrl-click (Cmd-click on macOS) the vehicle. |
| No panels while several objects are selected | The active object is not part of a vehicle. Click a part of the vehicle last. |
| No panels | Enable the RCCP button in the Scene view toolbar. The panels also hide in Play Mode and for a disabled vehicle. |
| The chip shows, but no dots show | Enable Gizmos in the Scene view. Open the arrow on the RCCP button and enable Part dots and radials. Close the setup wizards. In the Lights editor, disable Edit Light Positions. If the vehicle is very small on the screen, click Frame on the chip. |
See Scene Panels.
Purchase verification fails
RCCP 2 continues to work while your purchase is not verified. See Purchase verification.
| What you see | What to do |
|---|---|
| Invoice or order number not found | Copy the number again from your Asset Store orders. |
| This invoice is for another package | Use the invoice of your RCCP 2 purchase. |
| This invoice has reached its device limit | Send an email to support. Include your invoice number. |
| Too many failed verification attempts | Wait for the time in the message, then try again. |
| Invalid request signature | Set the clock of your PC to the correct time, then try again. |
| The verification service is temporarily unavailable | Wait a few minutes, then try again. |
The problem continues
Test the included prototype in a separate test scene or test project. This test shows if the problem is in your vehicle or in the project.
Before you contact support, select your vehicle or one of its children. Then select Tools > BoneCracker Games > Realistic Car Controller Pro 2 > Help > Copy Support Report. Scene Tools > Diagnostics has the same button. If no vehicle is selected, the report uses the active player vehicle in Play Mode. Otherwise, the report has only environment and scene checks.
The Help > Contact Support menu item and the Support button show three choices:
- Copy support report copies the report and opens the contact page or email address.
- Continue without report opens the contact page or email address. Your clipboard does not change.
- Cancel closes the dialog. RCCP does not copy the report or open a contact page.
The report includes the Unity and RCCP versions, render pipeline, build target, scene component checks and read-only vehicle validation. In Edit Mode, the report shows the configured values. In Play Mode, the report also samples runtime registration and input ownership of an active scene vehicle. The report does not apply fixes, change setup flags or send data automatically. Paste the report and examine it before you send it.
In Diagnostics, a missing required vehicle component is an error. A missing active Scene Manager or a scene with no vehicles is a warning. Optional modules are information only. These component checks do not prove that the vehicle drives correctly. For detailed setup checks, use the Inspector of the vehicle.
For support, send an email to [email protected] or use Contact Support. Include these items:
- Your copied report and invoice number.
- The first complete Console error. The report does not collect logs.
- The steps that cause the problem, the expected result and the actual result.
- Whether the included prototype has the same problem.
- A screenshot of the applicable Inspector or scene configuration.
Do not delete modules as a general reset. Deletion removes your assignments, and the original problem possibly continues.
Next step
- Vehicle setup — learn the required vehicle parts again.
- Tuning Recipes — improve the handling after the vehicle drives.
- Field Reference — find one setting.