Make an AI vehicle follow a route
Goal: make one vehicle drive around a simple route. When the route works, add racing behavior, chase targets and obstacle avoidance.
Requirements
Use an RCCP vehicle that drives correctly and a wide, simple road. Stop Play Mode before you edit.
The AI needs two different things:
- Waypoints tell the vehicle where to go, in sequence.
- A NavMesh tells the Unity navigation system where it can plan a route. Baking makes this navigation data from the scene geometry.
Waypoints do not replace the NavMesh. All four RCCP AI modes need a NavMesh.
Add AI to a vehicle
- Select the vehicle root in the Hierarchy.
- In the module grid, add AI from the Control group. See Vehicle Setup.
- Open the Inspector of the AI module. Under Behavior Settings, set the AI mode to Follow Waypoints for this first route.
If the vehicle has no navigation agent, RCCP adds one. While the AI module is enabled, the AI controls the vehicle. To stop the AI driving inputs, disable the module.
Create a simple route
- Open Tools > BoneCracker Games > Realistic Car Controller Pro 2 > Add to Scene > AI Waypoints.
- Keep the new container selected in the Hierarchy.
- In the Scene view, hold Shift and left-click the road to put each waypoint. For the first test, make a wide loop with gentle turns.
- Examine the green lines. Make sure that the sequence is correct and that a line connects the last point to the first point.
- Select the AI module of the vehicle and drag the container into Waypoints Container.
Check: the route stays on the road, and the AI uses the correct container. If the scene has more than one route, assign the container in the AI module.
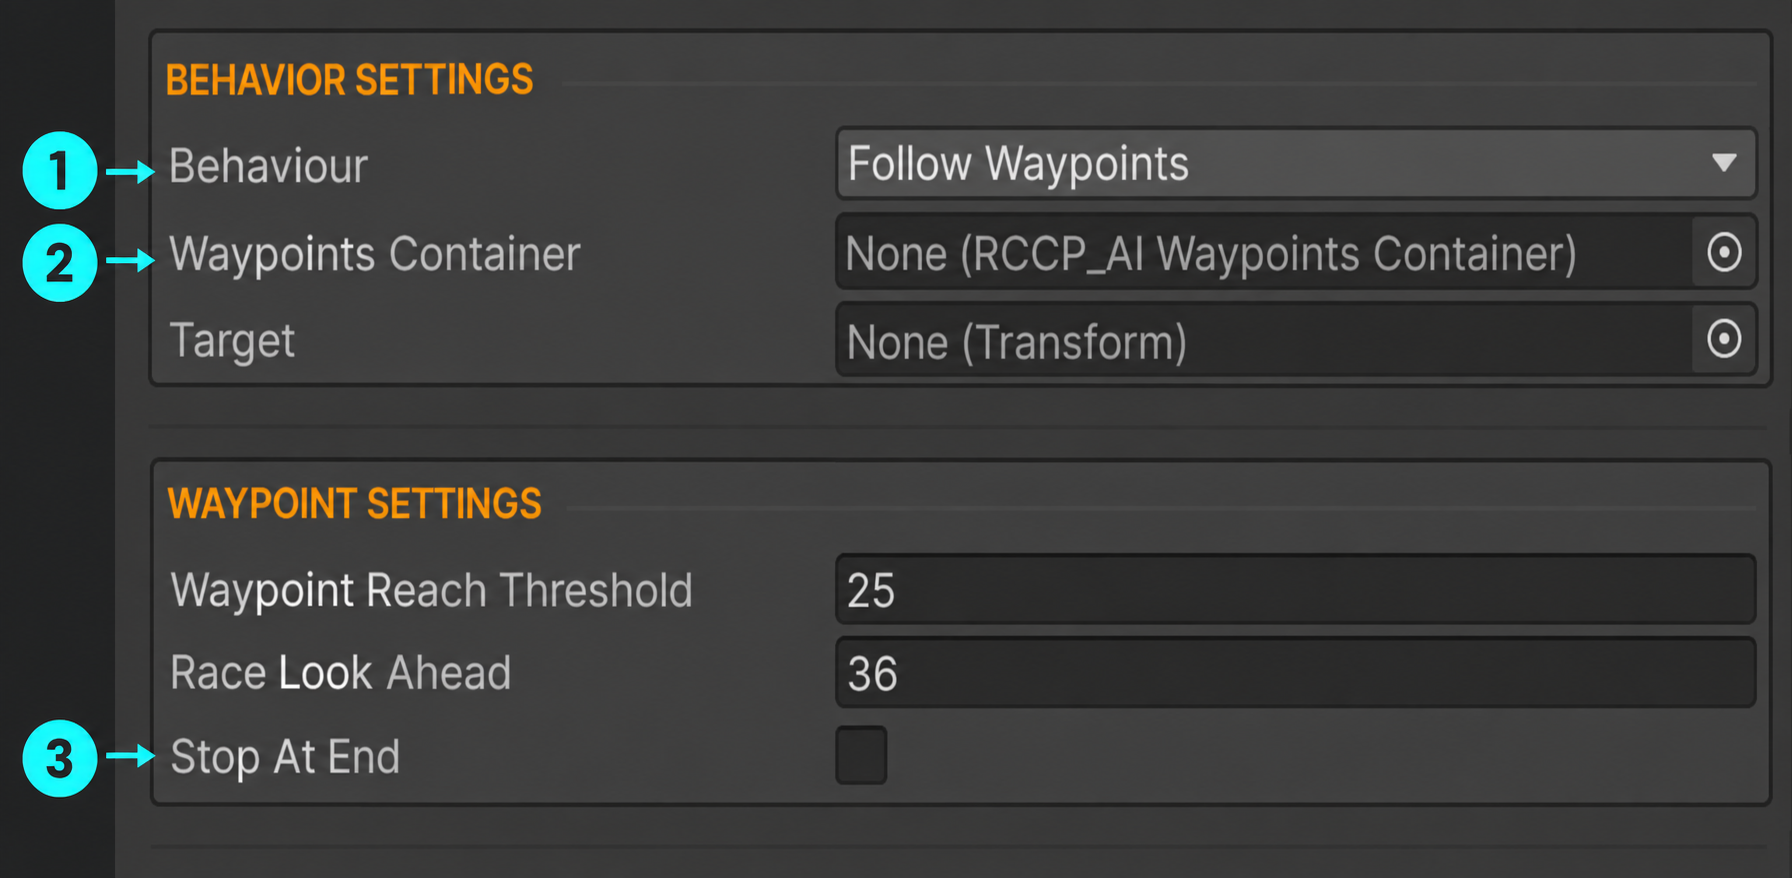
Open the screenshot at full size.
- Set the AI mode to Follow Waypoints.
- Drag your route container into this empty slot.
- For a loop, keep Stop At End disabled. To stop at the last point, enable it.
The target-following modes use the Target slot. For this route, keep Target empty. The AI also needs a baked NavMesh.
Bake the drivable area
If your scene has a valid baked NavMesh, make sure that it covers this route and the vehicle start position. If the scene has no NavMesh, use the Unity AI Navigation package:
- If necessary, install AI Navigation from the Package Manager.
- Select the scene object that holds the navigation data. Then select Add Component > Navigation > NavMesh Surface.
- Set Collect Objects and Include Layers so that the surface collects your road geometry. For a small practice scene, start with All Game Objects. Exclude geometry that the AI must not drive on.
- Set an Agent Type that agrees with the NavMesh Agent of the vehicle.
- Select the geometry source that describes the road, then click Bake.
- Examine the NavMesh display in the Scene view. The NavMesh must cover the road below the vehicle and the full route without gaps.
Check: the NavMesh Surface has a NavMesh Data asset, and the vehicle starts on the navigable area. The surface must be enabled to load its data into the navigation system.
For collection filters, agent types and bake settings, see the Unity NavMesh Surface reference. If you change road geometry on the route, bake the NavMesh again.
Test one lap
- Save the scene and click Play.
- Watch the AI vehicle in the Scene view with gizmos visible.
- Make sure that the vehicle gets to each waypoint and completes the loop.
- Stop Play Mode before you make permanent route or tuning changes.
Check: the vehicle drives around the correct road. The vehicle does not stop or miss the same turn again and again. If the vehicle does not move, read the Console before you change speed settings. RCCP shows a warning when the agent is not on a NavMesh.
To stop at the last waypoint and not loop, enable Stop At End.
The first route does not work
| Symptom | What to examine first |
|---|---|
| The vehicle does not move | Examine the NavMesh coverage, the agent type, the assigned route, the engine and Stop Now. |
| The vehicle drives toward the wrong route | Assign Waypoints Container. Do not use the automatic search for a container. |
| The vehicle drives in circles around a waypoint | Examine the route direction, the waypoint position and the NavMesh connections. |
| The vehicle misses a tight corner | Decrease Waypoint Reach Threshold. This value is the distance at which a waypoint counts as reached. |
| The vehicle goes wide at speed | If Corner Speed Model is Legacy, set it to Curvature. Test a brake zone before the corner. Road Grip changes only the fallback value for when the wheels supply no usable grip value. |
| The vehicle weaves on a straight road | Decrease Steer Sensitivity or change the look-ahead distance. Change one setting at a time. |
| The vehicle reverses again and again on a slow section | Examine the route and the Check Stuck recovery. |
Choose another driving mode
| Mode | Task | Necessary reference |
|---|---|---|
| Follow Waypoints | Follow the route in sequence. | Waypoints Container. |
| Race Waypoints | Drive the route with the racing look-ahead. | Waypoints Container. |
| Follow Target | Follow a target and stop near it. | Target. |
| Chase Target | Aim ahead of a moving target to intercept it. | Target. |
For a target mode, drag the target scene object into Target. Follow Target Distance sets the distance at which the AI stops behind the target.
In Chase mode, the AI aims ahead of the target. The lead time is the time that this vehicle needs to get to the target at its current speed. Chase Prediction Time is the maximum lead time. The prediction reads the Rigidbody of the target. If the target has no Rigidbody, the AI does not predict its movement.
Tune pace and cornering
Set Target Speed on a waypoint to set the arrival speed at that waypoint, in km/h. Set 0 for automatic speed planning. The AI starts to brake before the waypoint. Grip, corners and brake zones can decrease the speed more. Use higher values on straight roads and lower values at tight turns. After you change speeds, test the full route.
Start with Agressiveness (the spelling in the Inspector) and brake zones. The AI uses grip values from the grounded wheels to plan cornering and braking. Road Grip gives the fallback value when the wheels supply no usable value. Do not change the Kp, Ki and Kd speed-controller settings until you test the simpler settings.
| Setting | What to change |
|---|---|
| Road Grip | Sets the fallback value for missing or invalid wheel grip values. This setting does not change the tire grip. This setting does not replace a valid wheel value. |
| Corner Speed Model | Curvature uses the real radius of each bend. Legacy uses the earlier radius formula. This formula is wrong for bends that are not right angles. Both models use the grip values and braking calculations of the wheel system. Legacy does not keep the earlier driving behavior. AI that you add in the Editor starts with Curvature. AI that a script adds at runtime starts with Legacy. Saved AI keeps its model. To change the model from a script, set cornerSpeedModel. After you change the model, test the route and brake zones again. |
| Agressiveness | How hard the AI drives to get its target speed. |
| Max Throttle / Max Brake | The maximum throttle and brake inputs that the AI sends. |
| Steer Sensitivity | How strongly the AI turns toward its aim point. |
| Min Look Ahead / Look Ahead Per Kph | The aim distance at low speed, and the increase of the aim distance with speed. |
| Race Look Ahead | The look-ahead distance along the path for the racing behavior. |
While the AI drives, it changes the counter-steering, steering limiter, automatic reverse and reverse pedal swap settings for its own use. When you disable the AI, RCCP restores the player settings and releases the AI input override. An active handling preset changes the player settings that RCCP restores later. The preset does not change the AI steering setup. A handling preset does not replace the AI pace settings.
Slow the AI at one corner
- Open Tools > BoneCracker Games > Realistic Car Controller Pro 2 > Add to Scene > AI Brake Zones.
- Select the container. In the Scene view, hold Shift and left-click the road.
- Change the size and rotation of the new box to cover the braking area before the corner.
- Set Target Speed, then test the approach.
Check: the vehicle brakes while its position is in the zone. Make the box sufficiently large and put it sufficiently early to slow the vehicle before the turn. A brake zone sets a maximum target speed. A brake zone cannot give more braking grip than the vehicle has.
If you disable the zone or its BoxCollider, the zone does not limit the speed.
Avoid moving obstacles
Add RCCP AI Dynamic Obstacle Avoidance to the same object as the AI module. Use Add Component > BoneCracker Games > Realistic Car Controller Pro 2 > AI.
Set Dynamic Obstacle Layers to the layers of other vehicles and obstacles. An empty mask detects nothing. Layers are the Unity categories that filter objects. Each obstacle must be on a selected layer.
| Controls | Purpose |
|---|---|
| Auto Detect Obstacles, Detection Radius, Pool Update Interval | Which obstacles the component finds, the maximum distance and the update interval. |
| Vehicle Width, Vehicle Length, Safety Margin | The space that this vehicle needs. Set these values to agree with the model. |
| Prediction Time, Risk Threshold | How early the vehicle reacts to a possible collision. |
| Emergency Brake Distance, Min Speed Threshold | Braking at short range and steering at low speed. |
| Avoidance Steer Sensitivity | The strength of the added avoidance steering. This setting is not the same as the setting on the AI module. |
Test with one obstacle first, then with many vehicles. Avoidance adds braking to the brake input of the AI and adds a steering correction. Avoidance does not prevent all collisions. When you disable the avoidance component, its steering and braking inputs stop.
Edit routes and recovery
Invert reverses the sequence of a waypoint route. Delete Waypoints removes all waypoints. The context menu of the component has Smooth Waypoints and Place Waypoints Above Ground.
CAUTION: Make a copy of the route before you use Smooth Waypoints. Smoothing replaces the original waypoint objects.
Each new point keeps the target speed of the waypoint at the start of its segment. Ground placement uses Ground Offset and Ground Layer Mask.
Delete Waypoints and Delete Brake Zones ask for confirmation. You can undo them with Edit > Undo. These actions keep the prefab connections.
In Runtime Options:
- Stop Now stops and holds the vehicle.
- Reverse Now makes the vehicle reverse.
- Check Stuck enables the reverse recovery when the AI requests forward movement but the vehicle does not move.
When you change the mode, the AI clears the stop and reverse requests. Use runtime edits for diagnosis. Make permanent setting changes after you stop Play Mode.
Reverse Now and the Check Stuck recovery work with manual, automatic and automatic DNRP gearboxes. The AI brakes and selects reverse. Then the AI selects first gear again, or Drive on an automatic DNRP gearbox. The recovery starts when the vehicle stays below 2 km/h for 2 seconds and the AI requests a minimum of 30% throttle. The vehicle then reverses for 1.5 seconds. If you disable the AI module, a recovery in progress stops.
Next steps
- Scenes and Spawning — add more vehicles during a game.
- Cameras — watch an AI vehicle and keep the same driver.
- Field Reference — the settings of each AI component.
- Scripting — write your own input-driven vehicle controller.