Surfaces and Effects
Goal: give a road surface its own tire grip, skid sound and effects. Start with one surface on a simple piece of ground.
Before you start
Use a vehicle that you can drive already. Refer to Your First Drive or Vehicle Setup. Stop Play Mode before you make changes.
A collider is the invisible shape that the tires touch. A Physics Material is an asset that you assign to the collider. RCCP 2 uses the Physics Material to identify a surface. The visible material that gives the road its color is a different asset. The RCCP 2 wheel system uses the surface grip.
1. Add a surface
- In the Project window, create a Physics Material asset. Give it a clear name, for example
PracticeGrass. - Select the ground object in the Hierarchy.
- Drag the Physics Material asset into the Material slot of the ground collider.
- Open Tools > BoneCracker Games > Realistic Car Controller Pro 2 > Settings > Ground Physics.
- Click Add A Surface.
- In the new row, assign the same asset to Physics material.
- Set Grip under power and Cornering grip. Start with similar values for the two settings.
Lower grip values give less tire grip.
Check: the ground collider and the new surface row use the same Physics Material. A change to the visible color of the ground does not connect the ground to RCCP.
Keep the first row as your normal road surface. Add new rows at the end. Terrain mappings and wheel overrides use row numbers, so a row that you move or delete can change their meaning.
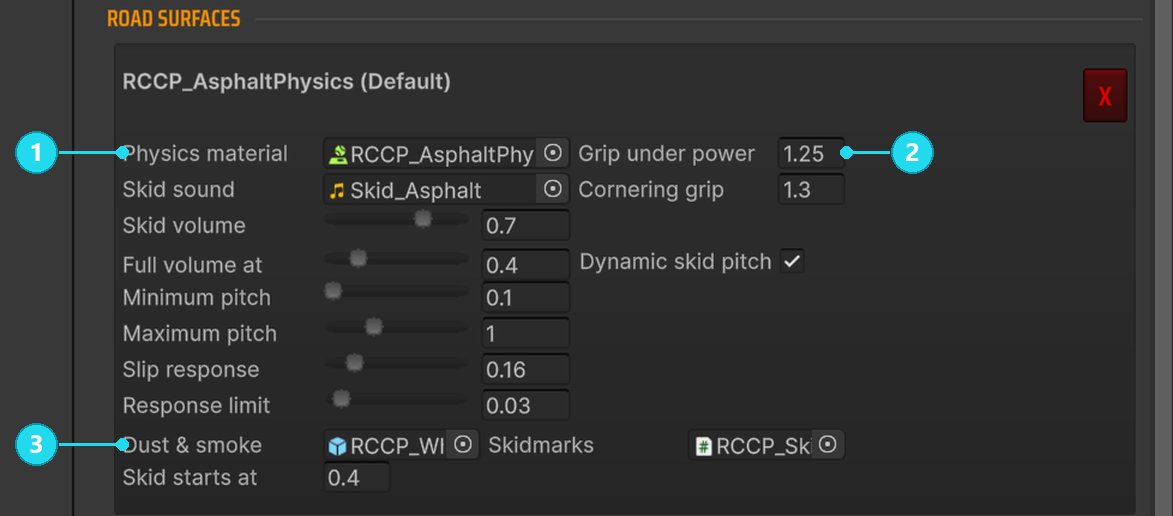
Open the screenshot at full size. 1 Assign the same Physics Material that the ground collider uses. 2 Adjust the grip under power and in corners. 3 Assign the tire particles. The Skidmarks slot is next to them.
The image shows the existing asphalt row as an example. Add a separate row for your new surface.
2. Select the sound and effects
In the surface row, assign only the effects that you want:
| Setting | What to assign or change |
|---|---|
| Dust & smoke | A tire particle-effect prefab. Keep it empty for no effect. |
| Skid sound | A looping tire sound. Keep it empty for no sound. |
| Skidmarks | A skidmark prefab with the necessary material and color. Keep it empty for no marks. |
| Skid starts at | The amount of slide that starts the effects. Lower values react to smaller slides. |
| Skid volume | Maximum skid-sound volume. |
| Full volume at | The additional slide at which the sound reaches full volume. |
| Dynamic skid pitch | Changes the pitch with the amount of slip and the change in slip. A new row starts with this option disabled. The included asphalt, grass and sand rows use this option. |
| Minimum pitch | Base pitch when a skid starts. A new row starts at 0.99. |
| Maximum pitch | Base pitch at full slide. A new row starts at 1.07. |
| Slip response | Sensitivity to increases and decreases in slip. Zero disables this response. A new row starts at 0.16. |
| Response limit | Maximum temporary pitch change from a change in slip. A new row starts at 0.03. |
Enable Dynamic skid pitch to show the four pitch controls. Changes in Ground Physics apply during Play Mode and stay after Play Mode stops.
Skid starts at controls the marks, particles and sound together. To make a surface quieter and keep its marks, decrease Skid volume.
A Dust & smoke effect stops between slides and starts again at the next slide. In a custom prefab, a Start Delay, Prewarm or burst at time 0 plays again at each start. A prefab with a Stop Action continues to play between slides.
3. Drive across the surface
- Save the scene and click Play.
- Drive across your normal road, then across the new surface.
- Brake and steer on each surface.
- Make a moving slide to examine the sound and marks.
- Adjust the grip and skid values while you drive. Each change applies immediately.
Check: the new surface has the grip and effects that you want. Compare the same maneuver at a similar speed on the two surfaces. A gentle turn can give no skid.
Grip, skid and sound settings in Ground Physics apply immediately, also during Play Mode. Dust & smoke and Skidmarks load when the scene starts. To test a change to these two slots or a new surface row, start Play Mode again. Ground Physics is an asset, so a change in Play Mode stays after you stop.
The surface does not behave as expected
| What you see | What to examine |
|---|---|
| A friction change on the Physics Material does not change tire grip | Change Grip under power and Cornering grip in Ground Physics. RCCP uses the material only to identify the surface for tire grip. The Unity friction of the material still affects body contact. |
| All surfaces feel the same | Examine the material on the collider that the wheels touch, then the related surface row. Examine the wheel for a Force ground surface override. |
| No skidmarks | Assign a Skidmarks prefab and enable Draw skidmarks on the wheel. Test while the vehicle moves and slides. A burnout without movement does not draw a trail. |
| Marks flicker on the road | Increase Ground Offset on the skidmark prefab. |
| Little smoke at first | Smoke uses the slide and the tire temperature. A cold tire makes less smoke. |
| Wheel Collider changes do not change the tire behavior as expected | Use Wheels and Tires to find the active wheel settings. |
Optional: paint different surfaces on a terrain
A Unity Terrain uses paint layers for its ground textures. Terrain physics materials connects each paint layer to a Road surfaces row.
NOTE: A direct surface match has priority over the terrain-layer mapping.
- Assign a separate Physics Material to the Terrain Collider of the terrain. Do not use this material in a Road surfaces row.
- Add an entry in Terrain physics materials with the material of the terrain collider.
- Add one Splatmap Indexes entry for each terrain paint layer, in the layer order of the terrain.
- Set the Index of each entry to the Road surfaces row for that layer. Count the rows from zero.
For example, if grass is surface row 1 and asphalt is row 0, a terrain with grass, grass and road layers needs the indexes 1, 1, 0.
Check: drive across each painted area. The mapping uses surface row numbers. Test the layer boundaries and blends, and also the solid areas.
Where layers blend, a wheel uses the layer with the most paint below it. If a terrain appears after the scene starts, RCCP finds the terrain the first time that a wheel touches it. Examples are a streamed tile or a terrain in an additively loaded scene. RCCP reads the paint of each terrain one time, so it does not see paint changes during the game.
Optional: adjust marks, smoke and collision effects
| Where to edit | Useful controls |
|---|---|
| Skidmark prefab | Max Marks sets how much trail stays visible. Min Distance sets the space between sections as a squared distance. A value of 0.04 gives a section every 0.2 m. More space gives coarser trails. Ground Offset lifts the marks above the road. |
| RCCP wheel | Draw skidmarks enables marks for that wheel. Tire width sets the width of the skidmarks. Force ground surface selects a fixed surface row. A value of -1 sets normal detection again. |
| Particles module of the vehicle | Tire smolder lets hot tires continue to smoke after a slide. Smolder smoke controls the amount. |
| Particles module of the vehicle | Assign impact, scrape and rim sparks. Use Spark on these layers to select the collision layers that make sparks. |
| Wheel Blur module of the vehicle | Multiplier scales the blur effect from 0 to 1. Each blurred wheel also fades from full effect at 5 m to no effect at 1.5 m from the RCCP camera. |
The Particles module also controls extra sparks on large impacts, impact flashes and the spark increase during a long scrape. Bursts for blown tires, detached panels and broken lamps have slots on each vehicle. An empty slot uses the effect in RCCP Settings.
All skidmarks use one scene manager, which RCCP creates when necessary. To add the manager before Play Mode, use Tools > BoneCracker Games > Realistic Car Controller Pro 2 > Add to Scene > Skidmarks Manager. To clear trails from code, refer to Transport and skidmarks API.
Exhaust smoke and backfire belong to the exhaust tips. Engine smoke and fire need Damage smoke & fire on the Particles module and the damage setup in Damage. Use Field Reference for the detailed settings. If effects cost too much performance, refer to Performance and Platforms.
Next step
- Tuning Recipes — adjust a vehicle that slides too much or too little.
- How the Car Drives — understand how wheel grip and surface grip work together.
- Damage — connect collision effects to vehicle damage.