Select, spawn or move a vehicle
Goal: Select the vehicle that the player drives. Then create or move a vehicle during the game.
The scene setup uses the Inspector. The optional spawn and checkpoint examples need a small C# script.
Prerequisites
Put one working RCCP vehicle in your scene. A scene contains the objects that are loaded in Unity. A prefab is a reusable object in the Project window. Spawning creates an instance of a prefab while the game runs.
Stop Play Mode before you edit the scene. Save the changes before you test.
Required scene objects
Add these objects from Tools > BoneCracker Games > Realistic Car Controller Pro 2 > Add to Scene:
| Item | Purpose |
|---|---|
| Scene Manager | Tracks the RCCP vehicles and the active player vehicle. If the scene has a scene manager, the menu selects the existing one. |
| RCCP Camera | Follows the player vehicle. See Cameras. |
| UI Canvas | Shows the dashboard and the menus. See UI and HUD. |
If a loaded scene contains a vehicle, the Editor usually creates the scene manager automatically. To control this behavior, use Tools > BoneCracker Games > Realistic Car Controller Pro 2 > Settings > Editor Preferences > Auto-Create Scene Manager. If no scene manager exists at runtime, RCCP creates one. Removal of the scene manager does not disable vehicle management.
The Editor automation preferences apply only to the current project. These preferences are automatic Scene Manager creation, automatic module grouping, prefab grouping permissions and platform warning suppression.
Inspector layouts, Scene Panels, overlays, favorites and welcome window preferences stay shared across all projects of the same local user.
Earlier automation preferences that applied to all projects do not transfer. Automatic Scene Manager creation and automatic module grouping start enabled. Prefab grouping starts with Ask Me Once. Platform warnings start enabled. If you move or rename a project folder, a new set of project preferences starts.
Check: The Hierarchy has one scene manager, one camera and one canvas. Save the scene and click Play.
Open the in-game settings panel. In the Vehicle row, select a vehicle, then click Spawn. The menu uses the order of the Demo Vehicles list. Without Demo Content, the list contains only the RCCP_Sedan01 prefab, and the menu shows Sedan. Demo Content replaces the same asset with the full vehicle list.
To edit the list, stop Play Mode and open Tools > BoneCracker Games > Realistic Car Controller Pro 2 > Settings > Data > Demo Vehicles. Start Play Mode again to update the menu.
Identify the player vehicle
While the game runs, select RCCP_SceneManager in the Hierarchy. Examine Active Player Vehicle.
If Register Last Vehicle As Player is enabled, the last eligible vehicle that becomes enabled takes the player slot. The player slot tells RCCP which vehicle the camera, the dashboard and the player actions use. In a scene with several vehicles, the result can be unexpected.
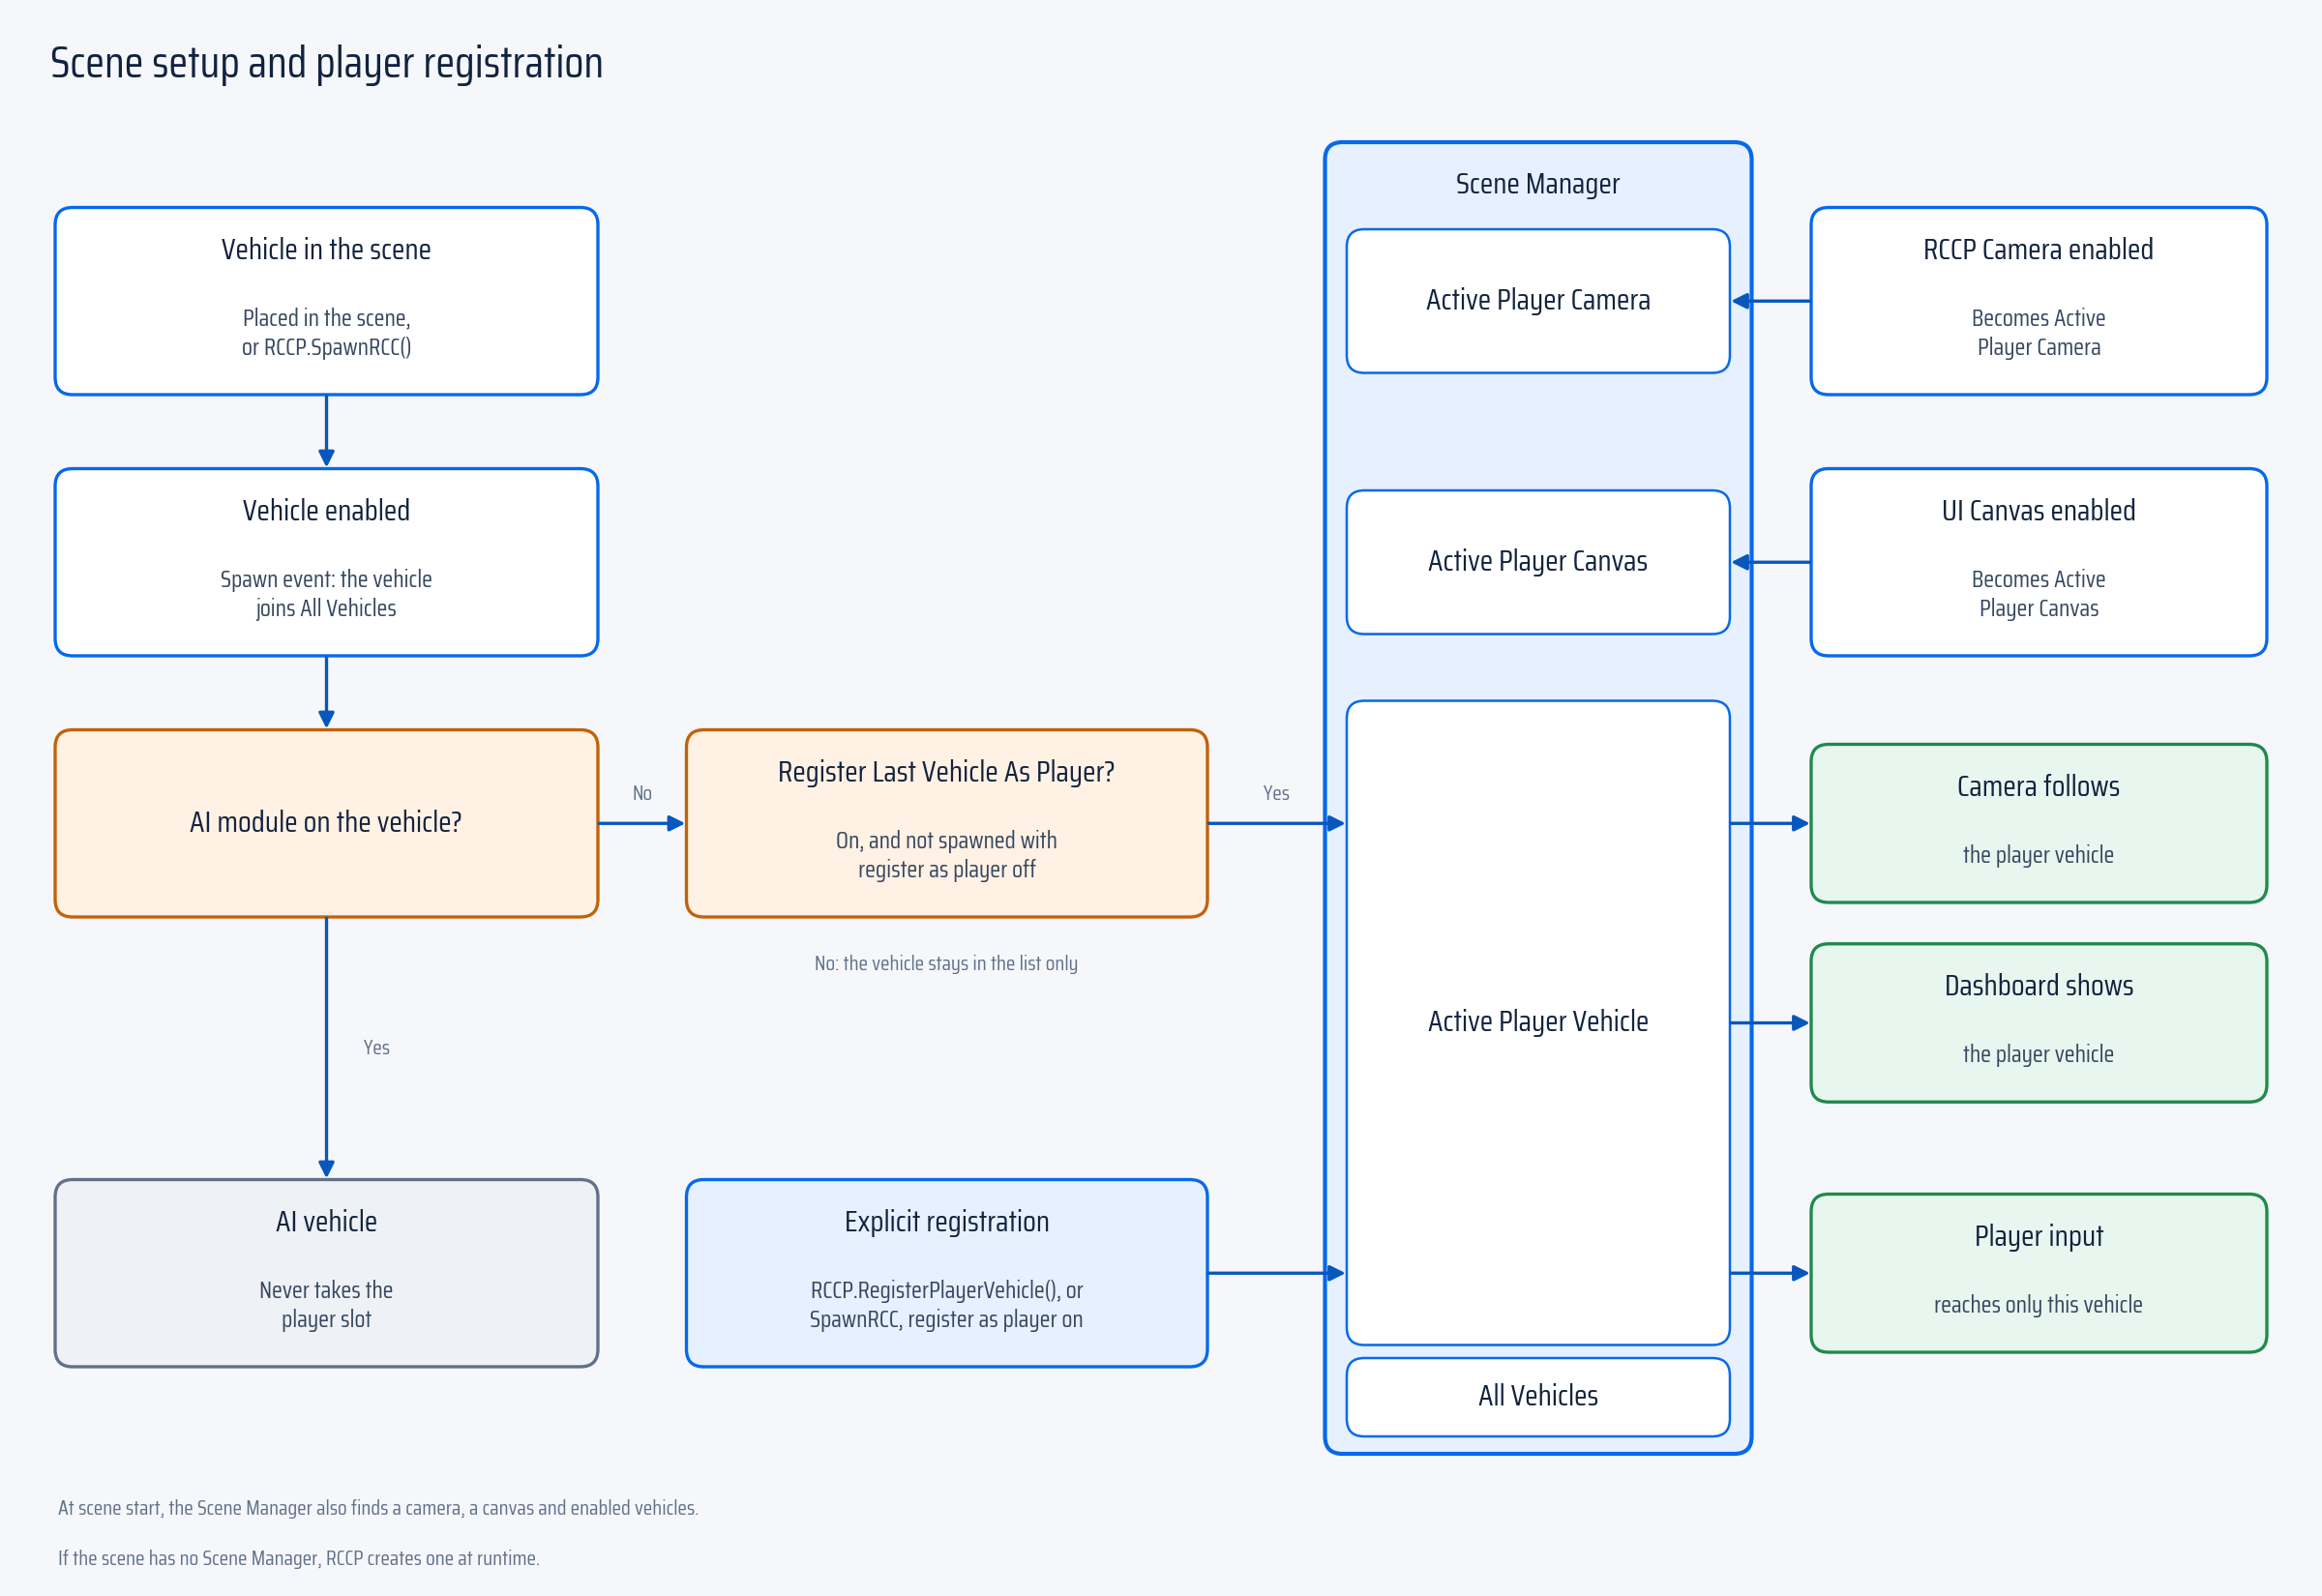
Check: Active Player Vehicle shows the vehicle that you want to drive. If the value changes when another vehicle appears, select the player vehicle with a script. See the next section. AI vehicles join the vehicle list through a different registration path. AI vehicles do not take the player slot automatically.
The camera, canvas, vehicle list and terrain fields of the scene manager show live information. Use these fields to find missing scene objects. These fields are not a list of prefabs to spawn.
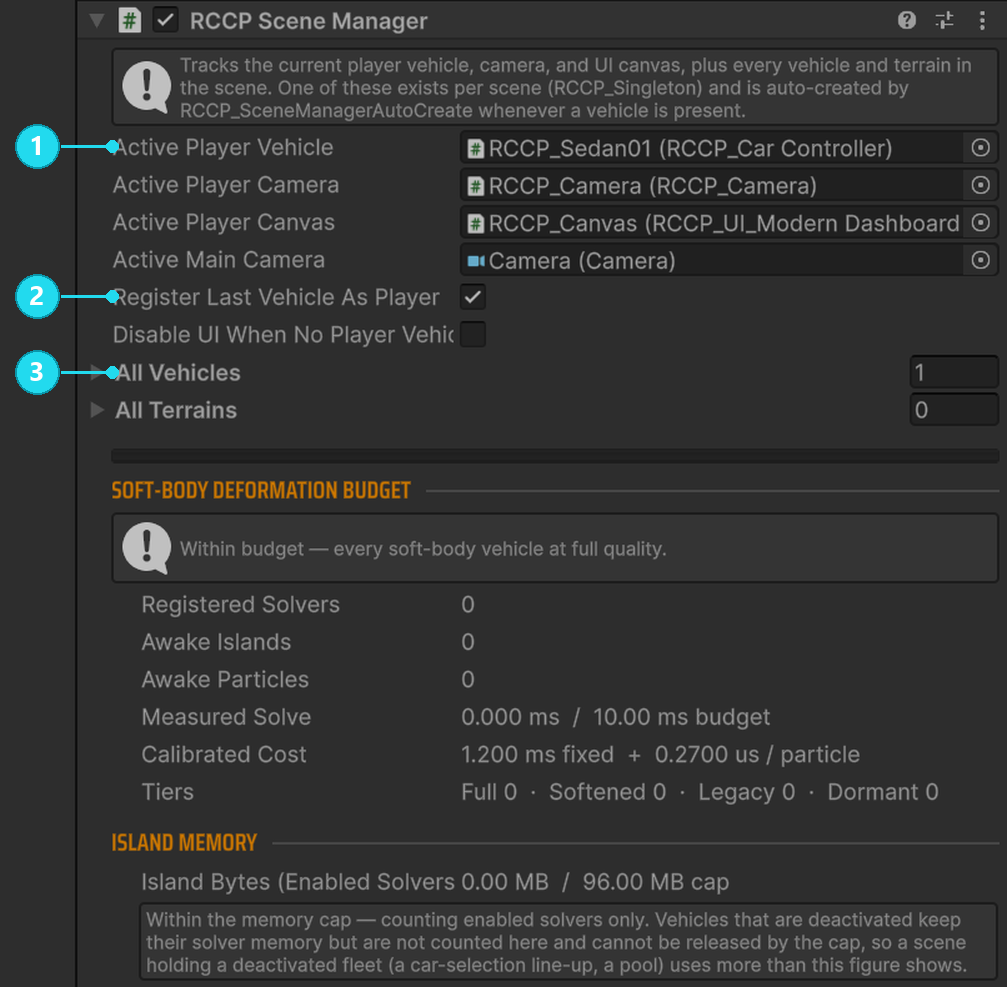
Open the screenshot at full size. 1 Examine the player reference during Play Mode. 2 This setting lets the last eligible vehicle become the player vehicle. 3 Expand the list to see the registered vehicles. The screenshot shows Play Mode in the prototype scene, with the example vehicle as the player vehicle.
Select the player vehicle with a script
For a scene with several vehicles:
- Stop Play Mode.
- Disable Register Last Vehicle As Player.
- Create a script named
ChoosePlayerCar.cswith this code. - Attach the script to an empty scene object.
using BoneCrackerGames;
using UnityEngine;

public class ChoosePlayerCar : MonoBehaviour {
    public RCCP_CarController playerCar;

    private void Start() {
        if (playerCar != null)
            RCCP.RegisterPlayerVehicle(playerCar, true, true);
    }
}
Drag the vehicle root from your scene into the Player Car field of this component. Save the scene and click Play.
Check: The vehicle becomes the Active Player Vehicle, gets the controls and starts its engine. The two true arguments enable the controls and the engine.
| Call | Use |
|---|---|
RCCP.RegisterPlayerVehicle(vehicle) |
Select the player vehicle. The control and engine states do not change. |
RCCP.RegisterPlayerVehicle(vehicle, isControllable) |
Also set whether the player can drive the vehicle. |
RCCP.RegisterPlayerVehicle(vehicle, isControllable, engineState) |
Also start or stop its engine. |
RCCP.DeRegisterPlayerVehicle() |
Clear the player slot. Disable the controls of the old player vehicle and release the camera target. |
Use these calls to select the vehicle. Do not set the scene manager field directly. Registration sets the control and engine states explicitly.
Spawn a vehicle
Put using BoneCrackerGames; at the top of your own MonoBehaviour script. Add the fields and the method inside the class:
using BoneCrackerGames;
public RCCP_CarController carPrefab;
public Transform spawnPoint;

public void SpawnPlayerCar() {
    if (carPrefab == null || spawnPoint == null)
        return;

    RCCP.SpawnRCC(carPrefab, spawnPoint.position, spawnPoint.rotation,
        true, true, true);
}
- Assign a vehicle prefab from the Project window to Car Prefab.
- Create an empty scene object at the position where the vehicle must appear.
- Assign the Transform of that object to Spawn Point.
- Put the spawn point above the road, away from other colliders.
- Call
SpawnPlayerCar()from your game flow or from the On Click () event of a UI button.
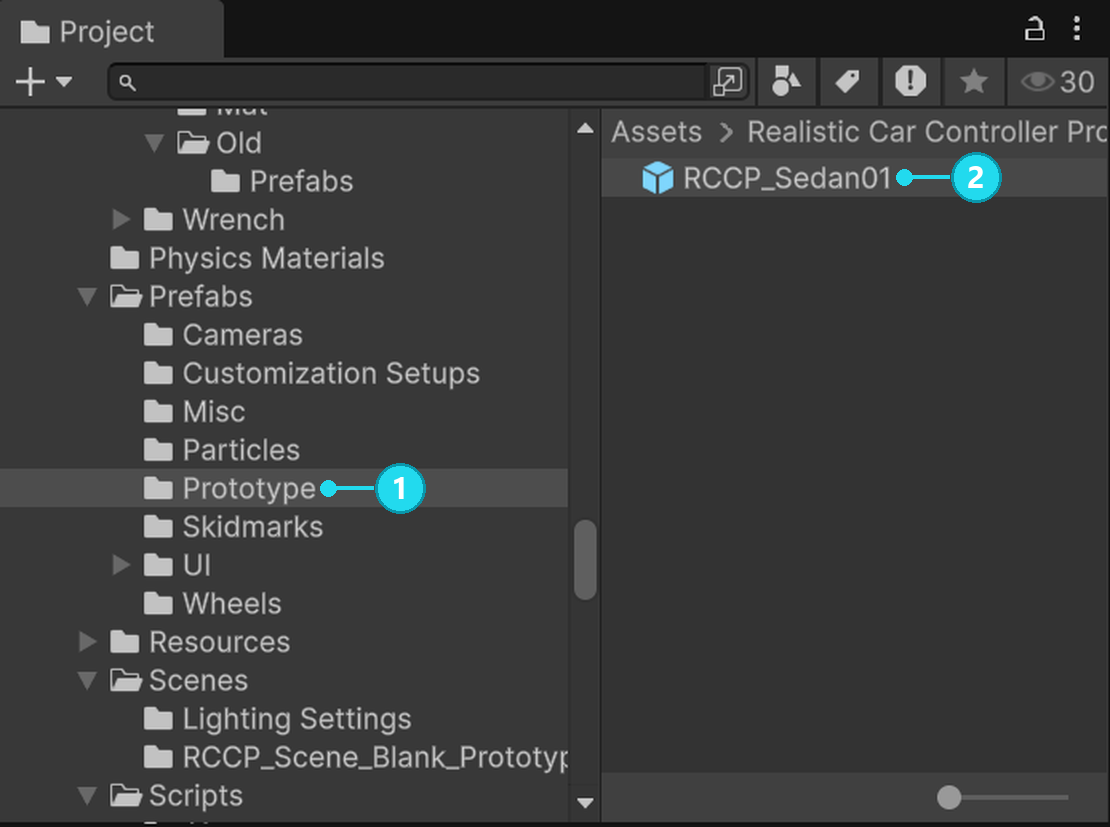
Open the screenshot at full size. 1 This example is in Assets/Realistic Car Controller Pro 2/Prefabs/Prototype. 2 Drag the vehicle prefab from the Project window into the Car Prefab field of your script. Spawn Point is a different reference. Assign the Transform of the empty scene object from the Hierarchy.
The Prototype folder contains the RCCP_Sedan01 prefab. You can also use your own working RCCP vehicle prefab.
The last three arguments are register as player, enable controls and run the engine. SpawnRCC returns the new RCCP_CarController. If necessary, keep the return value in a variable.
Check: One call creates one new vehicle at the spawn point. The call does not remove an older vehicle. Your game must remove or reuse the older vehicle.
For a background vehicle, set register as player to false. Automatic player registration then ignores that vehicle, so the vehicle cannot take the camera. If the player enters the vehicle later, register the vehicle with RCCP.RegisterPlayerVehicle.
Return a vehicle to a checkpoint
Use RCCP.Transport to move a vehicle. The call sets the physics position and the interpolation of the vehicle together. Transport always resets the wheel state, also when the call keeps the vehicle velocity. See Wheel state resets.
using BoneCrackerGames;
public Transform respawnPoint;

public void Respawn() {
    if (respawnPoint != null)
        RCCP.Transport(respawnPoint.position, respawnPoint.rotation);
}
Assign the checkpoint object to Respawn Point. Call Respawn() from your restart flow or from a UI button.
| Call | Result |
|---|---|
RCCP.Transport(position, rotation) |
Moves the player vehicle and stops it. If there is no player vehicle, the call does nothing. |
RCCP.Transport(vehicle, position, rotation) |
Moves and stops a specific vehicle. |
RCCP.Transport(vehicle, position, rotation, false) |
Moves a specific vehicle and keeps its velocity. |
Check: The vehicle appears at the checkpoint and does not slide across the gap. The stopping overloads set the speed, the spin and the drive torque to zero. A connected trailer moves with the vehicle.
If you move only the Transform, the physics motion of the vehicle does not change. Unity MovePosition applies the move at the next physics step. Use Transport for an immediate RCCP teleport or respawn.
The scene setup does not work
| What happens | What to check |
|---|---|
| Another vehicle takes the camera | Examine Register Last Vehicle As Player and the spawn code of the other vehicle. |
| A script or a button does nothing | Assign its vehicle and Transform fields. Examine the first error in the Console. |
| A respawn button does nothing | RCCP.Transport(position, rotation) needs an active player vehicle. |
| Dashboard readouts stay visible with no usable vehicle | Enable Disable UI When No Player Vehicle. Make sure that the Hud Roots list of the canvas contains the readouts. RCCP hides the driving readouts, not the full canvas. |
| Terrain layers do not change tire grip | Configure the terrain material and the layer mapping. See Surfaces and Effects. The terrain scan alone does not assign surfaces. |
Settings applied at scene start
When a scene starts, the scene manager applies the physics timing and frame rate overrides from RCCP Settings. If Show the telemetry panel is on, the scene manager creates the telemetry panel. If Remember key bindings is on, the scene manager loads the saved input bindings. The scene manager also collects the active terrain data. If a terrain loads later, for example as a streamed tile, the scene manager adds that terrain when a wheel first touches it. Terrain surfaces also work in a scene that starts with no terrain.
Before you change the timing settings, read Performance and Platforms. For binding persistence, see Controls.
Next steps
- AI Vehicles — make other vehicles drive themselves.
- Demo Content — try scenes with car selection and spawning already connected.
- Public API — use player change events and other calls.