Damage
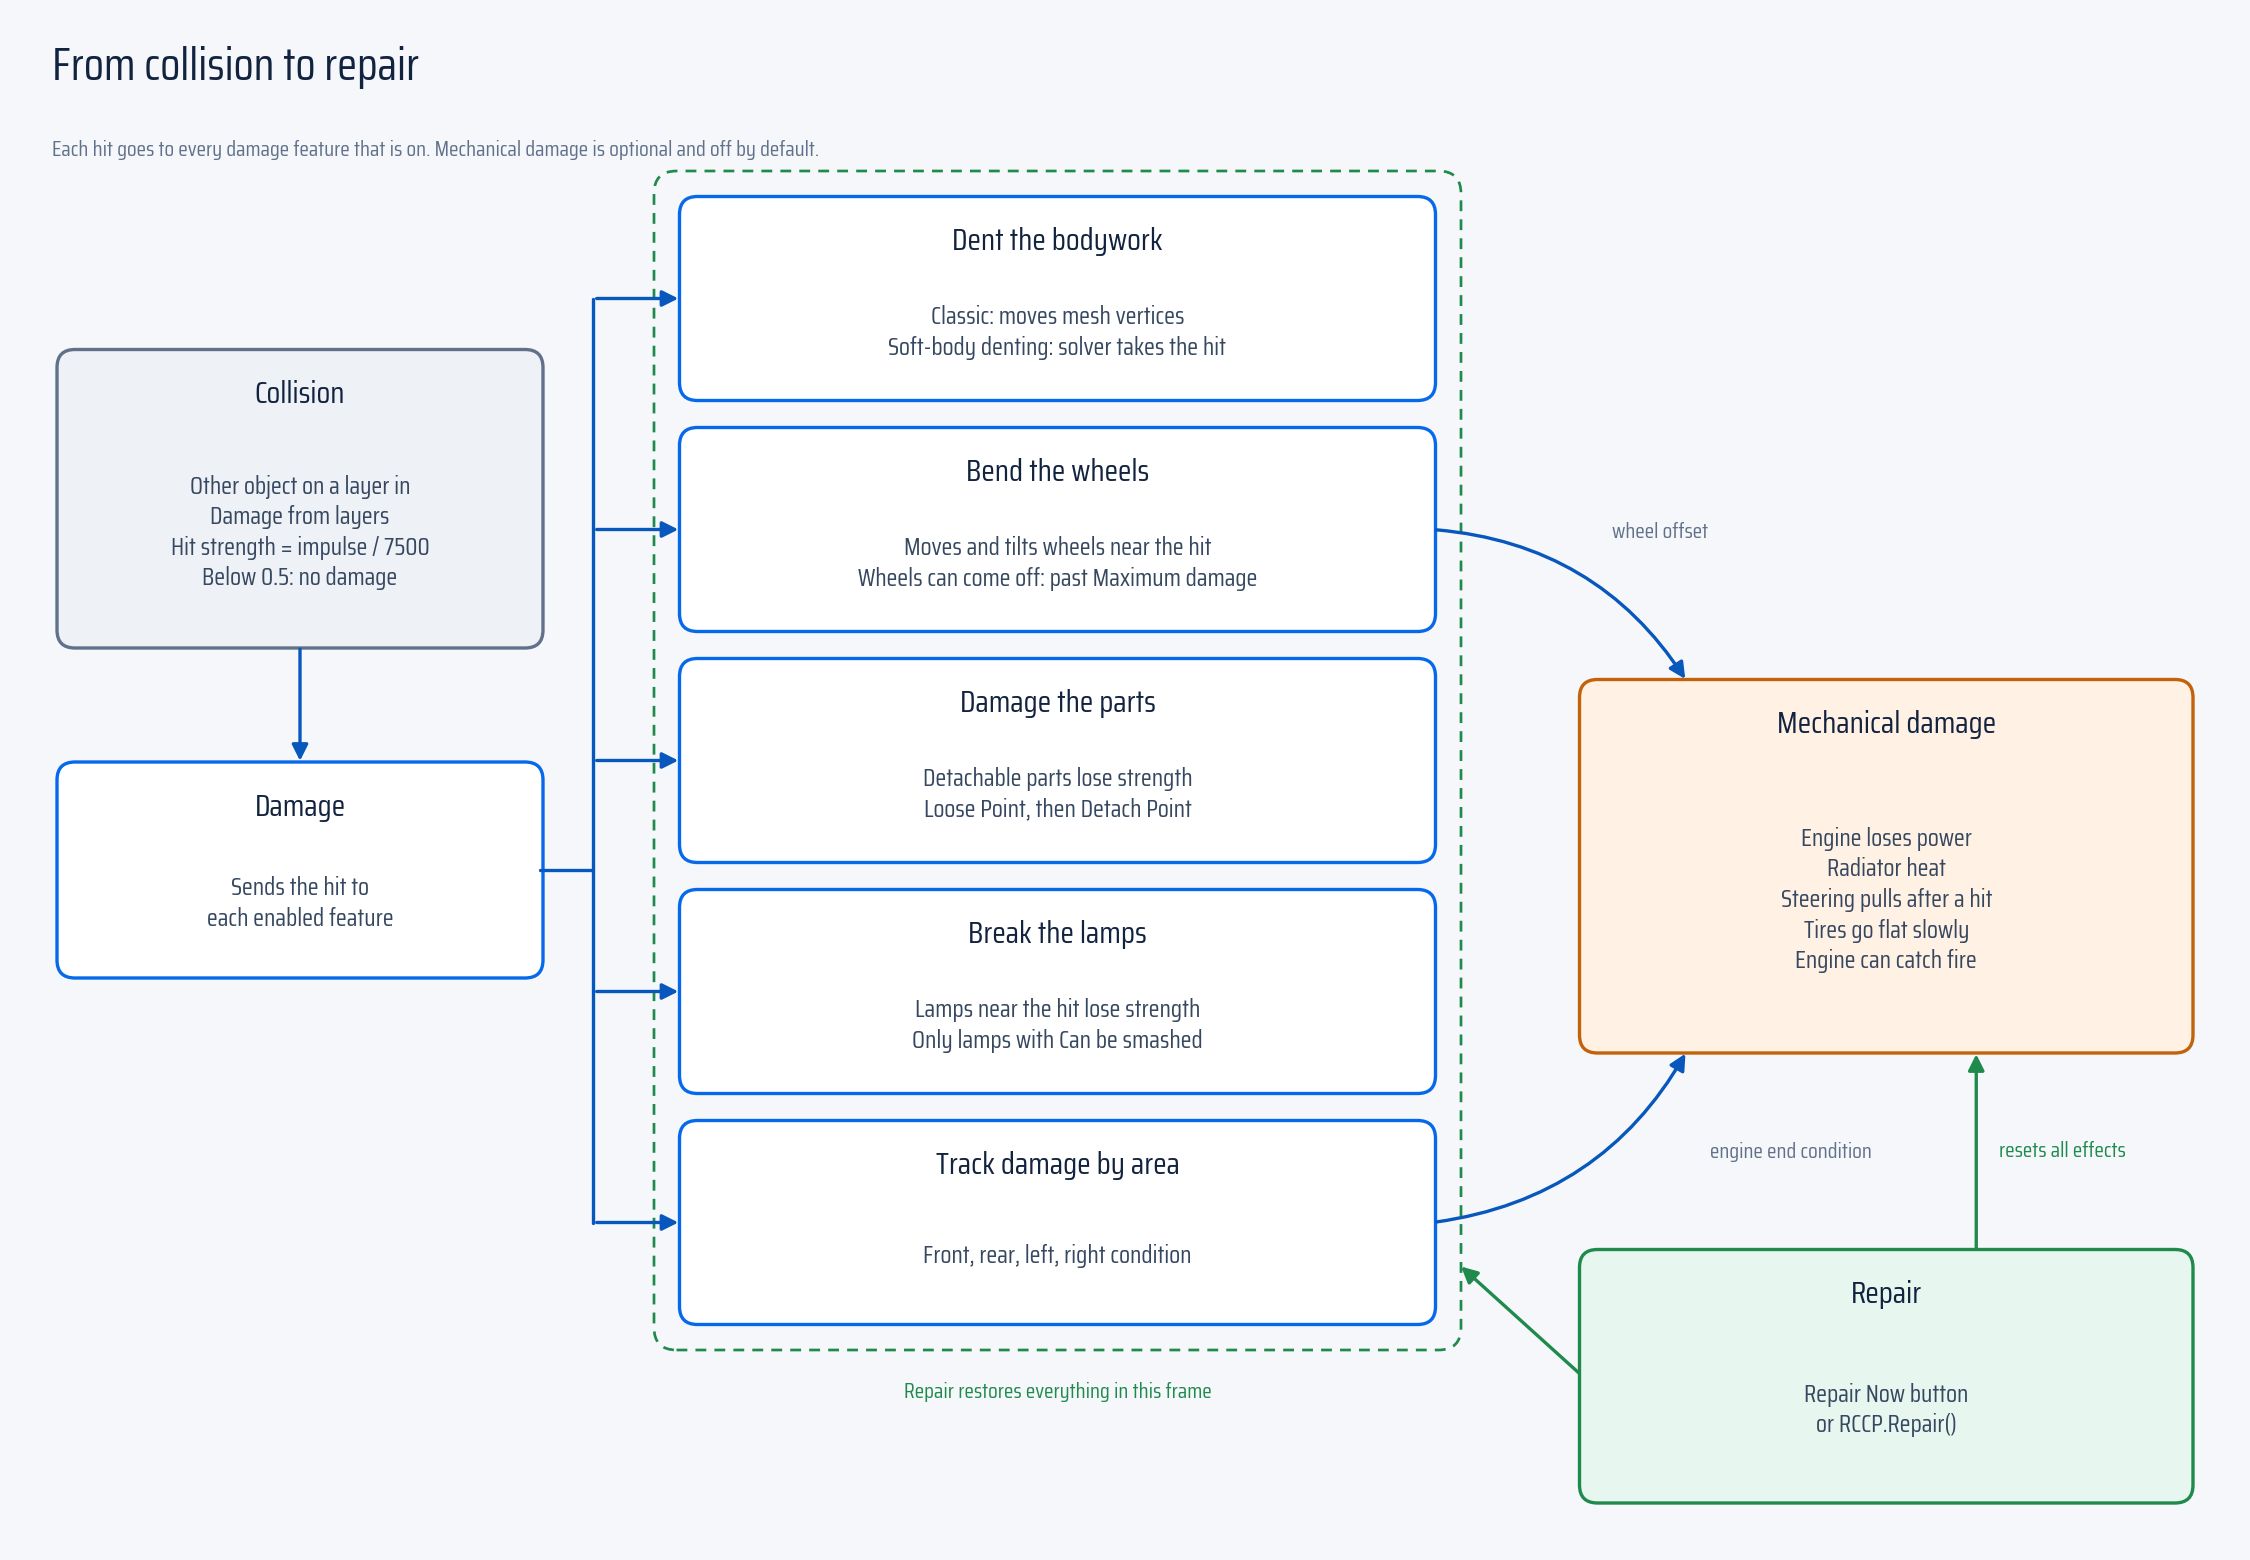
Goal: make a crash dent the vehicle and make sure that repair works. Then add optional broken parts or mechanical damage.
Before you start
Use a working RCCP vehicle in a test scene with a solid obstacle. Save the scene and stop Play Mode before setup.
Dents change mesh vertices, which are the points that make the model. The source model must let Unity read and write these points.
1. Enable damage
- Select the vehicle root in the Hierarchy.
- Find Features > Damage in the module cards.
- If the Damage card is missing, add it with +.
- Click the card to open its Inspector.
- Enable Collect parts automatically and Dent the bodywork.
- Make sure that Damage from layers includes the layer of your test obstacle.
Check: the Damage module is enabled and collects the parts of the vehicle.
The Setup Wizard can also add Damage from its Modules step.
Vertex dents on blendshape meshes adds local vertex dents below the existing blendshapes. Enable this option before Play Mode. This experimental option supports readable skinned meshes without bones, with or without blendshapes. Save files and replay recordings do not keep vertex dents.
Dent spread, Maximum damage and Dent direction control vertex deformation.
Spawn protection blocks live collision damage for 1 second by default after spawn or vehicle reactivation. The timer uses game time. Set 0 to disable protection. This protects body meshes, wheels, lamps, detachable parts and zone health. Collision sounds and particles remain active. Scripted and recorded impacts still apply.
For a scripted respawn that keeps the vehicle active, call car.Damage.ResetSpawnProtection() after you move the vehicle. The separate Wheel detachment grace setting controls how long wheels cannot detach.
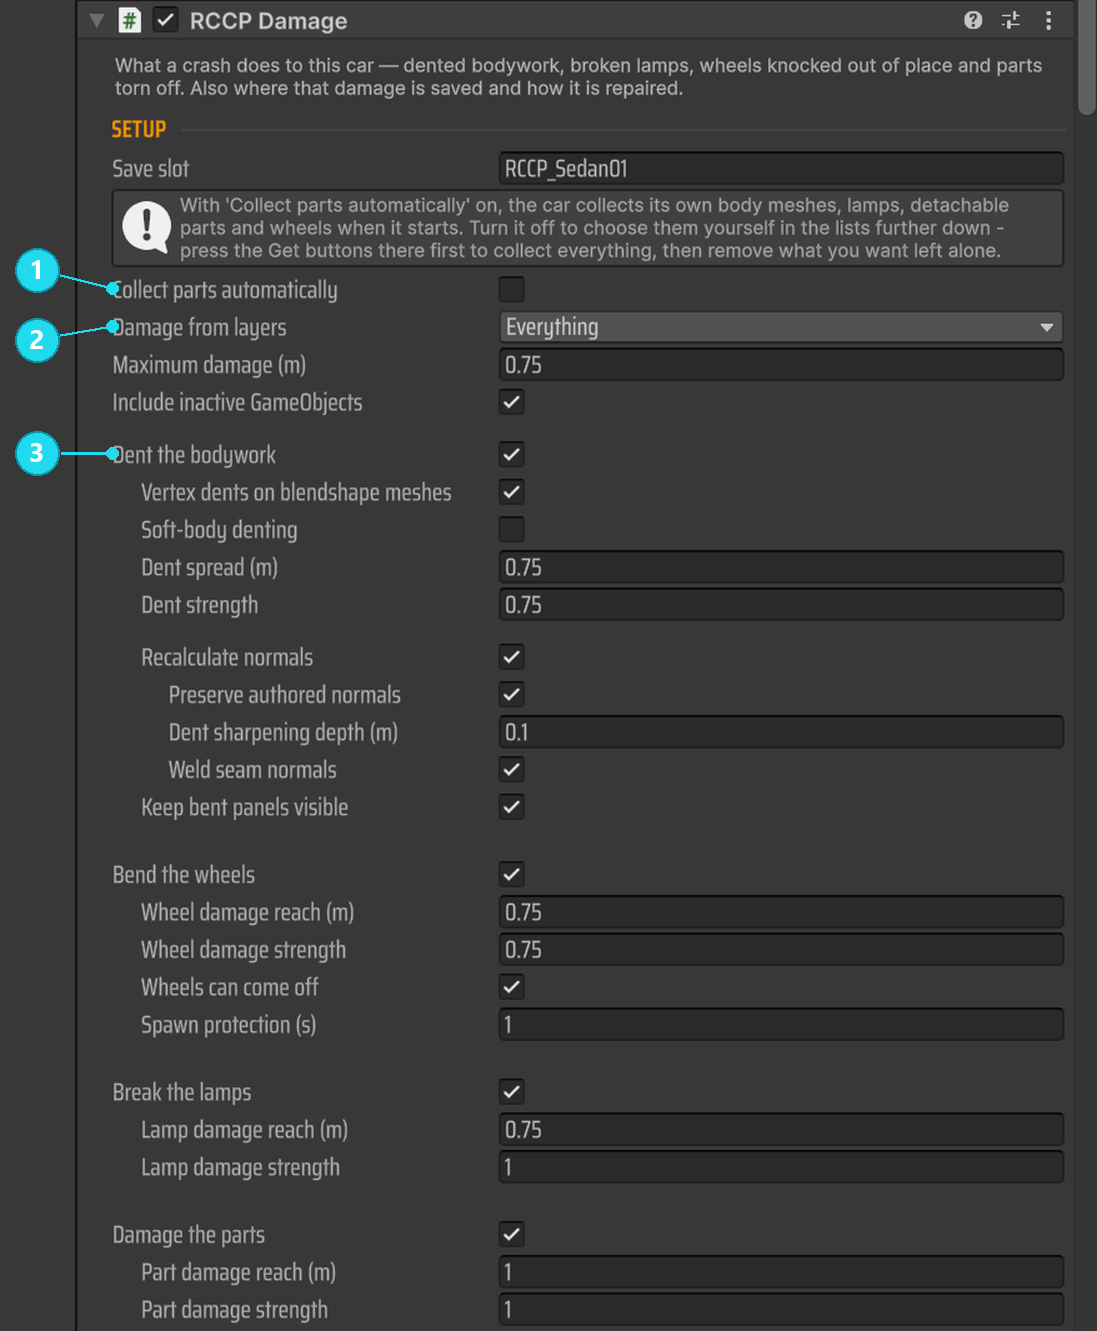
Open the screenshot at full size. 1 Enable automatic collection for this first setup. The example vehicle uses manually assigned parts, so its box is clear. 2 Include the layer of your obstacle. 3 Enable bodywork dents.
The other values belong to the example vehicle. You do not have to copy them or enable soft-body denting for this guide.
Select the damaged parts manually
To select exactly which objects can get damage, disable Collect parts automatically. Then complete the body, wheel, lamp and detachable-part lists. Use Get Meshes, Get Lights, Get Parts and Get Wheels to fill the lists.
Enable Include inactive GameObjects to also collect parts that start inactive. The component ignores empty mesh entries. Manual wheel entries must belong to this vehicle.
In manual mode, Mesh Filters and Skinned Mesh Renderers are two separate lists. Use Get Meshes or Get Skinned Meshes to fill the related list. An empty skinned list disables vertex dents on skinned meshes.
Keep cabin accessories out of the damage lists. Include structural inner surfaces, for example trunk wells and door inner panels.
2. Make the model readable
If the Setup Wizard enabled Read/Write for your model, go to the driving test.
If not, do these steps:
- Select the original imported model in the Project window.
- In the model import settings, enable Read/Write.
- Click Apply and wait for the reimport.
Check: the Console shows no unreadable-mesh warnings for the body panels that you want to dent.
This change applies to the model asset and to all its instances. The readable model also uses more memory. A model that is not readable still renders, but this system cannot deform its panels.
3. Test a dent and repair it
- Click Play and drive into the test obstacle.
- Stop the vehicle and examine the panel that you hit. A very light contact can have no effect.
- In Play Mode, select the Damage module.
- Click Repair Now near the bottom of the Inspector.
- Wait until Repaired in Live values becomes true.
Check: the crash changes the body shape and the repair restores it. The repair button is a Play Mode control. Outside Play Mode, the button is disabled.
Stop Play Mode before you change the saved setup.
Dent appearance
Change one of these settings, then do the same impact again:
| Setting | Use it to |
|---|---|
| Dent spread | Change how much of the panel an impact affects |
| Dent strength | Change how deep an impact deforms the panel |
| Maximum damage | Limit the displacement from the original shape |
| Dent direction | Select Legacy or Corrected impact direction handling |
The same impact can look different on models with different mesh detail. A higher strength cannot add vertices to a very simple panel.
Flat or faceted dents
Recalculate normals updates the lighting after deformation. Preserve authored normals keeps the authored shading away from the dent. Weld seam normals helps prevent unwanted hard seams.
Keep Keep bent panels visible enabled. The visibility bounds then follow the deformed shape.
For crowded scenes, profile the cost of normal recalculation and the soft-body settings before you increase visual detail.
Soft-body denting
Classic denting changes the panel shape immediately. With Soft-body denting, panels bend and wobble before they settle. Soft-body denting also supports animated repair.
To try soft-body denting:
- Stop Play Mode.
- Enable Soft-body denting on the Damage component.
- Open the new Deformation Solver and select a Stiffness preset.
- Do the impact and repair test again.
Check: the panel moves after the hit and then settles. Make sure that the repair finishes before you use it in gameplay.
To remove the feature, clear its checkbox. If you delete the solver child while the feature is enabled, the Inspector creates the solver again.
Panel preparation uses memory and processing time. Solver passes, Substeps and relighting change the cost. The scene-wide deformation budgets are in RCCP Settings. Performance and Platforms and Field Reference describe these controls.
A strength change does not give the same proportional result in classic and soft-body denting. Compare the result on your own vehicle.
Detachable bumpers, hoods and doors
The panel must be a separate object in the vehicle hierarchy.
- Select the panel.
- Use Add Component > BoneCracker Games > Realistic Car Controller Pro 2 > Misc > RCCP Detachable Part.
- On the Configurable Joint that the component adds, make sure that Connected Body is the vehicle root.
- If Connected Body is empty, drag the vehicle root into it.
- Set Part Type to the role of the panel.
- On the Damage module, enable Damage the parts.
- Test impacts near the panel.
| Part setting | Meaning |
|---|---|
| Strength | Remaining resistance to damage |
| Loose Point | Strength at which the part starts to move on its joint |
| Detach Point | Strength at which the part comes off |
| Is Detachable | Whether the part can come off fully |
| Deactive After Seconds | Time from detachment until the part is disabled |
| Add Torque After Loose | Torque that twists the part while it is loose |
Check: the panel starts attached. The panel becomes loose or comes off as configured, and returns after a repair.
Repair moves detached parts back to their original parents. When you destroy the vehicle, its detached parts are also removed.
On Damage, Part damage reach sets how near the impact must be. Part damage strength scales the damage.
Wheel damage
Enable Bend the wheels to move and permanently tilt a wheel after an impact. Wheel damage reach and Wheel damage strength control the impact response.
Select Wheel damage mode:
- Mechanical moves the wheel collider and can affect vehicle handling.
- Visual Only moves and tilts the wheel model. This is the default mode. The collider stays in its original position and rotation. Wheel damage causes no detachment, steering pull or tire leaks.
The demo vehicle prefabs use Visual Only. Other damage settings remain independent.
Wheel tilt stops at 20 degrees from the original rotation. A bent wheel wobbles once per revolution. A larger bend angle gives more wobble. Wheel Blur follows the same wobble. A wheel that does not turn keeps its current wobble phase.
Repair restores the original wheel position and rotation. Saved damage and replay snapshots keep the bend. Tire mesh vertices do not change.
In Mechanical mode, Wheels can come off lets a wheel come off after sufficient damage. Spawn protection prevents wheel detachment for a short time after spawn. If wheels come off immediately, make sure that the vehicle does not start inside the ground or other objects.
If a slow leak was active when the vehicle was deactivated, the tire uses the fully deflated radius after reactivation. Repair restores the fitted tire radius.
Broken lamps
Enable Break the lamps on Damage and Can be smashed on each lamp. Lamp damage reach and Lamp damage strength control the impact response.
Check: a hit near a breakable lamp can switch it off, and repair restores it. Lights describes the lamp setup.
Damage by area
Track damage by area records separate condition scores for the front, rear, left and right. The damage HUD and the engine-related mechanical damage use these scores.
A score alone does not dent a panel or decrease power. You must also enable the related damage features.
Mechanical damage
Enable Mechanical damage to add Damage Mechanics. Then select the effects that you need.
| Effect | Main setting | Dependency |
|---|---|---|
| Less engine power and overheating | Engine loses power | Track damage by area |
| Steering pulls after a collision | Steering pulls after a hit | Wheel displacement and positive Maximum damage |
| Tires deflate slowly | Tires go flat slowly | Wheel displacement and positive Maximum damage |
| Smoke, fire and engine failure | Engine can catch fire | Track damage by area, plus particles for visible effects |
Set Engine location to the correct end of the vehicle. Then test damage at that end.
Health to torque sets the shape of the power loss. The radiator and overheating controls set how damage becomes heat. Leak starts at and Time to go flat control tire leaks. For fire, keep Goes out above higher than Catches fire below. This gap prevents fast on-off changes.
Smoke and flames need the particle setup in Surfaces and Effects. Recompute inertia on detach recalculates the weight distribution after a part comes off.
When fire stops the engine, input and API start commands cannot start the engine until the fire stops. A repair lets the engine start again.
Repair a vehicle
Repair Now restores the body shape, wheel positions and attachment, tires, detachable parts, lamps and tracked area health. The mechanical repair removes the effects of mechanical damage, including fire. Parts that start inactive and never initialize do not change.
Soft-body repair can take time if it is not set to instant. In a script, use the public repair-status API. Do not assume that the vehicle is fully restored in the same frame. Refer to Damage and repair API.
Save a damaged vehicle
- Before you click Play, give the vehicle a unique Save slot.
- In Play Mode, damage the vehicle and click Save.
- Repair the vehicle, then click Load.
- Make sure that the saved damage returns.
Check: the slot restores the saved condition, including wheel attachment and tire state. A save with less damage can also reattach parts and lock loose joints. Delete removes the saved damage of that slot.
A save without wheel-attachment data does not change the current attachment state.
These buttons store damage on the device. Give each persistent vehicle a different slot name, so that two vehicles do not share one damage record.
Load examines the original vertex positions and mesh layout before it changes the vehicle. If the geometry is different, Load rejects the save, also when the vertex count is the same.
If a save fails, RCCP logs an error and keeps the previous slot contents. On WebGL, all PlayerPrefs keys share a 1 MB limit. RCCP rejects damage JSON of 1 MB or more before it writes the data. Smaller saves can also fail, because other keys use the same storage.
Damage does not work
| What you see | What to examine |
|---|---|
| No dents | Damage enabled, Dent the bodywork, readable meshes, obstacle layer and impact strength |
| One panel does not change | Automatic collection or the manually assigned body list |
| A distant vehicle dents but shows no smoke or fire | LOD disables particle effects from level 1. Refer to Performance and Platforms. |
| A deleted solver or mechanics object comes back | Clear the checkbox of its feature first. |
| Steering pull or slow leaks never occur | Set a positive Maximum damage and make sure that wheel damage occurs. |
| The repair button is not available | Enter Play Mode and damage the vehicle first. |
| Large multi-vehicle crashes stutter | Examine the deformation budgets and relighting costs, then profile on the target device. LOD does not disable damage, so a distant vehicle dents at full cost. |
Read next
- Lights — breakable lamps.
- Surfaces and Effects — sparks, smoke and fire.
- Field Reference — detailed damage and solver fields.