Install RCCP 2 in a new project
Install Realistic Car Controller Pro 2 (RCCP 2). Then continue to the included driving scene.
The core package includes the four-door civilian sedan, RCCP_Sedan01. You can drive this vehicle without Demo Content.
If you replace an existing installation, use Upgrade from RCCP 1.
Requirements
To call RCCP from your scripts, add using BoneCrackerGames; before the class declaration. See the script example.
Use Unity 6 (6000.0 or newer).
In Window > Package Manager, make sure that these required packages are installed:
| Package | Package ID |
|---|---|
| Input System | com.unity.inputsystem |
| Editor Coroutines | com.unity.editorcoroutines |
| Unity UI (uGUI) | com.unity.ugui |
If the installer names a missing package, open Window > Package Manager. Use + > Install package by name for each package ID in the table above. Click Install for each package. Wait until Unity finishes importing and compiling. Return to the installer to check the packages again.
- Open Edit > Project Settings > Player > Other Settings.
- Set Active Input Handling to Input System Package (New) or Both.
- If Unity asks for an Editor restart, accept the restart.
Install the downloaded package
- In Window > Package Manager, select My Assets.
- Select Realistic Car Controller Pro 2.
- Click Download.
- Click Import.
- Click Import in the Unity import dialog.
- Wait until Unity completes the import and the compilation.
The download contains the installer and a payload file. The payload file contains the RCCP 2 files. The installer imports these files. The installer opens automatically after the import.
- If the installer does not open, open Tools > BoneCracker Games > Realistic Car Controller Pro 2 > Installer.
- Read the Project checks.
- Click Next.
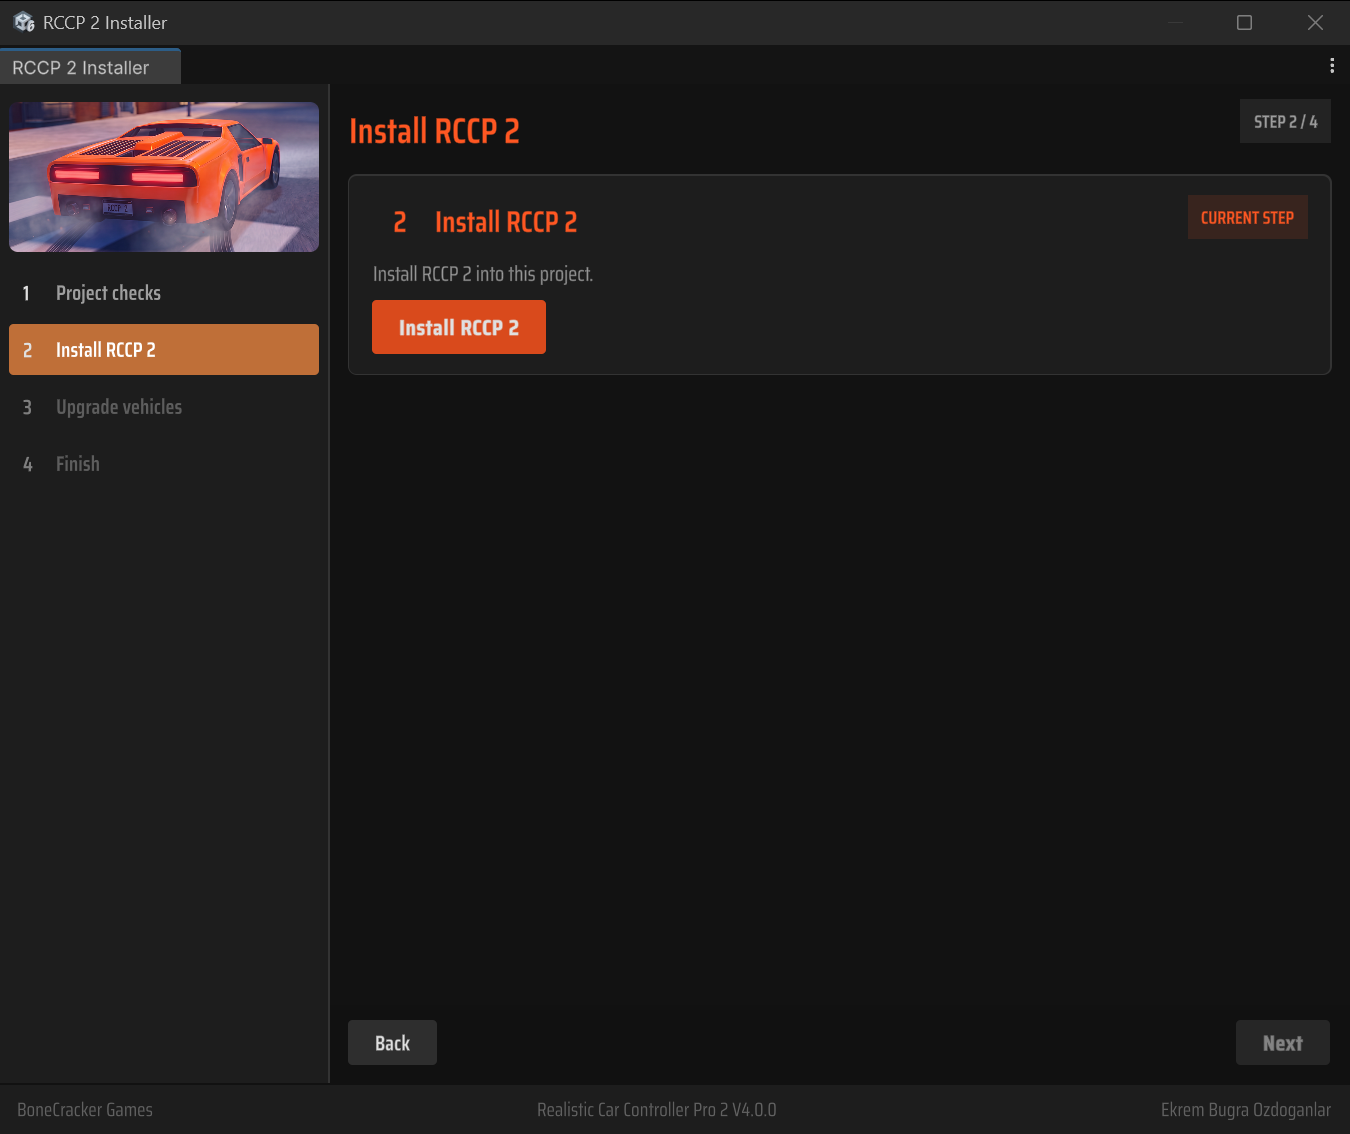
- On the Install RCCP 2 page, click Install RCCP 2.
- Wait until Unity imports and compiles the RCCP 2 files.
The included prototype vehicle has current wheel data. This vehicle does not need an upgrade.
- On the Upgrade vehicles page, click Find my vehicles.
- If no vehicles need an upgrade, click Continue.
CAUTION: Back up the project before you click Upgrade all. The upgrade saves the changed prefabs and scenes to disk.
- If files need an upgrade, examine the list. Then click Upgrade all.
- On the Finish page, click Finish.
- Click Open RCCP welcome window. The installer closes.
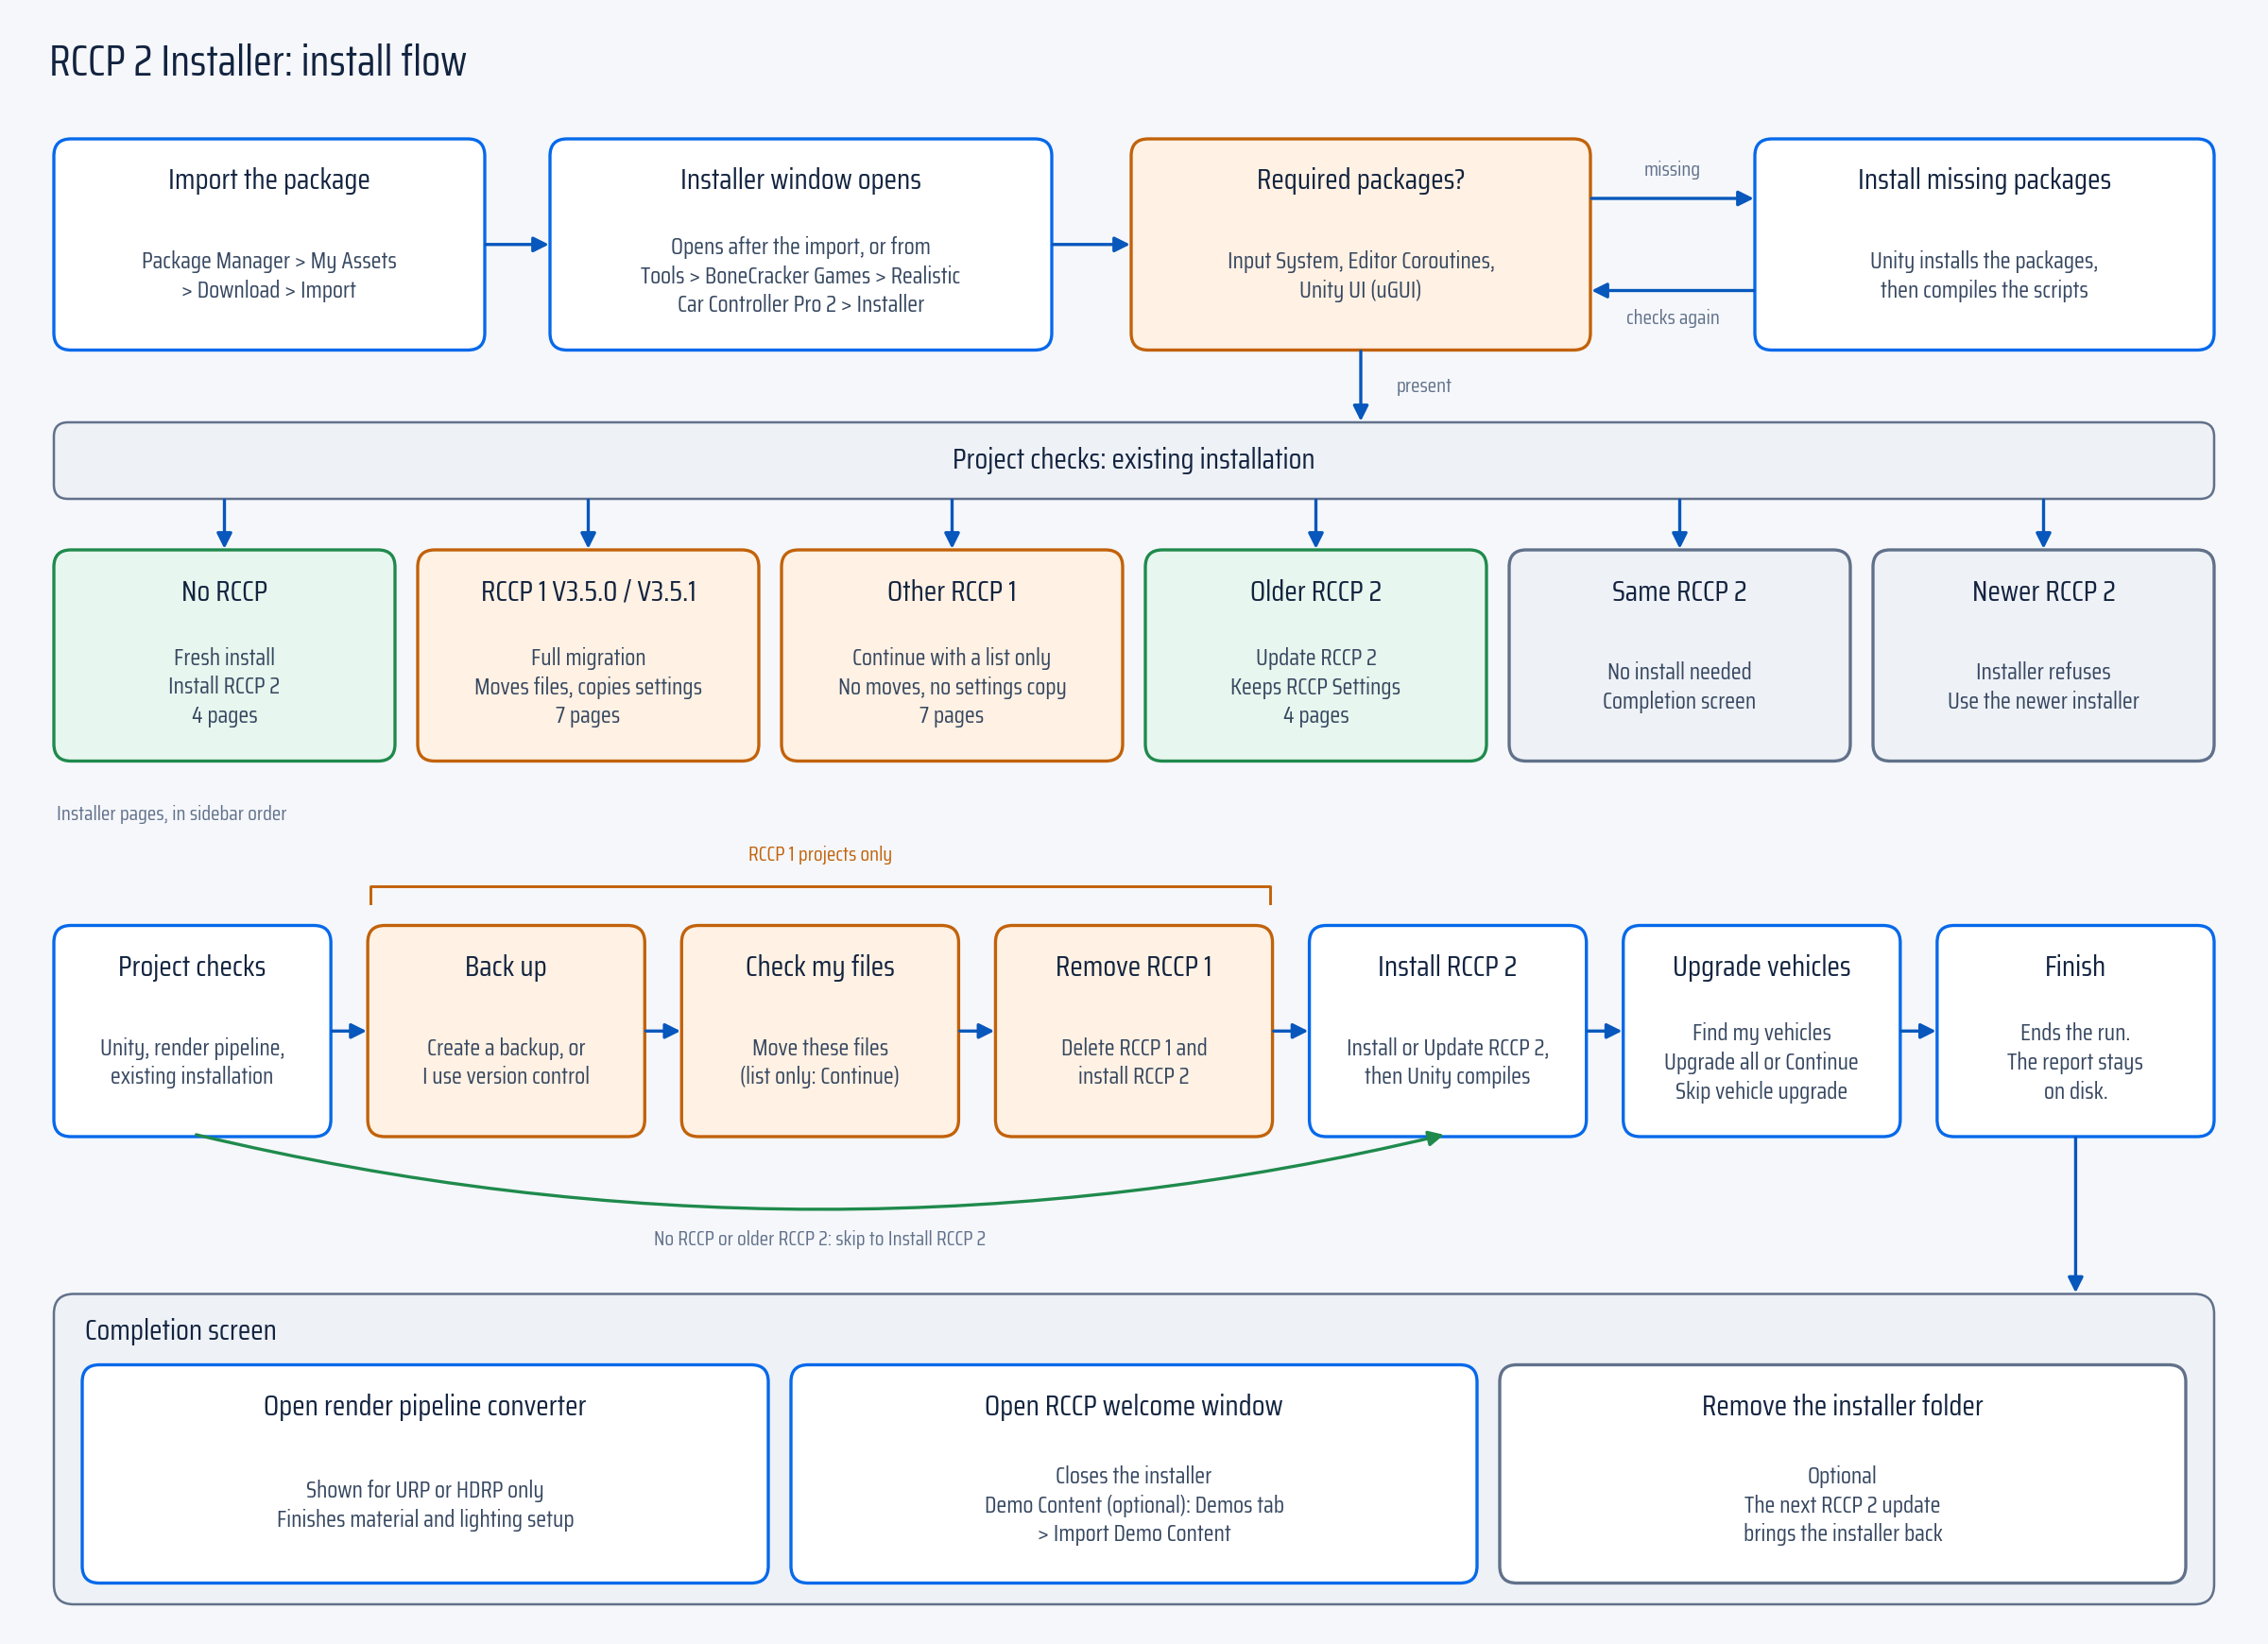
The installer shows one task on each page. When an action is successful, the installer goes to the next task. Use Back or the sidebar to see earlier pages. Later tasks stay locked until their requirements are complete. The compilation message stays visible while Unity compiles scripts. If the project uses URP or HDRP, the completion page also shows Open render pipeline converter.
Vehicle upgrades are optional. To go to Finish without a vehicle scan, click Skip vehicle upgrade. The vehicle scan shows its progress. If you cancel the scan, no vehicle files change. The scan skips missing or unreadable prefabs. The scan also skips prefabs with missing scripts or broken source references.
The scan includes inactive child objects.
On a fresh installation, RCCP scans the vehicle, trailer, detachable-part and prop prefabs in the project. Then RCCP assigns the necessary layers. This scan includes RCCP prefabs outside the product folder.
Check the installation
- Make sure that Assets/Realistic Car Controller Pro 2/ contains the scripts and scenes.
- Open Window > General > Console and look for red errors.
- Open Tools > BoneCracker Games > Realistic Car Controller Pro 2 > Welcome Window.
If the Console shows errors, correct the first error before you continue. For other installation problems, use Troubleshooting.
If Import TMP Essential Resources appears on the Welcome tab, click that button. TextMesh Pro needs these resources to show the dashboard text and the button text. If you use URP or HDRP, follow Render Pipelines before you drive.
Demo Content and add-ons
Before you import Demo Content, install AI Navigation (com.unity.ai.navigation) from Window > Package Manager.
The Compact City scenes use this package for navigation.
Demo import also checks for Newtonsoft Json (com.unity.nuget.newtonsoft-json).
If the import reports a missing package, install that package. Wait for compilation, then click Import Demo Content again.
The Demo Content addon contains four Compact City scenes: Day, Night, Day Mobile and Night Mobile. Import the addon from Welcome Window > Demos > Import Demo Content. Demo Content explains how to open and run the scenes. The prototype is included in the core package.
Other addons are optional. Install one when you need its feature, following its integration guide; some require a separate package first. The Welcome Window's Symbols tab lists addon scripting symbols, which tell Unity which integrations are installed. For driving keys, use Controls.
Demo Content installs in Assets/Realistic Car Controller Pro 2/Addons/Installed/Demo Content/.
The Models/Compact City and Models/Vehicles folders contain the source assets.
The Scenes folder contains the four Compact City demos: Day, Night, Day Mobile and Night Mobile.
The Scenes folder also contains the Open Chassis scene, RCCP_Scene_OpenChassis.
These scenes do not require Photon.
The Fonts and Shaders/Text folders contain shared fonts, materials and text shaders.
Open the scenes from Welcome Window > Demos.
Before you build the demos, click Add Demo Scenes to Build Settings.
Purchase verification
Purchase verification is optional. Verification locks no feature. RCCP 2 works the same before and after verification. Verification runs only in the Unity Editor. Verification adds nothing to your builds.
Until this PC is verified, the Welcome Window and the RCCP_CarController and RCCP_Settings Inspectors show Please verify your Asset Store purchase.
To verify your purchase:
- Click Verify Now.
- Copy your invoice or order number from your Asset Store orders.
- Paste the number into Invoice Number.
- Click Verify Purchase.
One invoice verifies a maximum of three devices. If this PC is already verified for RCCP 1, RCCP 2 shows as verified. RCCP 2 then needs no invoice.
Data that verification sends and stores
RCCP 2 registers the PC with www.bonecrackergames.com in the background when RCCP 2 loads. Registration does not need an invoice.
| When | What RCCP 2 sends |
|---|---|
| Registration | Two SHA-256 hashes of hardware identifiers, the Unity version, the RCCP version and a product ID |
| Verification | The invoice or order number and a product ID |
The server checks the number with the Unity Asset Store. The server stores the device hash, a device token and a SHA-256 hash of the number. The server also stores a masked copy of the number. The masked copy shows the first four and the last four digits. The server also stores the package name, quantity, price and purchase date from Unity.
The server also stores the IP address of each new registration attempt and each verification attempt. RCCP 2 does not send your scenes, scripts or project files.
License and third-party notices
The package root, Assets/Realistic Car Controller Pro 2/, contains these files:
License Agreement.txt: the license terms of RCCP 2.Third-Party Notices.txt: the third-party assets in RCCP 2 and their licenses.
Remove RCCP 2
RCCP 2 has no uninstall command.
CAUTION: Back up the project or commit the project to version control before you delete RCCP 2. Scenes and prefabs that use RCCP components lose their scripts.
- Delete the
Assets/Realistic Car Controller Pro 2/folder. - Open Edit > Project Settings > Player > Other Settings.
- In Scripting Define Symbols, remove
BCG_RCCPandBCG_RCCP2. - If the list contains
RCCP_DEMO,RCCP_PHOTONorRCCP_MIRROR, remove these symbols too.
To remove only the installer, click Remove the installer folder on the installer completion page. The next RCCP 2 update adds the installer again.
Next steps
Continue to Your First Drive. Open the prototype scene and drive the included vehicle.