Upgrade from RCCP 1
Use this page after the installation to examine the result and find your files. Before the installation, follow the RCCP 2 Installer window. Open that window from Tools > BoneCracker Games > Realistic Car Controller Pro 2 > Installer.
RCCP 2 replaces RCCP 1. A project can contain only one of these products.
Installer actions
The installer selects its steps from two versions: the installed version and the version in its payload.
| Control or message in the window | When you see this | Result |
|---|---|---|
| Move these files on Check my files | RCCP 1 V3.5.0 or V3.5.1 | Checks the matching file list, moves your files and copies eligible settings. |
| Continue with a list only | Another RCCP 1 version | Lists files. Moves no files and copies no settings. Removal and installation still replace RCCP 1. |
| Install RCCP 2 | No installed version | Installs RCCP 2 without the removal steps. |
| Update RCCP 2 | An older RCCP 2 version | Updates RCCP 2 and keeps current settings that the new version supports. |
| An installed-version message and Open RCCP welcome window | The installed version is the same as the payload | Shows the completion page. No installation is necessary. |
| A message that this installer has an older version | The installed RCCP 2 version is newer than the payload | Stops. The installer does not install RCCP 2. |
CAUTION: For a full migration, update RCCP 1 to V3.5.0 or V3.5.1 first. In list-only mode, the installer moves no files and copies no settings. Protect your files with a backup or version control before you continue.
For a full migration, the installer shows these pages one at a time:
| Step in the installer | What occurs |
|---|---|
| 1. Project checks | Read the project requirements. Then click Next. |
| 2. Back up | Create a backup copies the RCCP 1 folder and its metadata into RCCP1_Backup_<date> at the project root. Alternatively, select I use version control. After you select version control, click Next. |
| 3. Check my files | Check my files lists added, renamed and changed files. Move these files moves your added files, the referenced old demo files and the referenced retired core files. |
| 4. Remove RCCP 1 | Delete RCCP 1 and install RCCP 2 opens a confirmation dialog. Click Delete and install. The installer deletes the old product folder and starts the payload import. |
| 5. Install RCCP 2 | The installer imports the new product. After the scripts load, the installer copies the settings and the eligible changed files. If this step does not complete automatically, click Finish the install. |
| 6. Upgrade vehicles | Find my vehicles lists the assets that need an upgrade. The scan skips missing or unreadable prefabs. The scan also skips prefabs with missing scripts or broken source references. Other scene inspection errors stay visible. Upgrade all converts wheel data, native wheel settings and matching legacy ESP defaults. If no assets need an upgrade, click Continue. |
| 7. Finish | Finish completes the run. The report stays on disk. |
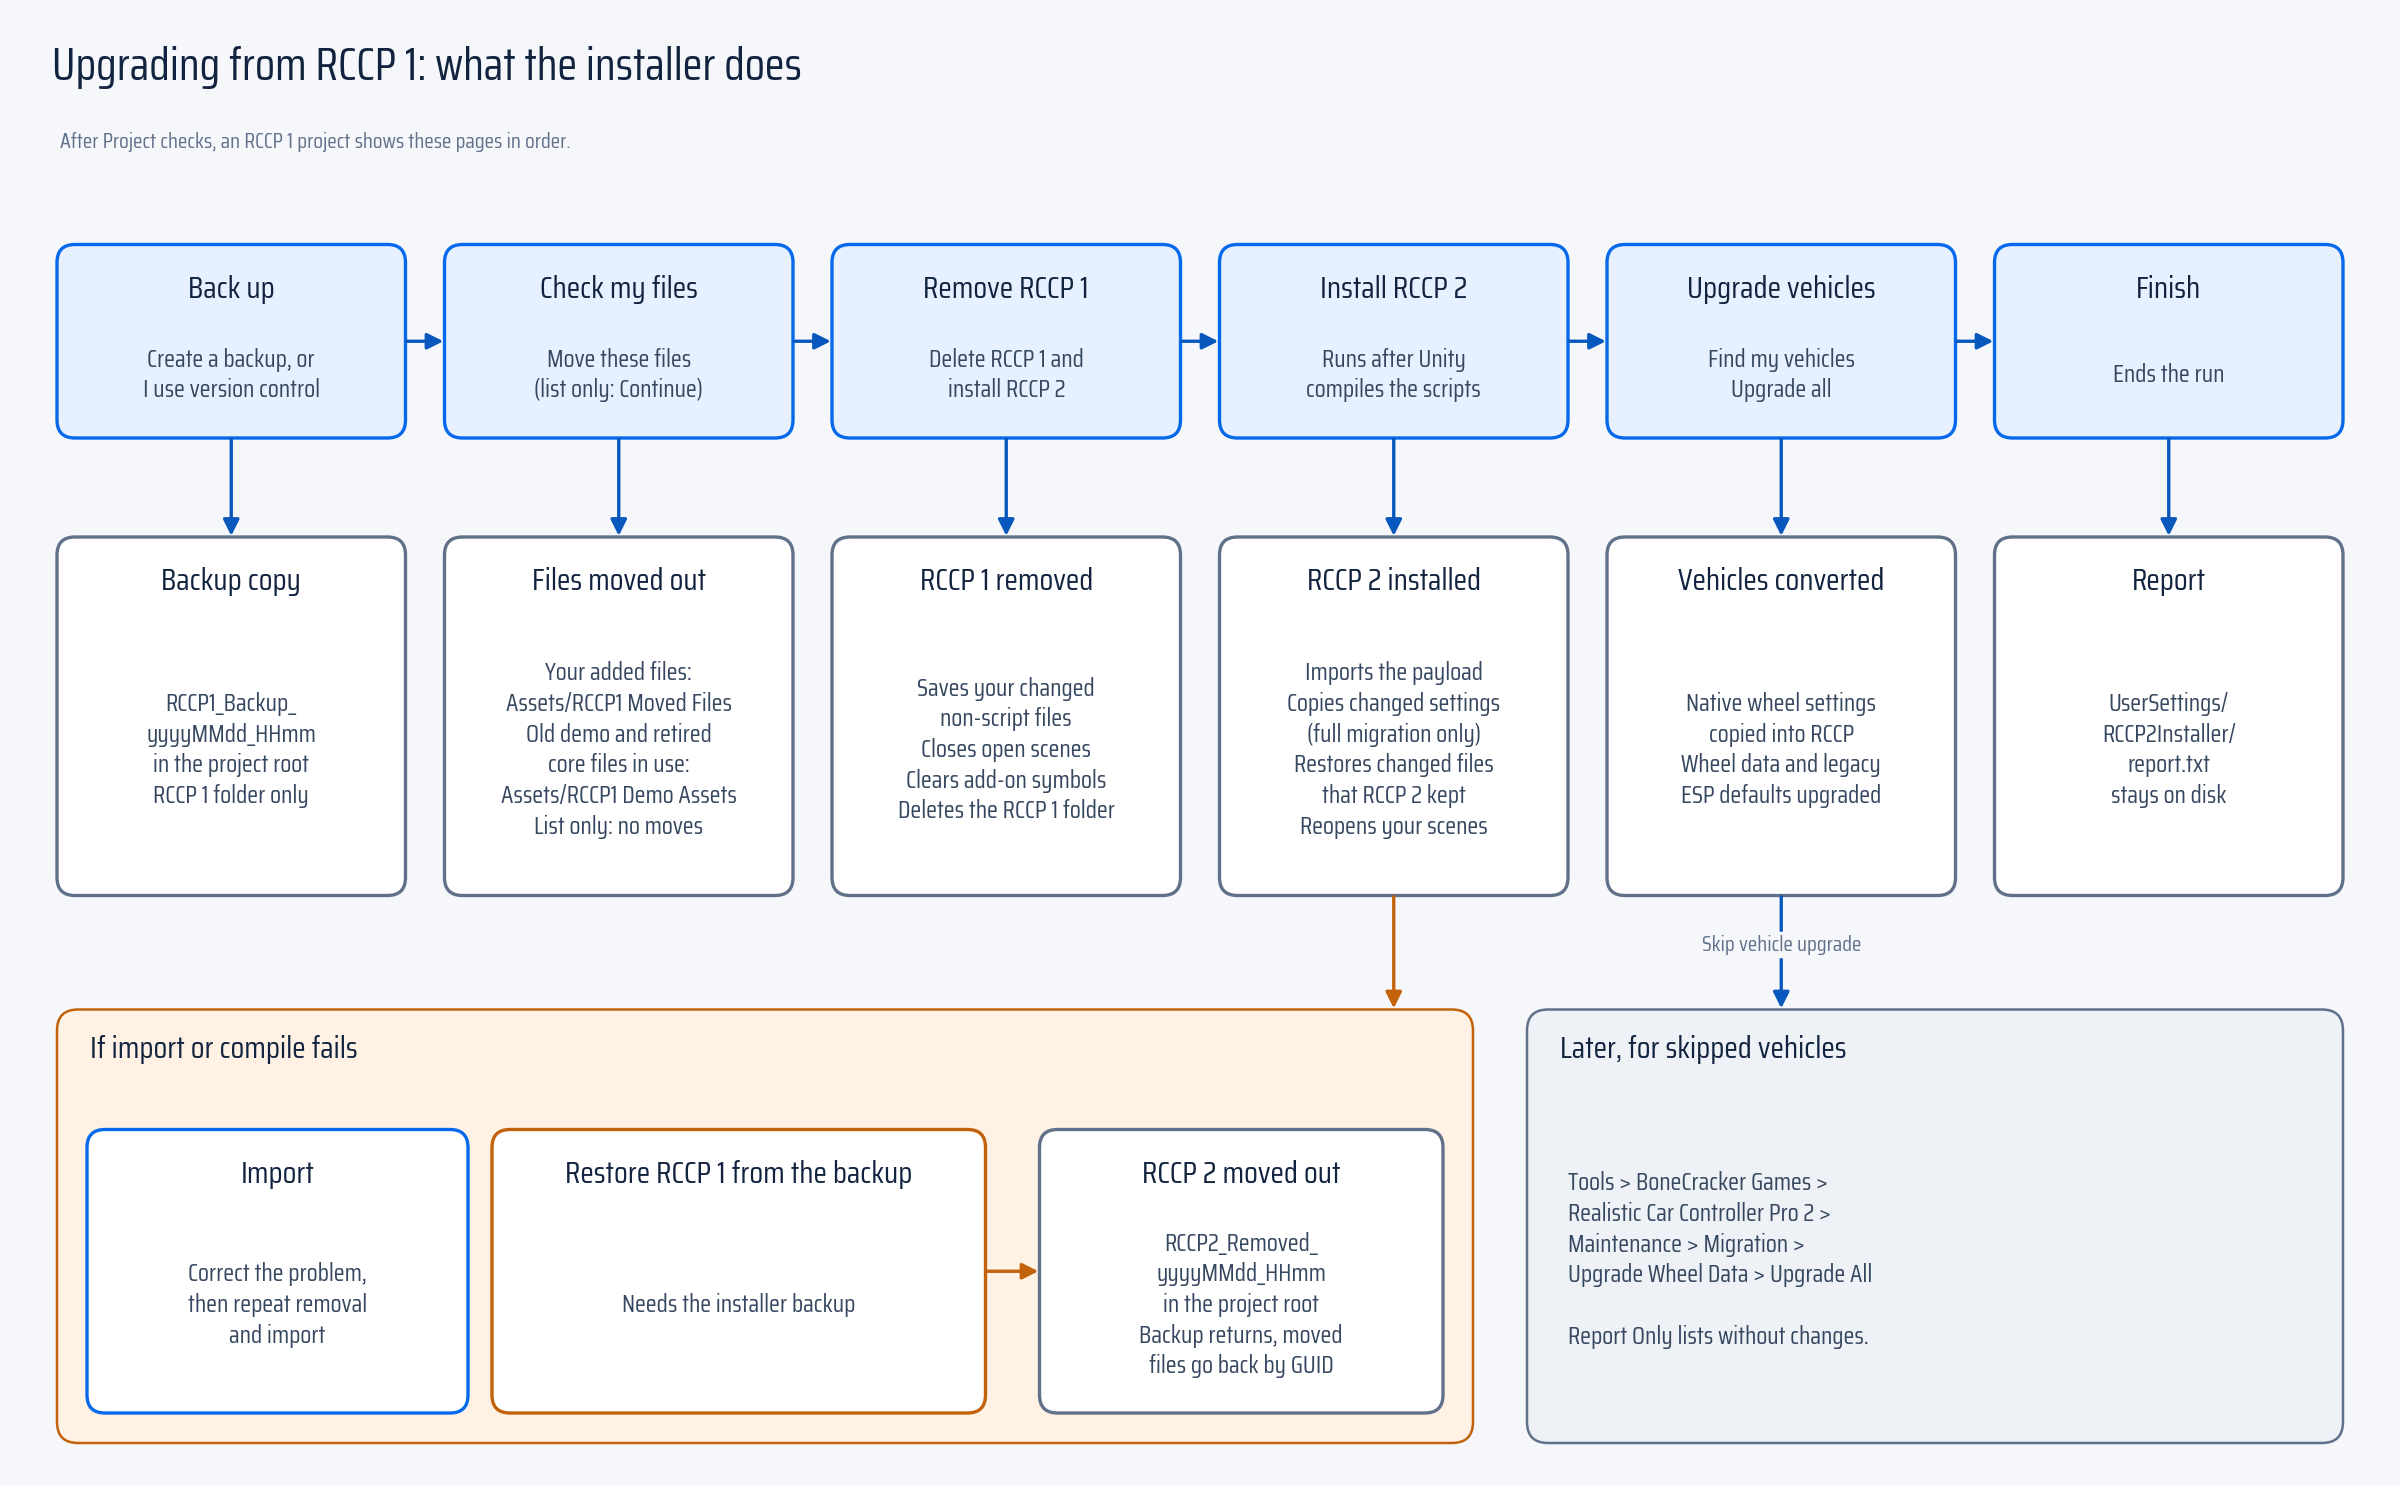
Fresh installations and RCCP 2 updates skip the three RCCP 1 preparation pages. Vehicle upgrades are optional. To go to Finish without a vehicle scan or a conversion, click Skip vehicle upgrade. The installation report records the skipped upgrade. Older vehicles can still need a conversion before you use them.
To convert later, open Tools > BoneCracker Games > Realistic Car Controller Pro 2 > Maintenance > Migration > Upgrade Wheel Data > Upgrade All. Report Only in the same menu lists the results and changes no files.
Use Back or the sidebar to see earlier pages. When an action is successful, the installer goes to the next task. After a script reload, the installer opens the unfinished task again.
The name of the backup folder contains the date and the time, for example RCCP1_Backup_yyyyMMdd_HHmm.
The backup contains the RCCP 1 folder, not the complete project.
Before the removal, save your open scenes and close Prefab Mode. The installer closes the scenes during the removal. After the installation, the installer opens the saved scene setup again.
During an RCCP 1 upgrade, the layer assignment scans only the RCCP 2 product folder. Your prefabs outside that folder keep their authored child layers.
In a full migration, the installer keeps the file identifiers when the installer moves your files:
| Location | What to find there |
|---|---|
Assets/RCCP1 Moved Files |
The files that you added inside the old product folder. |
Assets/RCCP1 Demo Assets |
Old demo files and retired core files that your assets use. |
UserSettings/RCCP2Installer/report.txt |
The file moves, settings decisions, changed files and vehicle upgrade results. |
Retired core files are RCCP 1 files whose identifiers are not in the RCCP 2 payload. The installer moves the referenced retired files with their metadata. Asset references keep the same identifiers. The file-check page lists the unused retired files. The removal page removes these files.
Retired-file preservation excludes Addons/, Scripts/Shaders/URP/, Scripts/Shaders/HDRP/, Prefabs/Profiles/HDRP/ and Resources/ in the old product folder.
Add-ons and pipeline assets use separate installers. Old Resources registries must not replace RCCP 2 registries.
For RCCP Settings, a full migration copies your changes only where RCCP 2 keeps the original default. If RCCP 2 changes a default, the installer keeps the new value and reports your previous value. The report also lists the settings that RCCP 2 does not have.
For an RCCP 2 update, the installer saves the complete RCCP Settings asset before the import. After the import, the installer restores the asset.
The restored asset keeps added behavior presets, their selected index, curves and asset references.
The snapshot stays in UserSettings/RCCP2Installer/changed/Resources/RCCP_Settings.asset until the next installation run starts.
Changed scripts do not replace RCCP 2 scripts. To compare your script changes, get the changed scripts from the backup or version control. The installer restores a changed non-script file only when the RCCP 2 copy is the same as the original RCCP 1 file. Read the report for files that stay in the backup or version control.
The installer stopped: Retry or Restore
Open the installer again and read the error on the current page.
RCCP 2 requires Input System (com.unity.inputsystem), Editor Coroutines (com.unity.editorcoroutines) and Unity UI (uGUI) (com.unity.ugui).
If the installer names a missing package, open Window > Package Manager.
Use + > Install package by name for each listed package ID.
Click Install for each package.
Wait until Unity finishes importing and compiling.
Return to the installer to check the packages again.
If the removal or the import is not complete, the window shows these recovery controls:
| Control | When to use the control |
|---|---|
| Import | Correct the reported problem. Then do the removal and the import again. This control needs the installer payload. |
| Restore RCCP 1 from the backup | Go back to RCCP 1 with the backup that the installer created. This control needs that backup. |
If the compilation fails, correct the Console errors. The installation continues after the scripts compile. If you use version control instead of the installer backup, restore the project with version control.
Restore moves the RCCP 2 files out of Assets into RCCP2_Removed_<date> at the project root. Restore does not move the installer.
Restore puts back the RCCP 1 backup. Then Restore moves your relocated files back by their identifiers.
If Restore reports conflicts, correct the conflicts. Then click Restore RCCP 1 from the backup again.
CAUTION: Do not delete
UserSettings/RCCP2Installer/. That folder contains the saved run, the changed files, the settings and the report.
Expand Installation report on the current page to read the report. If the saved run is missing or cannot be read, the installer stops. This stop protects the records. If you cannot recover the saved run, restore the project from your backup or version control.
The vehicle drives differently after the upgrade
RCCP 2 uses a new wheel simulation. The conversion changes the old tire curves into calibrated grip and estimated sliding behavior. The converted settings do not give the same driving behavior as RCCP 1.
Vehicle upgrades also update ESP when all four settings are exactly equal to the RCCP 1 defaults:
| Setting | RCCP 1 default | RCCP 2 value |
|---|---|---|
| Expected understeer | 0.01 |
0.002 |
| Expected road grip | 0.85 |
1 |
| ESP strength | 0.5 |
0.7 |
| ESP brake smoothing | 2 |
10 |
The tool does not change other calibration values that you set directly. Explicit prefab overrides stay. Fields without overrides follow the upgraded source prefab. If the report asks you to upgrade the source prefab first, upgrade the source prefab first. The ESP check also runs when the wheels already use current data.
- Before the upgrade, record the acceleration, braking and cornering results of your vehicle in RCCP 1.
- Use the same route, surface, inputs and vehicle configuration for the RCCP 2 comparison.
- Read old wheel data before you change wheel settings.
- Do these driving tests again in RCCP 2.
- Change one setting at a time in the tuning order of the wheel guide.
- Do the test again after each change. Compare the result with your original results.
If you did not record RCCP 1 results, open a copy of the project from before the upgrade. Use a version control revision or a full project backup. Record the RCCP 1 results in that copy.
If the vehicle uses a preset, read A behavior preset changed my tire values. In RCCP 2, the friction curves of a preset can set the tire values when Play Mode starts.
Script compatibility
RCCP API types now use the BoneCrackerGames namespace. Add using BoneCrackerGames; at the top of each script that calls RCCP.
The class names stay the same. This using directive corrects namespace lookup errors. The directive does not replace the other API migration steps below.
If your script uses an .asmdef, read the assembly definition guidance.
The RCCP class keeps its public members.
Read changed wheel access and obsolete wheel settings.
Moved menus and folders
| Before | After |
|---|---|
| Tools > BoneCracker Games > Realistic Car Controller Pro | Tools > BoneCracker Games > Realistic Car Controller Pro 2 |
| The RCCP 1 product folder | Assets/Realistic Car Controller Pro 2/ |
| The files that you added, and the old demo files and retired core files that your assets use | The preserved folders in Installer actions. |
RCCP 1 replay clips play in RCCP 2 without conversion. The director matches each clip vehicle by name. The director first searches the registered scene vehicles, then the active player vehicle. If neither matches, the director searches its Clip Vehicle Prefabs list. The director can spawn the missing vehicle from a matching prefab. If no vehicles match, the clip does not start.
For saved clips, continue to Replay.
Unity 6.6 shows a Missing signature window
Unity 6.6 checks the signature of each imported .unitypackage file. The RCCP 2 payload and the add-on packages have no signature.
Unity shows the Missing signature window during the import. Click Reimport Anyway to continue the installation.
After the upgrade: checklist
- Keep the backup or version control revision and the installer report.
- Read the moved files, the settings decisions and the changed scripts in the report.
- Make sure that your scenes and vehicle prefabs have no missing scripts.
- Convert skipped vehicles with the old wheel data procedure.
- Compare custom wheel code with the wheel API table.
- Compare and tune your vehicle with the steps in The vehicle drives differently after the upgrade.
Read next
Continue to Wheels and tires for wheel settings.