UI and HUD
Goal: add the RCCP dashboard to your scene and examine its readouts. Then change its appearance.
UI means user interface: the buttons and menus on the screen. HUD means heads-up display: the speed, gear and other data that show while you drive. A Unity Canvas holds these elements.
Before you start
Use a scene with a working player vehicle and camera. Complete Installation, including the TextMesh Pro resources for text. Stop Play Mode before you change the scene.
1. Add the interface
- Open Tools > BoneCracker Games > Realistic Car Controller Pro 2 > Add to Scene > UI Canvas.
- Save the scene.
- Click Play and drive the player vehicle.
Check: speed, engine revs and gear follow the vehicle. RCCP connects the included canvas to the registered player vehicle through its scene manager. If the scene already has an RCCP canvas, the menu shows a message and selects that canvas. The menu does not create a second canvas.
If the dashboard follows the wrong vehicle, use Scenes and Spawning to select the player vehicle.
2. Read the dashboard
The included canvas starts with the compact Telemetry style. A saved gauge selection replaces this style. The top-left panel shows RPM, speed, gear and assist activity. A separate panel shows fuel and damage. The damage value is 0% for a vehicle without damage.
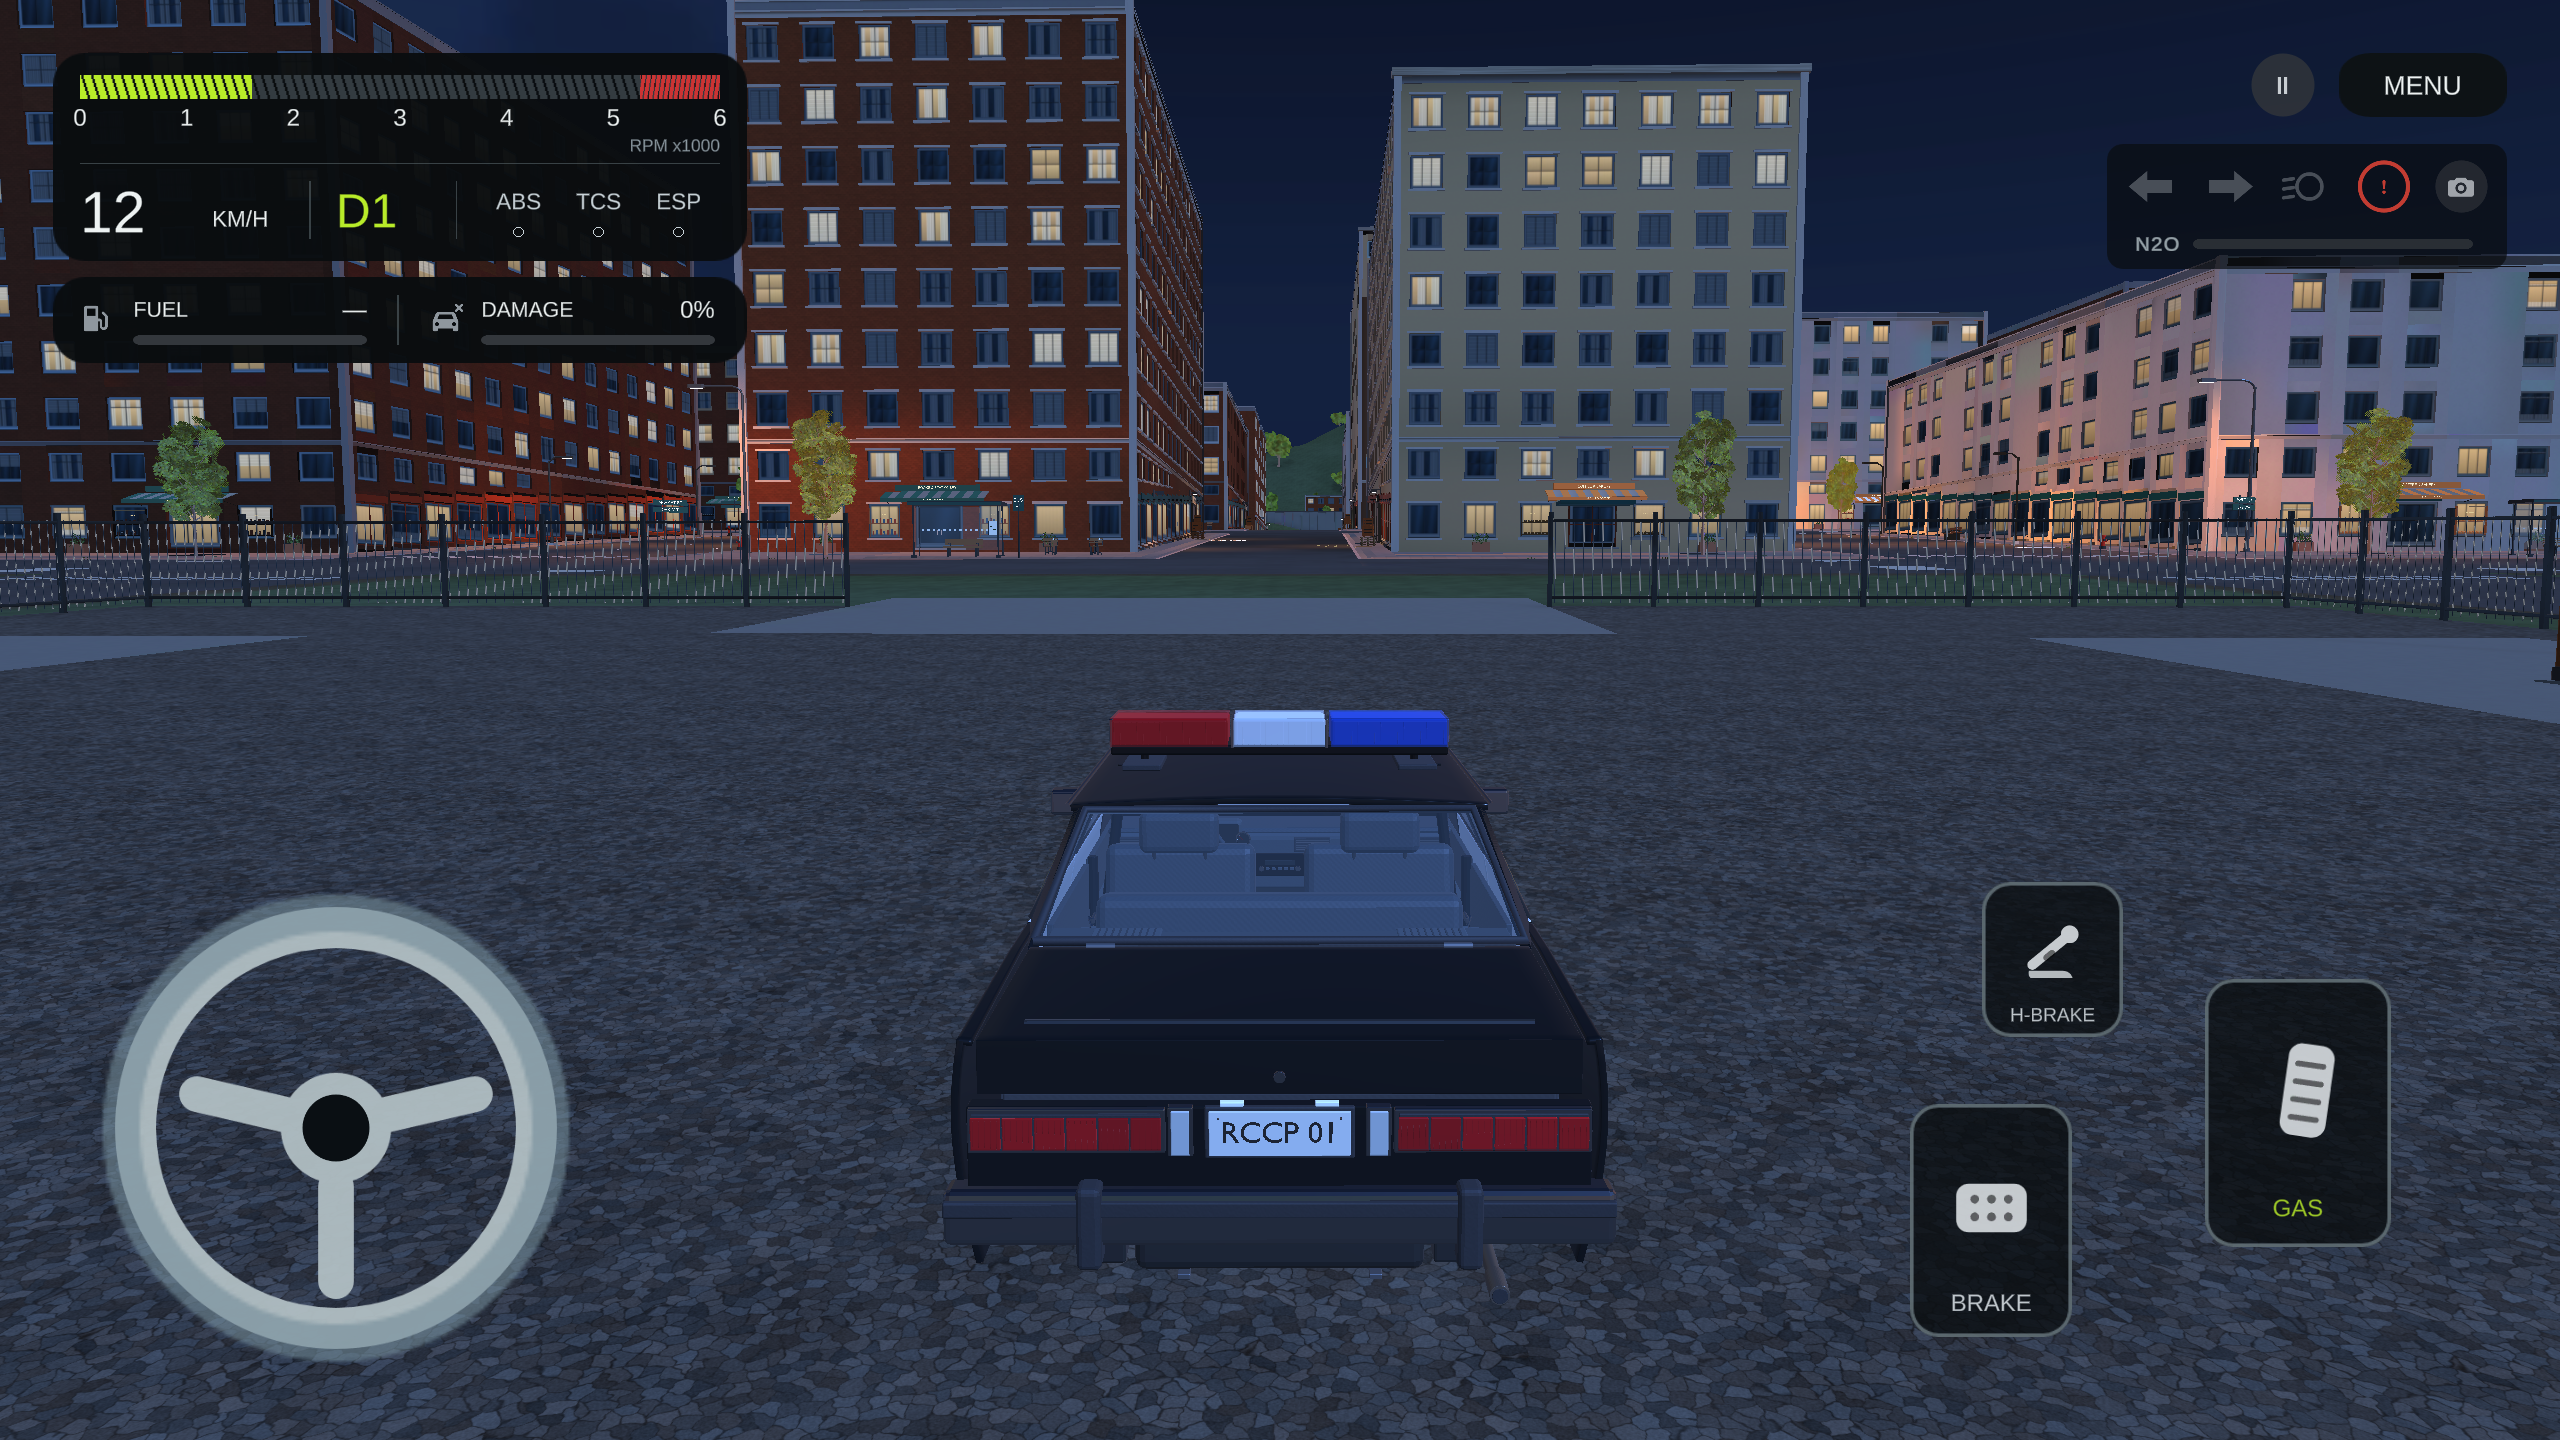
In the Telemetry style, a dim assist label means that the system is off or not available. An outlined dot means that the system is ready. A bright filled dot means that the system is in operation. The RPM scale follows the active vehicle. The scale is not fixed at 8000 RPM.
Use the compact upper-right panel for the indicators, headlights, hazard lights and camera. Select Detach trailer to release the attached trailer. Select Rig view to hide or show the player vehicle's body and expose its mechanical rig. Each button stays disabled when its action is unavailable.
To enable or disable ABS, ESP and TCS, open Settings. The compact gauge shows their activity.
The annotated image below shows the Radial style.
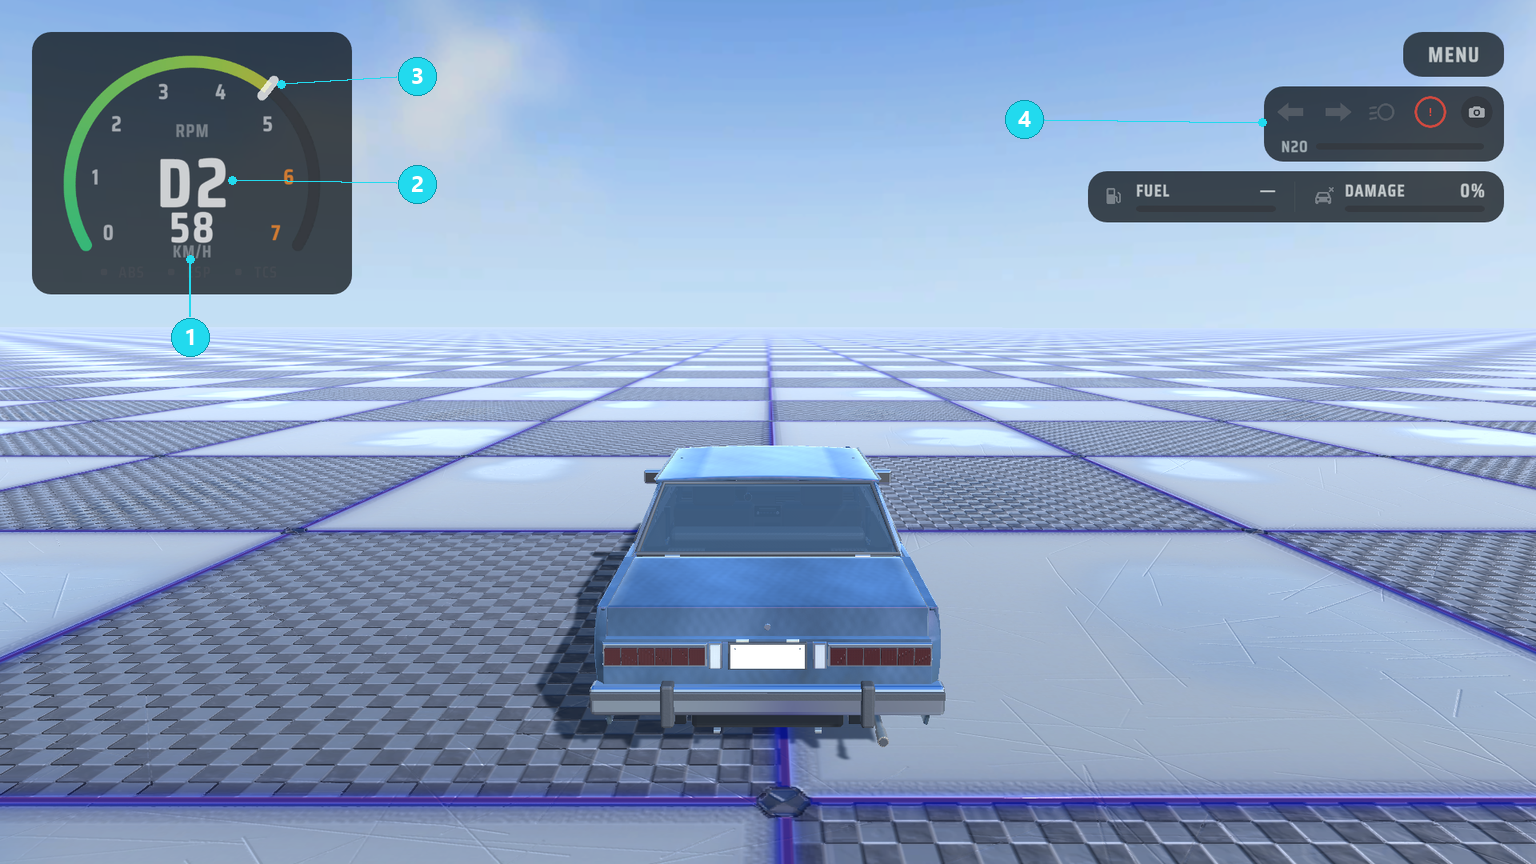
Open the screenshot at full size. In this example, 1 shows 58 km/h and 2 shows D2, a forward driving gear. 3 shows the rev counter. 4 contains the indicator, headlight, hazard and camera buttons and the nitrous bar. The fuel and damage panel is below it.
| Readout | What it tells you |
|---|---|
| Speed and unit | The speed of the vehicle. Show speed in mph in RCCP Settings changes the display unit. |
| Rev counter | Engine speed in RPM (revolutions per minute). |
| Gear | The selected gear, including neutral and reverse. The available gear buttons change with the transmission. |
| ABS, ESP and TCS | Flash when an assist is in operation. Assists and Presets describes each assist. |
| Lamp icons | The current headlight and indicator states. |
| Damage | Overall vehicle damage. |
| Fuel and nitrous | Remaining amounts, if the vehicle has these features. |
| Record and replay indicators | Whether recording or playback is in progress. |
If the fuel or damage module is missing or disabled, its percentage field shows an em dash. Without a NOS module, the nitrous bar is empty. In your own canvas, you can hide the widgets that you do not use.
The damage card below the dashboard shows separate front, rear, left and right body areas. A damaged area changes from yellow to orange and red. A warning next to a wheel shows a deflated tire.
If the vehicle has an enabled Damage Mechanics component, HEAT shows the normalized engine heat. FIRE shows only during an engine fire. Without this component, the thermometer and heat row stay hidden.
In the default display mode, the card shows after a qualifying impact or an increase in damage. The card fades after five seconds, unless a critical condition continues. Deflated tires, engine fire and critical heat keep the card visible.
Settings panel
Select Vehicle & Driving, Controls or Options in the category menu. Only the selected page is visible.
On wide screens, the categories show on the left. On narrow screens, the categories show above the settings. If necessary, scroll the selected page. The panel stays in the safe area of the device. The close button and the session commands stay outside the scroll area.
Use Vehicle & Driving to select a vehicle, control its engine and change its driving assists. Controls contains input rebinding and touch-layout commands. Options contains the graphics, audio and interface settings. Customization and Photo Mode are also available next to the categories.
In Options, use Quality to select the graphics quality. Use Sound to mute or unmute the sound. Master Volume changes the session volume and does not change the mute state. Gauge Style and UI Theme change the dashboard and menu appearance.
Use Resume or X to close the panel. Quit and Restart open confirmation panels.
For a custom canvas, the optional Volume Slider and Volume Label fields are on RCCP UI Set Audio. Set the slider range to 0–1. Connect its dynamic On Value Changed (Single) event to SetVolume.
For a sound switch, assign Audio Toggle. Connect On Value Changed (Boolean) to SetAudioEnabled. The existing audio dropdown continues to work.
Compact City test-area map
In Compact City, select TEST AREAS or push F6 to open the location map. Select an area. Then select SET DESTINATION to drive there, or TRAVEL HERE to move to a checked arrival position.
To close the map, use X, F6 or Escape. To remove the driving target, click X on the active destination card. When the map closes, it restores the previous pause and input state.
Move TestPanelButton under RCCP_Canvas > Dashboard > HUDSafeArea to change the button position. Assign the button to Test Panel Button on Compact City Navigation UI. The Compact City scenes include this reference. Other scenes keep the button hidden. Refer to Demo content for the locations and travel checks.
3. Select a gauge style
Open Settings > Options > Gauge Style and select a style:
| Style | Appearance |
|---|---|
| Radial | Circular arc. |
| Analog | Traditional dial and needle. |
| Digital | Bar and numbers. |
| Minimal | Compact readout. |
| Telemetry | Compact horizontal RPM scale, speed, gear and assist states. |
Check: the gauge changes style and continues to follow the engine. RCCP saves the selected style for the next session.
On the RCCP UI Modern Dashboard component, Auto Max RPM makes the dial follow the engine Max RPM of the current vehicle. If Auto Max RPM is off, Max RPM sets the limit of the dial. If the needle and the printed numbers do not agree, examine these settings. Radial Ticks and Analog Ticks usually find the label objects automatically. If you move these labels to a different structure, assign them manually.
4. Save your own canvas
- Stop Play Mode.
- Make a separate copy of the canvas prefab in your own project folder. A prefab is a reusable saved object.
- Edit the graphics and layout of the copy. Keep the existing components and their references.
- Open Tools > BoneCracker Games > Realistic Car Controller Pro 2 > Settings > Global Settings.
- Assign your copy to Dashboard canvas.
- In a new scene, use Add to Scene > UI Canvas to add your version.
- If necessary, replace the canvases in existing scenes manually.
Check: a new canvas from the menu uses your copy. This setting selects the canvas that the menu creates. The setting does not replace canvases that are already in scenes.
The interface is blank or incomplete
| What you see | What to examine |
|---|---|
| Missing text | Import TMP Essential Resources as described in Installation. |
| White or missing graphics | Examine the Sprite Atlas setting below. |
| Readouts do not follow a vehicle | Examine Active Player Vehicle on the scene manager. |
| Settings do not open during touch-layout editing | Close the layout editor with Done first. |
| An old customized canvas does not have the new features | Compare it with the current RCCP_Canvas prefab. Refer to the older-canvas notes below. |
Set the Sprite Atlas mode
The modern UI uses a Sprite Atlas V2. Unity packs the small UI images into one shared texture. If the project uses an older atlas mode, these graphics can be missing.
CAUTION: The Sprite Atlas mode applies to the whole project. If you use older atlases in other places, examine their conversion too.
- Stop Play Mode.
- Open Edit > Project Settings > Editor.
- Under Sprite Atlas, set Mode to Sprite Atlas V2 - Enabled.
- Wait until Unity completes the reimport.
- Test the canvas again.
Missing graphics can have other causes. Also examine the sprite reference on the related Image component.
Optional: hide driving readouts when no vehicle is usable
Enable Disable UI When No Player Vehicle on RCCP_SceneManager. The modern dashboard then hides its Hud Roots when the player vehicle is missing, inactive, disabled or not controllable. The mobile controls use the same condition. The menus stay available.
Put your own driving readouts in Hud Roots on the modern dashboard. Do not put the settings and customization panel roots in that list. This setting does not disable the full Canvas object. A custom or older canvas needs its own visibility logic.
Photo mode, replay and touch-layout editing can also hide the HUD. When these views close, the dashboard restores the captured visibility.
Optional: make a UI theme
A theme replaces sprites, the images of the UI graphics. A theme does not change the layout or the button behavior.
RCCP includes two themes, Carbon and Motorsport, in Textures/UI/ModernUI/Themes/ under the RCCP folder. The Themes list on the included canvas contains the two themes.
- Create Assets > Create > BoneCracker Games > Realistic Car Controller Pro 2 > UI > UI Theme.
- Set Theme Name. This name is only for reference. The player sees the option text of the theme dropdown.
- Prepare your replacement sprites. To keep the same stretch behavior, keep the original dimensions and border settings.
- Add Sprite Pairs. Original must be the exact sprite that the canvas uses. Themed is its replacement.
- Add the theme to Themes on the RCCP UI Theme Applier of the canvas.
- If you use a theme dropdown, add the related option.
Check: select your theme, then select the default again. Sprites that are not in the list keep their original appearance. If nothing changes, compare the Original reference with the sprite on the related Image component.
Theme selection 0 is the default appearance. Your themes start at 1. Saved selections use these positions. Add new themes at the end of the list and do not change the order. Each change restores the original sprites before it applies the replacements, so themes do not add to each other.
Optional: keep an older canvas
The current RCCP_Canvas is in Prefabs/UI/ under the RCCP folder. RCCP 2 does not include the older RCCP_Canvas_Old.prefab. Changes to the current prefab do not go into your older copies automatically.
To keep an older layout, assign your customized copy to Dashboard canvas. For gauge styles, themes and movable touch controls, copy the current prefab and apply your changes to that copy. The modern dashboard inherits RCCP_UIManager, so integrations can continue to use that base type.
Next step
- Mobile — enable touch controls and arrange them.
- Customization — connect paint and upgrade options.
- Replay and Recording — add the replay interface.
- Field Reference — individual UI settings.