Cameras
Goal: make the camera follow your vehicle, adjust the chase view, and add a hood or wheel view.
Before you start
Use a vehicle that drives. Stop Play Mode before you edit the scene.
RCCP uses one scene camera for all views. A camera mount is a small object on the vehicle. The mount marks the position of a hood or wheel view. The scene camera follows the mount in world space and stays outside the vehicle hierarchy.
1. Check the scene camera
- Find the RCCP camera in the Hierarchy. If you use the prototype scene, use its camera.
- If your scene has no RCCP camera, select Tools > BoneCracker Games > Realistic Car Controller Pro 2 > Add to Scene > RCCP Camera.
- Click Play, click in the Game view and drive.
Check: the view follows the player vehicle. If the view follows no vehicle or the wrong vehicle, correct the player registration. Refer to Scenes and Spawning.
In the normal player-spawning workflow, RCCP sets Vehicle to follow for you. Do not change Camera pivot. The camera system controls this field.
2. Frame the chase camera
- Stop Play Mode and select the RCCP camera.
- Find the Chase camera (TPS) section in its Inspector. In the TPS view, the camera follows behind the vehicle.
- For manual framing, disable Frame the car automatically.
- Adjust Distance behind the car and Height above the car.
- Click Play. Test the view on a straight road and in a corner.
Check: the road ahead is visible and the vehicle stays in the lower part of the view. If the distance changes back when the camera gets the vehicle, automatic framing is still enabled.
Use automatic framing when the player can change between vehicles of different sizes. Automatic framing measures each vehicle and calculates a distance and a height for it. The distance is 2.7825 times the maximum bounds extent. The height starts at 0.66 times that extent. If necessary, automatic framing increases the height to put the base camera position at least 0.75 m above the vehicle bounds. The calculation uses the selected follow position.
Automatic framing tries to keep a margin of two degrees below the vehicle. On level ground, it limits the look-down angle to keep the horizon below the top quarter of the view. If the road view needs a smaller angle, the lower edge of the vehicle can be out of the view. Distance, height and angle change together during the transition.
For a truck with a trailer, the calculation uses the higher bounds top and the shared follow position of the two. Position offsets, vehicle pitch, acceleration effects and obstacle avoidance can change the final camera position. Manual trailer camera settings keep their distance and height.
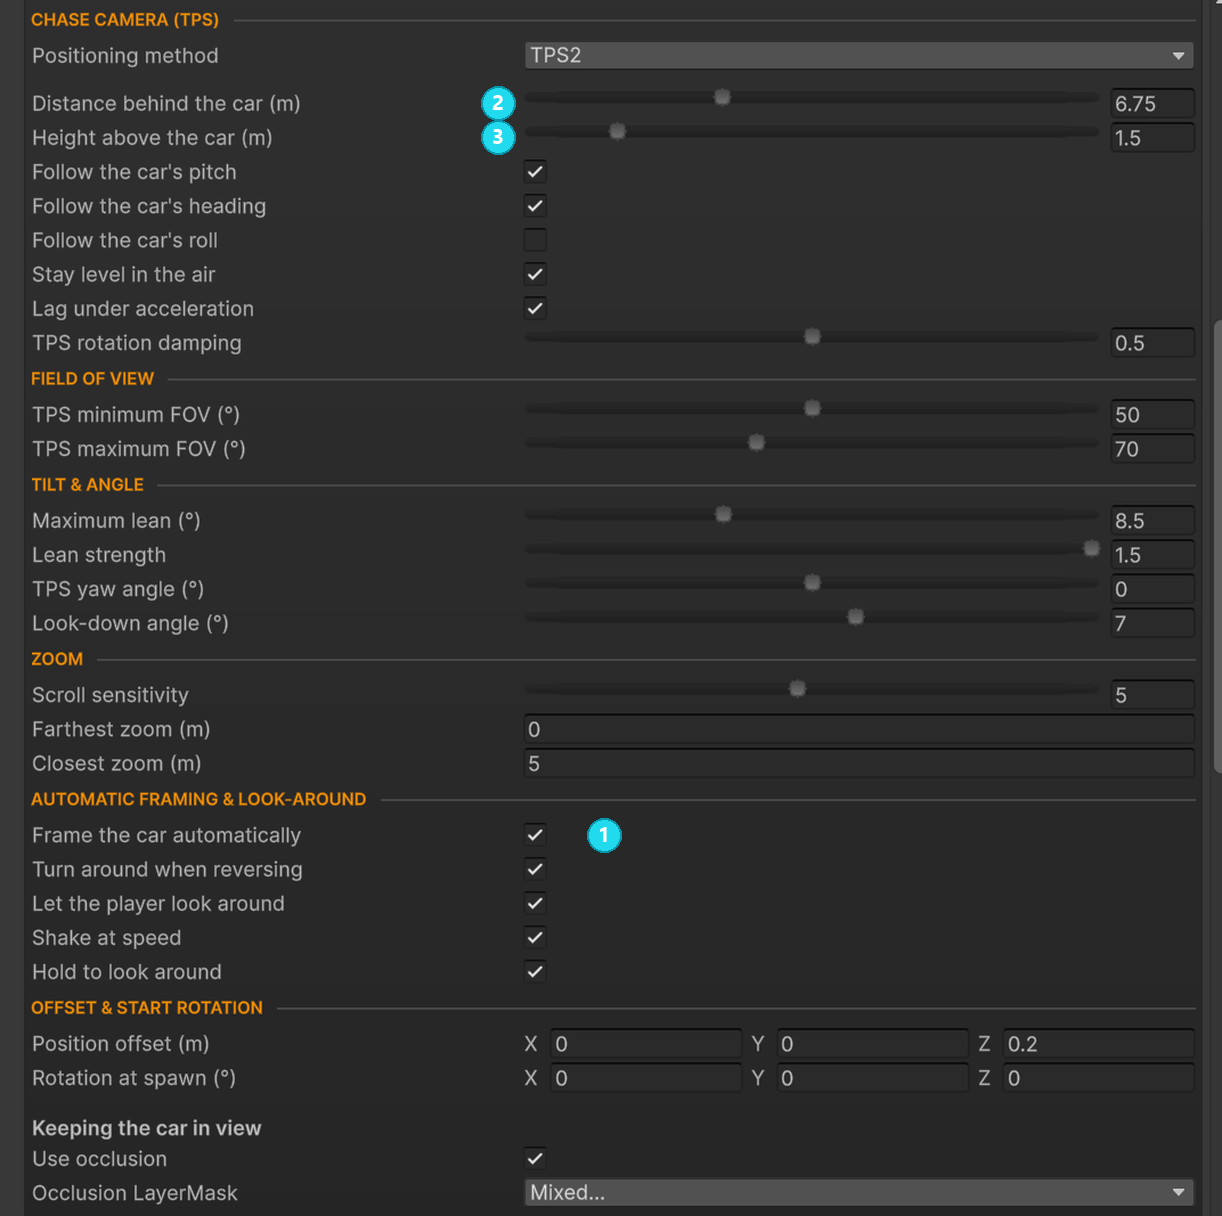
Open the screenshot at full size. Scroll through the chase settings to find 1 Frame the car automatically. In the example, this setting is enabled. For manual framing, disable it. Then adjust 2 Distance and 3 Height near the top. The values in the screenshot are for this example vehicle only.
Chase camera settings
| Setting | Use it to |
|---|---|
| Look-down angle | Aim the view farther down to the road |
| Position offset | Move the framing to the side, up or forward |
| TPS rotation damping | Change how quickly the view turns back behind the vehicle |
| Aim at the middle of the car | Frame the body, not a model origin at an unusual position |
| TPS minimum FOV / TPS maximum FOV | Control how much the field of view increases with speed |
The field of view is the width of the area that the camera sees. If the standstill value and the top-speed value are equal, the field of view does not change with speed.
For a calmer view, decrease Maximum lean, disable Shake at speed, or change the settings that make the camera follow the pitch and roll of the vehicle. Test one change at a time.
3. Add a hood or wheel view
- Stop Play Mode and select the vehicle root.
- In Presentation, add or open Cameras.
- Click Add Hood / Cockpit Camera or Add Wheel Camera.
- Select the new mount. Use the Move and Rotate tools of the Scene view to put it in position. For a cockpit view, put the mount near the eye position of the driver and point it forward.
- Select the RCCP camera of the scene. In the matching view section, enable Include in the camera cycle.
- Click Play and click in the Game view. Press C to change the view.
Check: the new view appears and looks along the road. If the view is inside a body panel, stop Play Mode and move the mount.
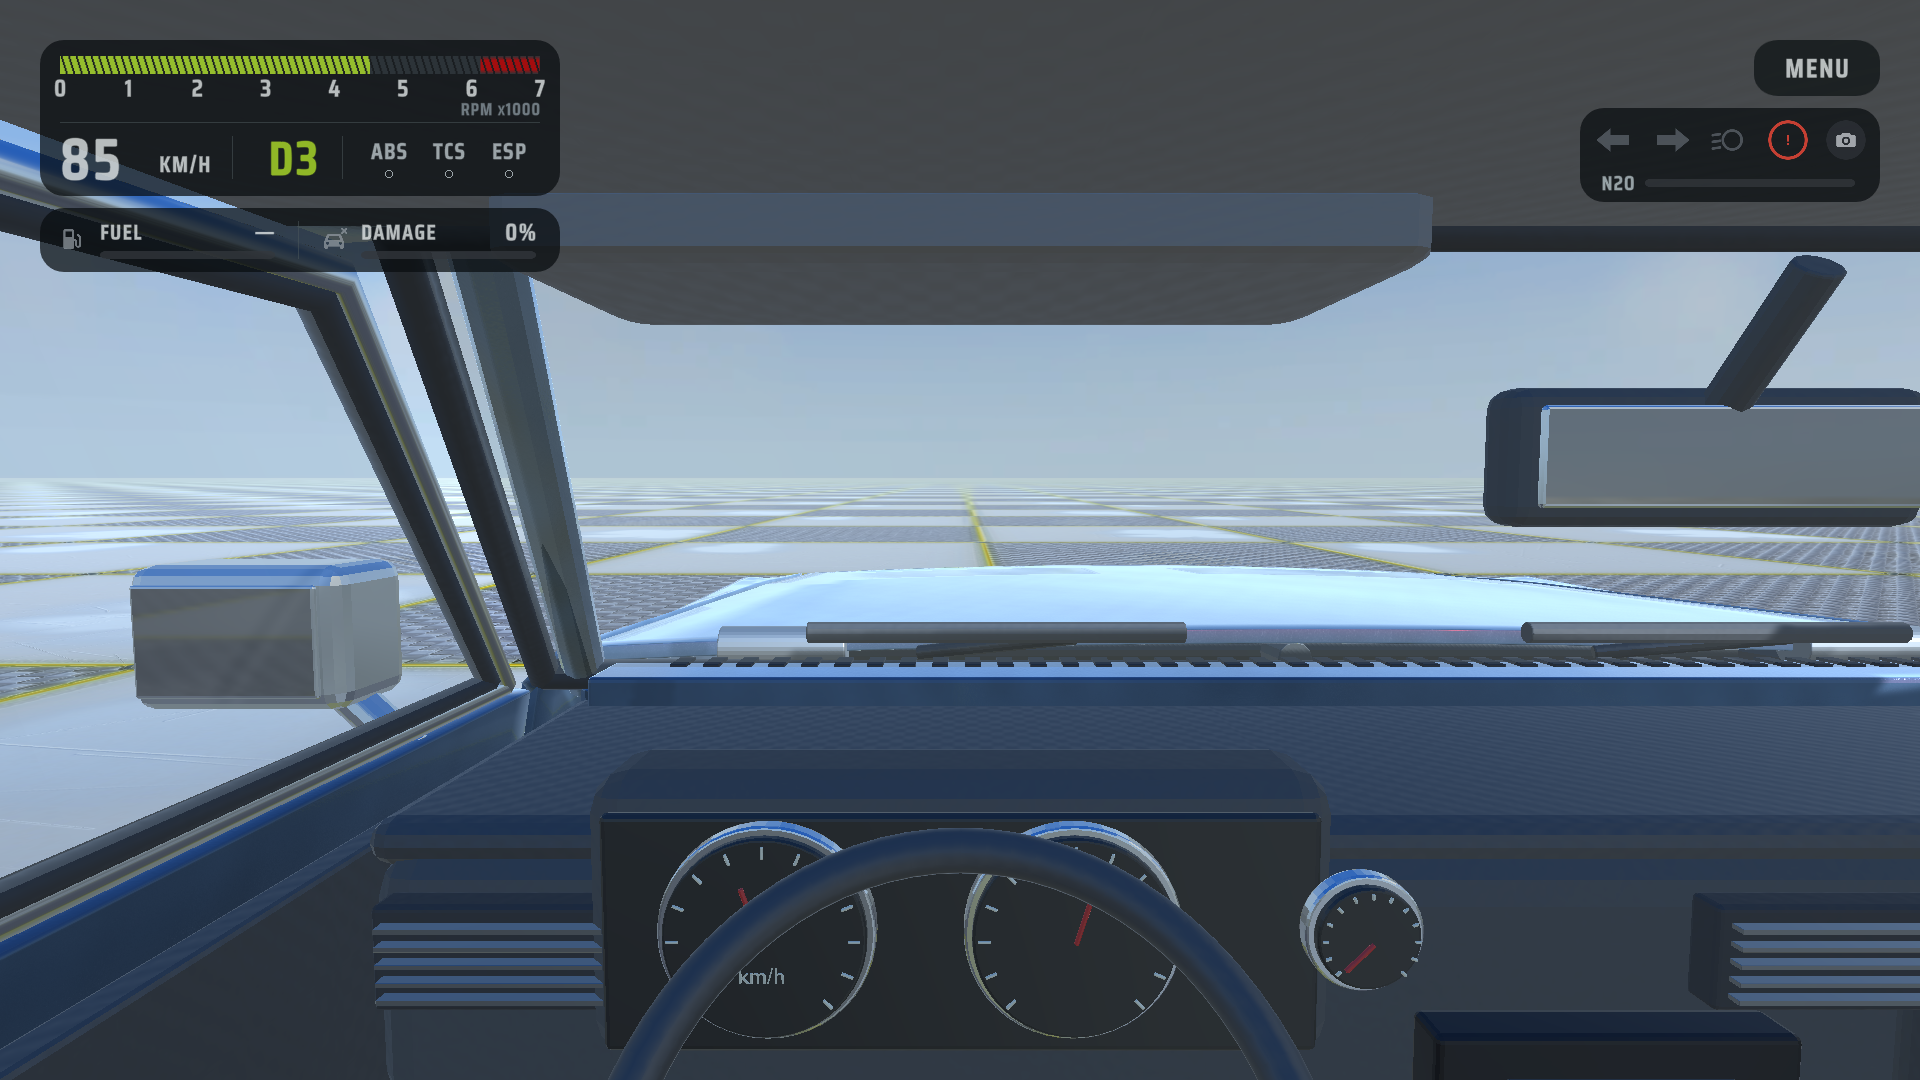
The hood view uses the position and the rotation of the mount. Tilt a cockpit mount down a small amount to show the instruments. Then examine the view with the steering wheel straight and turned. RCCP applies look-around and hood motion after this base view.
Optional hood motion
Hood motion adds small movements from acceleration, braking and cornering. The RCCP Camera prefab has hood motion enabled. A camera that is not an instance of that prefab has hood motion disabled.
On the scene camera, open Hood camera (FPS) > Hood motion. To use the shared settings, enable Enabled.
To change the settings for one vehicle, select its RCCP Hood Camera mount and enable Override Hood Motion. The mount settings then replace the full shared group.
To disable motion for one vehicle, enable its override. Then disable Enabled in its Hood Motion group.
Travel values are in meters. Pitch values and roll values are in degrees. The motion reaches each limit at 1 g (9.81 meters per second squared).
| Response at 1 g | Maximum travel | Maximum rotation |
|---|---|---|
| Acceleration | 0.03 m backward | 1 degree upward pitch |
| Braking | 0.04 m forward | 1.5 degrees downward pitch |
| Cornering | 0.02 m outward | 1 degree outward roll |
The response follows the measured acceleration, also during a long corner. Steering while the vehicle is stationary causes no cornering motion. Acceleration in reverse moves the camera forward.
A shorter response time makes the movement faster. The default response time is 0.12 seconds. The movement becomes stable in approximately 0.6 seconds.
Hood motion does not change the collision effects. In the air, hood motion moves back to neutral. Hood motion resets after a camera change or an RCCP transport.
A pause keeps the current view. Replay playback disables hood motion. If third-party code teleports the vehicle, call RCCP_Camera.ResetHoodMotion() after the move.
Hood motion does not change the field of view, add road vibration, turn the view into corners, or change the wheel camera.
Test acceleration, braking and turns in the two directions. If the view moves inside a body panel, decrease the travel values. Change one setting at a time.
Camera views
| View | Needs |
|---|---|
| TPS — chase | A registered player vehicle |
| FPS — hood or cockpit | A hood/cockpit mount on that vehicle |
| WHEEL | A wheel mount on that vehicle |
| FIXED — roadside | A Fixed Camera System in the scene |
| CINEMATIC | A Cinematic Camera System in the scene |
| TOP — overhead | Its camera-cycle option enabled |
The camera cycle skips a view that is not available or not included. Fixed and cinematic views need enabled camera systems. A view selection does not create those systems. If a hood or wheel mount is removed, the camera goes back to the chase view. When an active trailer is attached, the truck-and-trailer view replaces the chase view.
To add a roadside or cinematic view, find the Fixed camera or Cinematic camera section in the RCCP camera Inspector. Enable Include in the camera cycle. Then click Create Fixed Camera System or Create Cinematic Camera System.
4. Test look-around and obstructions
Stop Play Mode. Then examine these settings:
| Setting | Meaning |
|---|---|
| Let the player look around | Lets the player turn the view around the vehicle in the chase or hood view |
| Hold to look around | Mouse and touch only. On: the player drags the RCCP Canvas drag panel. Off: mouse movement turns the view. |
| Look-around speed (left/right) / Look-around speed (up/down) | Sets how fast a drag or the right stick of the gamepad turns the view. At full travel, the stick turns the view this number of degrees per second. This applies when Hold to look around is on or off |
| Return to the normal view | Moves the view back behind the moving vehicle after the look-around input stops |
| Use occlusion | Moves the chase camera closer when scenery blocks the view |
| Occlusion LayerMask | Selects the scene objects that count as obstructions |
Then drive near a wall and try to look around.
The hold mode needs the RCCP Canvas drag panel or a custom UI element that calls RCCP_Camera.OnDrag.
The right stick of the gamepad does not need this panel.
Check: the camera responds to the correct control and scenery does not hide the vehicle. If an invisible object pulls the camera in, examine the layer of that object.
The mouse wheel zooms the chase view. At all frame rates, one notch zooms the same distance. Scroll sensitivity sets that distance. Farthest zoom and Closest zoom are offsets from the normal chase distance. The zoom resets when the view or the vehicle changes.
With the standard keyboard bindings, hold B to look back. When you push or release the button, the chase view changes immediately, without rotation damping. Controls gives the rebinding procedure and other devices.
Optional: other camera features
| Feature | Where to start |
|---|---|
| Automatic camera changes for a display or menu scene | Change camera by itself and Time on each view |
| Top-down driving | TOP, Overhead height and Viewing angle |
| A flat overhead view without perspective | Use ortho mode |
| Softer impact movement | Shake the camera on impact, Spring stiffness and Spring damping |
| Muffled sound inside the cockpit | Muffle audio inside the car, then select the views that count as inside |
| Crash camera control | Let a crash take this camera and the settings of the crash system |
| Replay camera work | Replay and Recording |
| Photo mode and saved screenshots | Camera and photo mode API |
The crash system and the replay system control the crash and replay camera modes. Do not select those modes manually as usual views.
Camera troubleshooting
| What you see | What to check |
|---|---|
| No view follows the vehicle | Player vehicle registration and the scene camera |
| The camera cycle skips the hood or wheel view | The vehicle mount and the cycle option must both exist. |
| Mouse look-around does not work | Examine the Game-view focus and Let the player look around. Hold mode also needs the Canvas drag panel or a custom OnDrag call. |
| The camera distance resets again and again | Frame the car automatically |
| The camera shakes too much | Shake at speed, roll-following and impact-shake settings |
| Jitter continues after camera tuning | Examine physics and performance. Refer to Performance and Platforms. |
After the final settings, stop Play Mode and save the scene.
Read next
- Controls — camera input and rebinding.
- Scenes and Spawning — the vehicle that the camera follows.
- Field Reference — all camera fields.