Configure driving controls
Goal: Drive with the keyboard or a gamepad, change a key binding, and make sure that RCCP remembers the new binding.
Prerequisites
Complete Your First Drive. If you use a keyboard, a gamepad or a physical wheel, disable Use mobile controller in RCCP Settings. For touch controls, see Mobile.
A binding connects a physical control, such as W, to an action, such as Throttle. To change a key, change its binding. Do not change the RCCP action names.
Check the basic controls
- Click Play.
- Click in the Game view, away from text fields.
- Hold W to accelerate, A/D to steer and S to brake.
- If you connected a gamepad, use its right trigger, left stick and left trigger.
Check: The player vehicle responds to the device that you use. RCCP enables all action maps together. You do not select a gamepad control scheme.
If the vehicle does not respond, examine the registered player vehicle and the engine before you change bindings. For player registration, see Scenes and Spawning.
Change a binding in the Editor
CAUTION: Do not rename the actions or the maps. RCCP finds them by name. A renamed action stops working with no message.
- Stop Play Mode.
- Open Tools > BoneCracker Games > Realistic Car Controller Pro 2 > Settings > Input Settings.
- In the Inspector, click Open Input Actions.
- Select the action that you want to change.
- Edit its binding, or add a new binding.
- Click Save Asset.
- Click Play and test the new key.
Check: The new control does the correct action. If a saved in-game rebind overrides the new binding, reset that rebind before you test the edited asset.
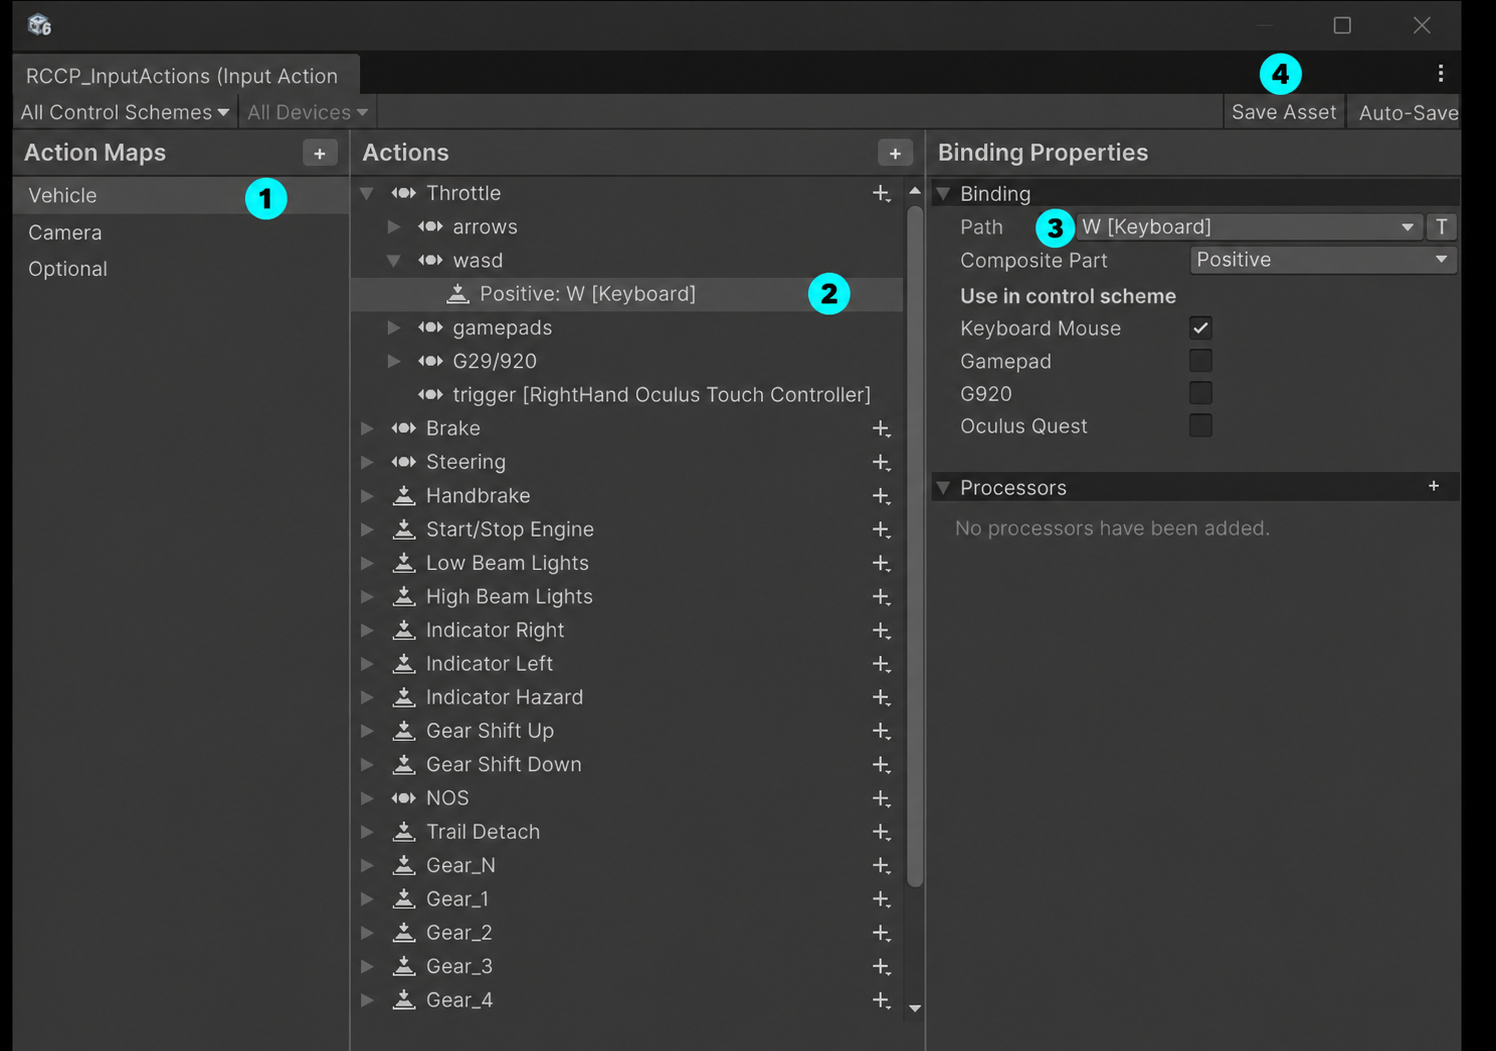
Open the screenshot at full size.
To change the W key in the screenshot:
- Select the 1 Vehicle map.
- Expand Throttle > wasd.
- Select 2 Positive: W [Keyboard]. The Path field shows only when you select a binding below an action.
- Set 3 Path to the new key.
- Click 4 Save Asset.
The asset contains the Vehicle, Camera and Optional maps. Its control schemes are Keyboard Mouse, Gamepad, G920 and Oculus Quest. RCCP finds actions and maps by name. If you rename a map, RCCP logs an error in the Console.
Change bindings in the game
The RCCP canvas has a rebinding panel:
- In Play Mode, open the in-game settings panel.
- On the Controls page, click Rebind Inputs.
- Select an action.
- When the prompt shows, press the new control.
- If the panel asks for more than one control, complete each prompt. Keyboard steering is a composite binding with separate left and right keys.
- Test the action.
- Restart the game and make sure that the new binding stays.
Check: The row shows the new binding, and the control works after a restart.
To save and load the overrides automatically, enable Remember key bindings in RCCP Settings > Controls > Input. To restore the default bindings, click Reset All.
RCCP stores the overrides under RCCP_Rebinds in PlayerPrefs.
If that key is not present, RCCP loads the overrides from the legacy rebinds key and saves them under RCCP_Rebinds.
Each binding GUID must match the current input asset.
RCCP ignores data that is not valid, and does not change the legacy key.
An empty RCCP_Rebinds record sets the bindings to their defaults.
If RCCP rejects the data, the current live overrides do not change.
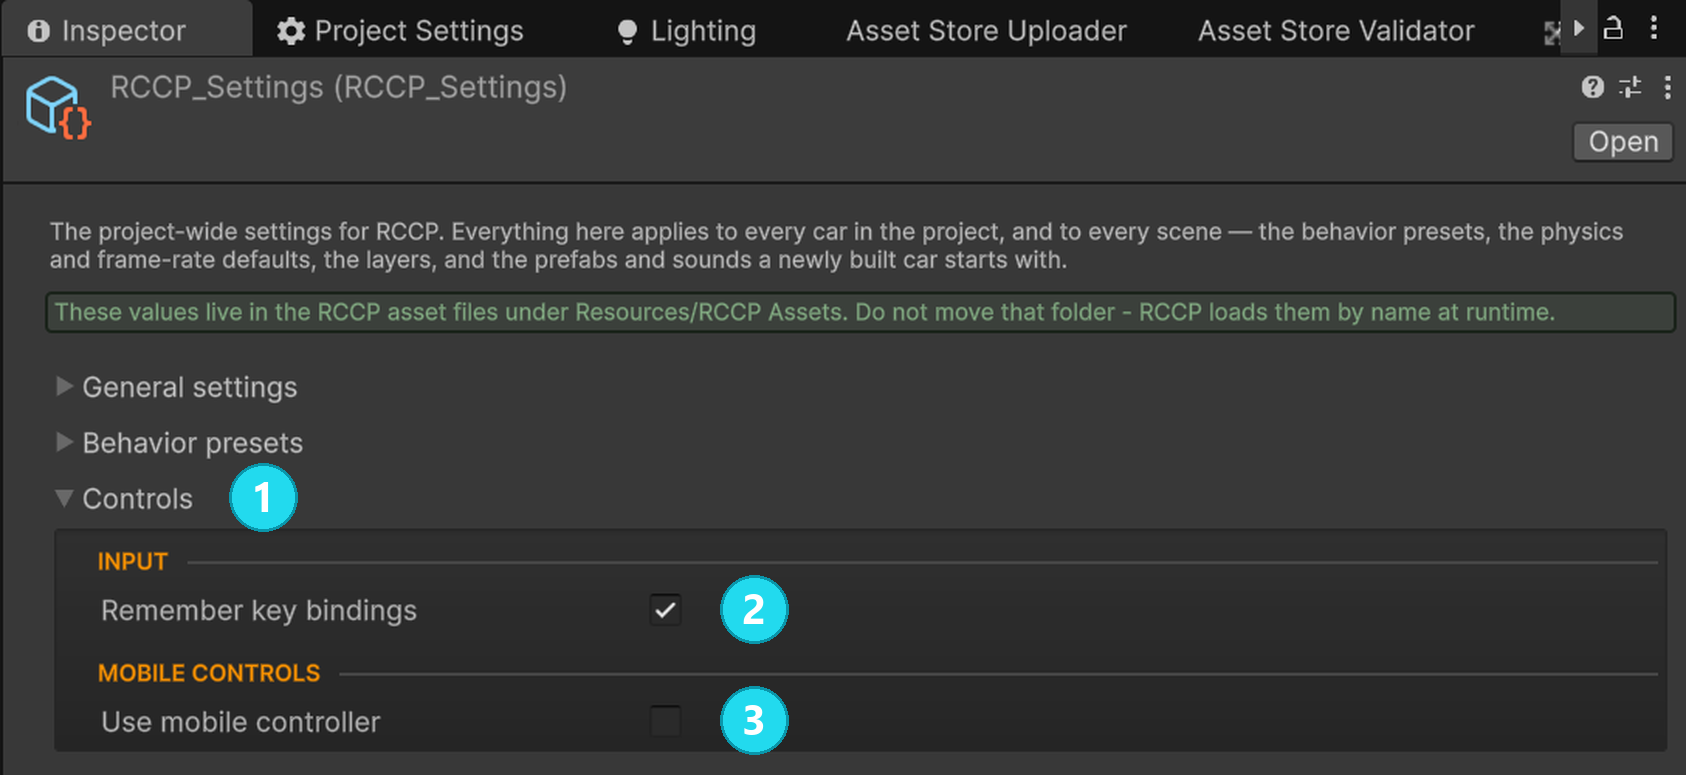
Open the screenshot at full size. These settings apply to the full project. To change one binding, use the Input Actions editor.
Default keys
These tables show the bindings of the included input asset. Your edited bindings and the saved player overrides can be different. Some features, for example nitrous, lights and trailer detachment, operate only if the vehicle has the related components.
Keys for vehicle control
| Action | Keyboard | Gamepad |
|---|---|---|
| Throttle | W or Up Arrow | Right trigger |
| Brake | S or Down Arrow | Left trigger |
| Steering | A / D or Left / Right Arrow | Left stick, left / right |
| Handbrake | Space | Button South (A / Cross) |
| Nitrous | F | Button East (B / Circle) |
| Clutch | M | — |
| Start / stop engine | I | Button North (Y / Triangle) |
| Low beam lights | L | D-pad up |
| High beam lights | K | Left stick down |
| Left indicator | Q | D-pad left |
| Right indicator | E | D-pad right |
| Hazards | Z | D-pad down |
| Shift up | Shift (either side) | Right shoulder |
| Shift down | Ctrl (either side) | Left shoulder |
| Neutral | N | — |
| Gears 1 to 6 | 1, 2, 3, 4, 5, 6 | — |
| Reverse gear | — | — |
| Detach trailer | T | Right stick press |
Only the G920 scheme has a direct reverse binding. On a keyboard or a gamepad, shift down from first gear to select reverse. An automatic gearbox can also select reverse. See Auto reverse when braking at rest below.
The clutch input operates only if Automatic clutch is off on the clutch module of the vehicle. In that mode, Press clutch while shifting and Press clutch while handbraking still press the clutch. The gamepad scheme has no clutch binding.
Camera and other feature keys
| Action | Keyboard and mouse | Gamepad |
|---|---|---|
| Change camera | C | Left stick press |
| Look back (hold) | B | Button West (X / Square) |
| Look around, with Hold to look around on | Drag on the screen with the left mouse button or a finger | Right stick |
| Look around, with Hold to look around off | Mouse movement | Right stick |
| Zoom | Mouse scroll wheel | — |
| Record | R | — |
| Play back | P | — |
| Action | Keyboard and mouse | Gamepad |
|---|---|---|
| Feature Lab panel | Tab | — |
On the included RCCP camera, Hold to look around is on. The right stick operates in both modes. At full travel, the stick turns the view at Look-around speed (left/right) and Look-around speed (up/down), in degrees per second. The drag and the scroll-wheel zoom do not use the input asset. Rebinding does not change these two controls.
R operates the recorder of the player vehicle. If the vehicle has a recorder, P plays that recording. P can also start the scene Replay Director. For both, see Replay and Recording.
Add the Feature Lab canvas prefab to your scene before using the panel. See Demo Content.
The controls do not work as expected
| What happens | What to check |
|---|---|
| The keys do nothing while you type in a text field | While a UI text field has focus, RCCP ignores the driving input. Click in the Game view. |
| Input stops after you switch applications | When the application loses focus, RCCP resets the inputs. Select the game window again. |
| Only one vehicle responds to the light, gear or recording keys | These actions apply only to the registered player vehicle. Other vehicles do not respond. |
| The number keys do not hold a gear | Use a manual transmission for direct gear selection. An automatic gearbox can select a different gear after the key press. |
| A stick or a pedal applies input at rest | Examine the device values. Adjust the deadzone of that axis on the input module of the vehicle. Change only the axis that drifts. |
| Steering changes go back to the old values | An active behavior preset can overwrite the steering settings. See Assists and Presets. |
| A rebind is lost after a restart | Examine Remember key bindings, the saved RCCP_Rebinds key and any code that clears PlayerPrefs. |
Connect a physical steering wheel
- Connect the device.
- Open Window > Analysis > Input Debugger.
- Make sure that the Input System detects the device.
- Turn the wheel and press each pedal. Make sure that the axes change.
- If the included G920 bindings match your device, try them. If not, add bindings for the controls that your device reports.
- Before you drive at speed, test the steering direction, the full pedal travel and the released values.
Detection is only the first check. A different wheel can need different axis bindings or processors. An Invert processor can correct a reversed axis. A combined throttle and brake axis needs bindings that separate the two directions.
Included G920 bindings
| Action | Control |
|---|---|
| Steering | Wheel axis (stick/x) |
| Throttle | Accelerator pedal (stick up / down) |
| Brake | Brake pedal (z) |
| Clutch | Clutch pedal (rz) |
| Handbrake | Button 2 |
| Nitrous | Trigger |
| Start / stop engine | Button 7 |
| Low beam / high beam | Button 10 / Button 9 |
| Indicators left / right | Hat left / right |
| Hazards / look back | Hat up / hat down |
| Change camera | Button 8 |
| Shift up / down | Button 5 / Button 6 |
| Gears 1 to 6 | Buttons 13 to 18 |
| Reverse | Button 12 |
Neutral has no wheel binding. When you move the shifter out of a gear, RCCP selects neutral.
Trailer detachment, recording, playback and Feature Lab have no G920 binding in the included asset.
RCCP wheel support reads input only. RCCP does not supply force feedback or gamepad rumble. These effects need a separate device integration.
Adjust the input response
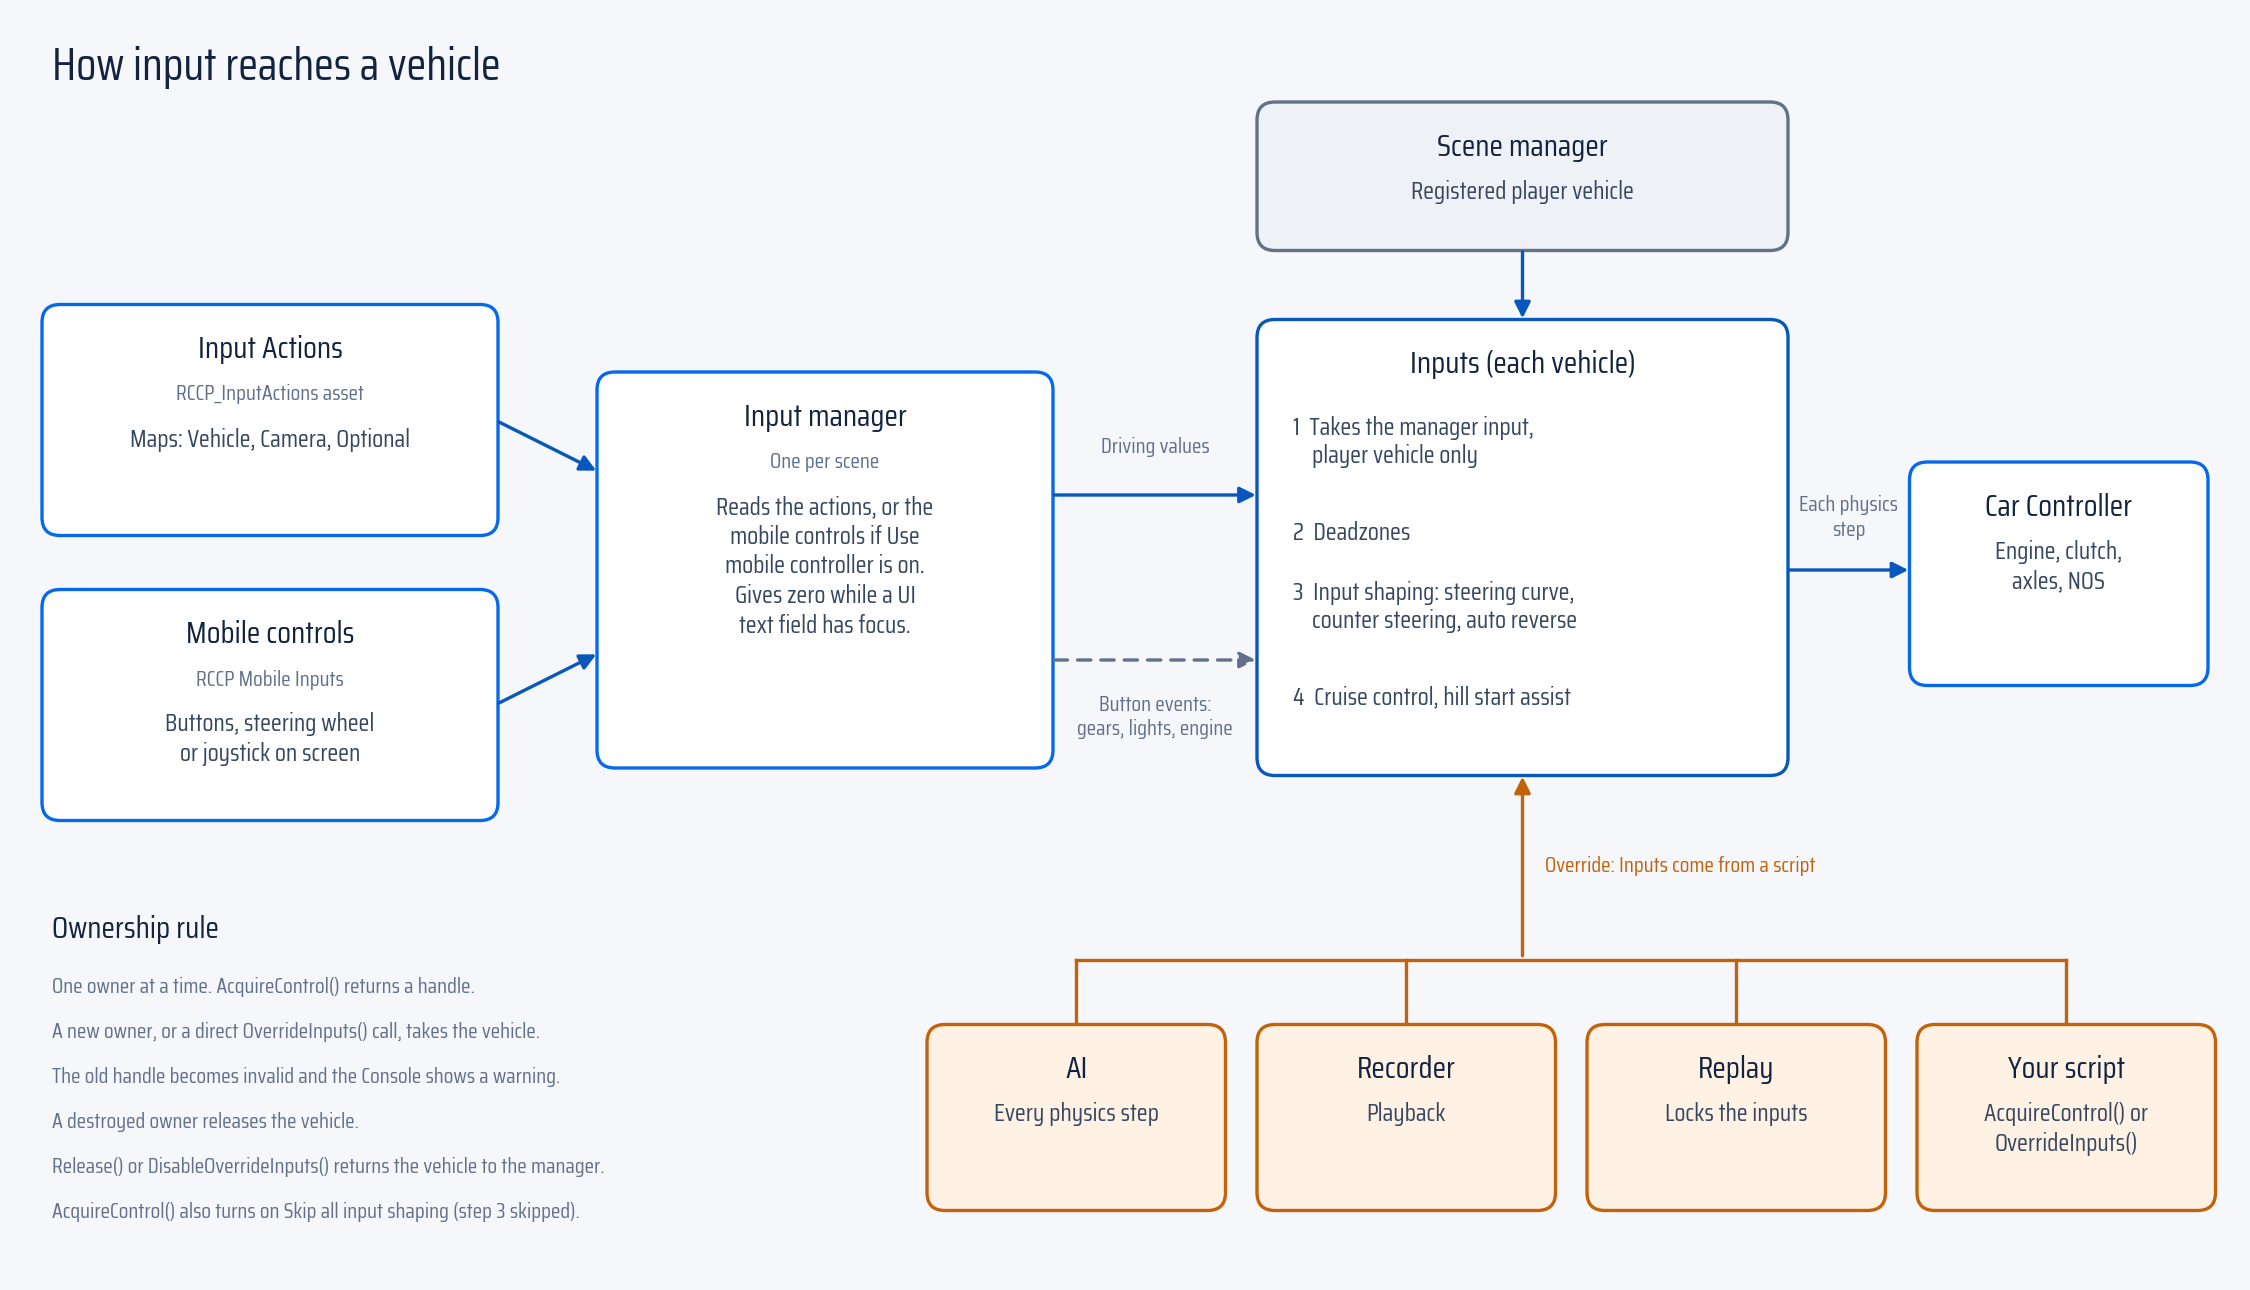
Use these settings on the input module of the vehicle:
| Setting | Purpose |
|---|---|
| Steering curve by speed | Decrease the available steering angle as the speed increases. |
| Steering limiter | Decrease the steering while grounded wheels on a steering axle slide sideways. The limit starts above 4 m/s (14.4 km/h) forward wheel speed and applies fully from 8 m/s (28.8 km/h). |
| Counter steering and Counter steer strength | Adjust the automatic steering correction into a slide. |
| Auto reverse when braking at rest | With an automatic gearbox, select reverse when the player holds the brake at rest. |
| Swap pedals in reverse | In reverse, swap the throttle and brake functions for automatic driving. |
| Cut throttle while shifting | Set the throttle to 0 during a gear change. |
| Apply brake / Apply handbrake | Hold the vehicle when player control is disabled. |
| Per-axis deadzones | Ignore a small input around the rest position. |
Calibrate the device before you tune the vehicle. First, make sure that the released wheel or stick reports no input at rest. Then adjust the response of the vehicle. For the input processing path, see Scripting.
Create custom rebind buttons
Add the RCCP UI Rebind Input component to a UI object. Set its Action, Binding and Binding Text fields. The Action Label, Rebind Overlay and Rebind Text fields are optional.
Connect the On Click () event of the button to StartInteractiveRebind(). To reset that row, call ResetToDefault(). For one reset button for many rows, use RCCP UI Rebind Input Reset. Add the rows to its list and call its OnClick().
If your options screen saves the bindings itself, use these calls to save and load the overrides:
using BoneCrackerGames;
RCCP_RebindSaveLoad.Save(); // When applying the player's changes.
RCCP_RebindSaveLoad.Load(); // When loading saved controls.
Call each method at the correct point in your game flow. Do not call both methods together at start. If Remember key bindings is on, the scene manager also loads the overrides at start and saves them when it is disabled.
Next steps
- Mobile — touch screen and tilt input.
- How the Car Drives — transmission behavior.
- UI and HUD — the ready-made rebinding interface.
- Scripting — send inputs from your own code.