Tuning Recipes
Goal: select a test for a problem that you can see or hear. Change one related setting, and then find if the change helps.
Before you start
Use a vehicle that operates correctly. Save a copy of your scene. Stop Play Mode before you edit settings that you want to keep.
Select the vehicle root in the Hierarchy. Click the module cards to open the related parts. The wheel settings are on the wheel objects below the axles.
To open Vehicle Settings, select the vehicle root and click Find Vehicle Settings.
Before you tune the wheels, read Wheels and tires. If the wheel shows Upgrade wheel data, do the upgrade steps first.
How to read a recipe
- Select the symptom in the table below.
- Record the original setting. Then make the problem occur one time.
- Stop Play Mode and change one setting.
- Use the same road, start position, speed and input again.
- Keep the change only if the result is better.
Check: you can say what is better. For example, the vehicle rolls over less in the same turn, the body bounces less after the same bump, or the audio transition is smoother.
The expandable audio notes keep earlier measurements from a prototype vehicle. The wheel recipes use comparisons on your own vehicle.
| Symptom | Start here |
|---|---|
| Wheels spin but the vehicle does not move much | Grip and traction |
| The vehicle tips over | Rollover |
| Steering is late, or the body bounces | Floaty handling |
| The vehicle catches or jumps over curbs | Road contact |
| Impacts are silent or too quiet | Crash sound |
| Engine layers sound out of tune | Engine sound |
Settings that a behavior preset controls
When a behavior preset is enabled, the preset can replace or limit the settings of a vehicle. Before you tune, decide where to make the change. Edit the shared preset, or enable Ignore behavior presets on this vehicle.
If a value changes back when Play starts, read Assists and Presets.
Tire grip controls
Use the wheel settings explanation to find the difference between surface grip and tire behavior. Before you change the tire response, use the tuning order.
Body setup checks
Some settings are on Unity components or scene objects:
| Where | What to check |
|---|---|
| Rigidbody on the vehicle root | Mass, interpolation and angular damping |
| Select the center of mass button on the Dynamics module | The button selects the COM marker. You can move the marker in the Scene view. |
| Body and ground colliders | The vehicle stays on the road and the colliders do not overlap |
The center of mass is the point that the vehicle balances on. Stop Play Mode before you move the marker. Then start a new run to compare.
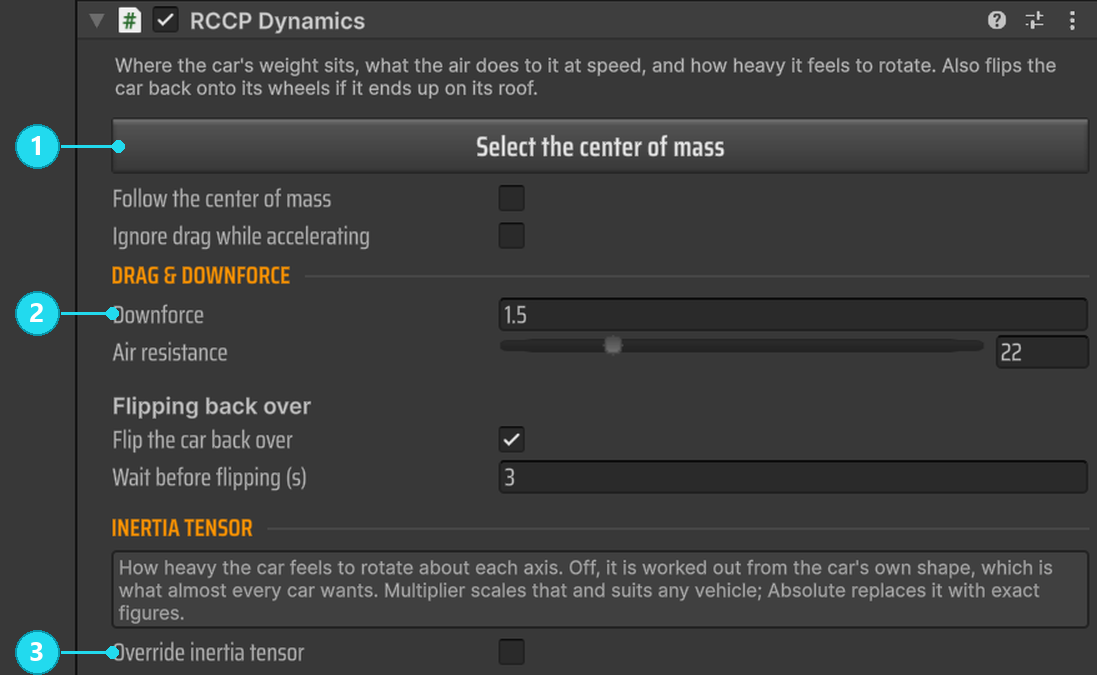
Open the screenshot at full size.
- 1: click this button to select the balance marker. Then move the marker in the Scene view.
- 2: Downforce changes the vehicle at speed. Downforce does not move the center of mass.
- 3: the inertia tensor sets how much the vehicle resists rotation. For your first center-of-mass test, keep the override disabled. A behavior preset can enable the override and set its multiplier.
The values in the screenshot are from the example vehicle. These values are not a tuning recipe.
The vehicle disables parts of itself at a distance
The optional LOD module decreases the work for vehicles that are far from the camera. Thus effects, sound or wheel movement can stop at a distance.
LOD changes only what you see and hear: wheel-model alignment, skidmarks, audio, particles, exhausts and wheel blur. Stability, Dynamics, Damage and lights operate at each level. Thus a vehicle at a distance drives the same as a vehicle near the camera. To keep effects, sound and wheel movement at a distance, enable Always full detail on LOD or increase LOD distance factor. Refer to Performance and Platforms.
LOD keeps disabled the systems that were disabled when the vehicle started. Full detail does not enable these systems.
Loss of grip
The wheels spin but the vehicle does not move
- Make sure that the vehicle is in gear. Release the brakes.
- Make sure that the body does not touch an obstacle.
- On each driven wheel, examine Touching the ground (
isGrounded) in Live values. - Examine Grip (
grip) and the surface. Use Wheels and tires. - If a wheel value is too low by accident, restore that value before the next standing start.
- If no axle gets power, examine Connected axle on the differential. Refer to How the vehicle drives.
- When the contact and surface settings are correct, compare Tire > Longitudinal > Peak Grip (
wheelData.tire.peakGripLongitudinal).
Check: compare the distance in the same test time. Also compare a stop in a straight line. Do not use only the wheel speed to find an improvement.
For Peak Slip Ratio (wheelData.tire.peakSlipRatio) and Slide Grip (wheelData.tire.slideGripLongitudinal), use the tire tuning order. If the values change during the test, read preset replacement.
Body movement control
The vehicle rolls over in corners
- Make sure that the wheel objects agree with the wheel positions of the model.
- On Dynamics, click Select the center of mass.
- Stop Play Mode. Move the marker a small distance lower.
- Drive through the same corner at the same speed.
- Compare the suspension and Anti-roll force (N) (
antirollForce) only after you examine the geometry.
Check: count the wheel lifts or rollovers in repeated turns. After each change, do a bump test and a braking test again.
For body movement through the available travel, use the suspension settings. A result on a flat road does not show the result over a curb.
The body bounces or the steering is late
Before you select a symptom, do the base suspension checks:
| Symptom | Compare one setting | Repeat this test |
|---|---|---|
| The body continues to bounce | Vehicle Settings > Wheels > Suspension > Damper (N·s/m) (wheelSettings.damper) |
Cross the same bump and count the bounces |
| The body leans or dives too far | Spring (N/m) (wheelSettings.spring) |
Do the same corner or braking test again |
| The suspension extends too quickly after compression | Rebound Damping Ratio (wheelData.damperReboundRatio) |
Cross the same bump and compare the return movement |
| The body moves too far into compression | Spring Progression (wheelData.springProgression) |
Compare a small bump with a larger bump |
| The suspension hits full compression too hard | Bump Stop Zone (m) (wheelData.bumpStopZone) |
Cross the same bump at the same speed |
| The suspension hits full extension too hard | Droop Stop Zone (m) (wheelData.droopStopZone) |
Cross the same crest and examine the ground contact |
| Steering is late | Steering speed (steerSpeed) on the axle, then Override inertia tensor (overrideInertiaTensor) on Dynamics |
Compare one setting in the same steering test |
| Steering response needs more adjustment | Tire > Shared > Relaxation Length (m) (wheelData.tire.relaxationLengthLateral) |
Use the same steering input and compare the response and the overshoot |
| Steering is too weak at high speed | Steering curve by speed (steeringCurve) on Inputs, then Grip steering margin (°) (gripSteeringMargin) |
Do the same lane change at the same speed |
| Grip changes too suddenly in a corner | Tire > Lateral > Peak Slip Angle (°) (wheelData.tire.peakSlipAngleDeg), then Sharpness (wheelData.tire.sharpnessLateral) |
Drive through the same corner with one change for each run |
Before you select a direction for the change, read what these settings do.
- Stop Play Mode and record the original value.
- Change one setting by a small quantity.
- Do the same maneuver again.
- If the result is worse, restore the original value.
Check: record the number of bounces, the body movement or the settle time. For steering, also compare how far the vehicle turns after the first response.
The vehicle catches or jumps over curbs
- Compare the wheel positions and Radius (m) (
wheelSettings.radius) with the model. - Make sure that the body collider does not touch the curb first.
- Compare Contact > Contact Patch Width (m) (
wheelData.contactPatchWidth) over the same curb. - Restore the baseline before you compare Max Step Height (m) (
wheelData.maxStepHeight). - If the suspension reaches full compression, go back to the suspension recipe above.
Check: compare the ground contact, the body movement and the clearance at the same approach speed. Do the test again on a flat road.
To find the difference between the contact dimensions, the visible wheel and the skidmarks, use the contact explanation.
Looks & sound
Crash sounds are inaudible
- On the vehicle, open Presentation > Audio.
- Make sure that the Crash clip list has usable clips and no empty slots.
- Examine its Max Volume and the mixer, if there is one.
- Read Crash volume by mass and the unit of Full-volume crash.
- To make similar impacts louder, decrease Full-volume crash in small steps. Then do the same impact again.
Check: the impact is audible at the expected volume. Also test a small bump. The small bump must not be louder than you want.
When mass normalization is on, the severity is the collision impulse divided by the mass. The result is a change in velocity. When mass normalization is off, the reference is the raw impulse. If you change the mode but not the reference, crashes can become too quiet.
Optional: recorded prototype test and detailed notes
These measurements come from one prototype vehicle setup. The measurements are not current defaults. The measurements do not guarantee a result on your vehicle.
Crash loudness is one division: the impact severity divided by the full-volume reference. In the recorded setup, Crash volume by mass (normalizeCrashByMass) is on. Thus RCCP divides the impulse by the vehicle mass first, and the severity is a change in velocity in meters per second.
In that setup, Full-volume crash (crashMaxVolumeReference) is 14.3. A severity of 14.3 m/s plays at full volume. A lower severity plays at a proportional volume. For example, a severity of 5 m/s plays at 35%. To make usual impacts louder, make this value smaller.
RCCP does not create a sound if the calculated volume is 0.04 or less. With the tested settings and a Max Volume of 1, this limit is a severity of approximately 0.57 m/s.
What to change
| Setting | Where | Change |
|---|---|---|
Full-volume crash (crashMaxVolumeReference) |
RCCP Audio | Decrease the value. The recorded setup used 14.3. Try 10. If you want hard hits to reach full volume early, try 8. With 8, the 5 m/s severity plays at 63% instead of 35%. Behavior presets do not change these audio settings. |
Crash volume by mass (normalizeCrashByMass) |
RCCP Audio | Keep it on. This setting is a unit switch, not a volume control. Read the NOTE below. |
Crash (crashSound) → Audio Clips |
RCCP Audio | Add at least one clip, and remove the empty slots. The prototype and the demo vehicles each have 4 clips. The random selection can select an empty slot, so some crashes have no sound. |
Crash (crashSound) → Max Volume |
RCCP Audio | Make sure that the value is 1. A lower value makes all crashes quieter and increases the silence limit. Then small bumps make no sound. |
| Rigidbody → Mass | Unity Rigidbody, vehicle root | Use the correct vehicle mass in kilograms. A mass that is too high decreases the calculated crash severity. |
NOTE: The unit of the reference value changes with the switch above it. RCCP does not convert the value when the switch changes. With Crash volume by mass on, the unit is meters per second (approximately 14.3). With the switch off, the unit is raw impulse in N·s (approximately 20000). An impulse value in the speed field can put usual impacts below the playback limit, and these impacts become silent. If the switch is on and the reference is more than 1000, the Audio Inspector shows a "unit mismatch" warning.
Settings that did not help in this test
- Minimum impact force (
impactMinImpulse): this setting controls only the gameplay impact event. Crash audio starts directly from the collision and does not use this setting. - Impact cooldown (s) (
impactCooldown): this setting also controls only the gameplay impact event, not the sound. - Pitch variation (
pitchRandomness): this setting changes only the pitch, so that repeated clips do not sound the same. This setting does not change the volume. - Effect fade speed (
effectVolumeSmoothing): this setting smooths only the looping effects: turbo, reverse, brake squeal, flat tire, nitrous and wind. A crash is a one-shot sound, and RCCP does not smooth it.
A one-shot crash sound is different from a continuous scrape sound.
Read more: Engine Audio · Field Reference
The engine sounds out of tune
- Open Audio > Engine sounds and examine the recording of each layer.
- Compare Ref with the RPM of that recording.
- If the Off recording has a different RPM, give it its own Off Ref RPM.
- Make sure that each RPM window reaches the references of the adjacent layers.
- Select Equal Power. Enter Play Mode and examine Blend running now in Live values.
- Listen from idle through acceleration. Then release the throttle and listen while the RPM decreases.
Check: the blend operates as you want, and overlapping layers do not play different notes. A validator or a pitch readout helps the check, but you must also listen.
RCCP sorts the reference RPM values internally. Thus Idle can stay the last card in the standard set. For the authoring workflow, refer to Engine Audio.
Optional: recorded prototype test and detailed notes
These measurements come from one prototype vehicle setup. The measurements are not current defaults. The measurements do not guarantee a result on your vehicle.
An RCCP engine sound is a set of recordings that play at the same time. The recordings agree only when RCCP sets the pitch of each recording from the engine speed of that recording. Two different faults stop this. The two faults sound different, so first find which fault you have.
All the numbers below come from the prototype in this recorded test. The engine revved in neutral with the handbrake applied. The test read the pitch of each audible engine voice and converted that pitch back to an engine speed. Each row shows the largest gap between two voices at the same moment, in semitones. A semitone is a musical pitch interval, and 3 semitones is a minor third. Audibility depends on the recordings and the listening conditions.
Case one: correct pitch at high RPM, incorrect pitch at lower RPM. This is the prototype in this recorded test, with Engine blend (engineBlendMode) set to Equal power:
| Rev band | Widest gap between two voices |
|---|---|
| 1000 – 1500 | 4.1 semitones |
| 1500 – 2000 | 8.4 semitones |
| 2000 – 2500 | 7.7 semitones |
| 2500 – 3500 | 0.0 – 0.2 semitones |
| 3500 – 4000 | 1.9 semitones |
| 4000 – 4500 | 3.6 semitones |
| 4500 – 5000 | 2.6 semitones |
| 5500 – 8000 | 0.0 semitones |
The cause is one setting with two functions. The RPM pair on each layer card sets where the layer is audible. The same pair also limits the pitch range of that layer. The equal-power blend keeps a layer audible up to the Ref (rpm) of the next layer.
If a window stops before the reference of its neighbor, the layer continues to play at the pitch limit of its window. Thus the layer holds one incorrect note for as long as it is audible. On the tested vehicle, the window of the idle layer ends at 1200, but the blend keeps the layer audible to 2000. This range is the band with the 8.4-semitone gap.
To correct this fault, give each layer a window that reaches the Ref (rpm) of the layers on each side. On the same vehicle, the test widened each window to the references of its neighbors. After this change, all bands fell to 0.5 semitones or less, and most bands fell to 0.0. The gap at 1500 – 2000 fell from 8.4 to 0.0, and the gap at 4500 – 5000 fell from 2.6 to 0.0. No other setting changed.
Before you copy the settings from this earlier test, examine the window of the idle layer on the current vehicle.
Case two: incorrect pitch at all RPM, worst at high RPM. This is the Legacy blend. Each layer follows its own authored pitch ramp, and no setting connects the layers:
| Rev band | Widest gap between two voices |
|---|---|
| 2000 – 2500 | 11.1 semitones |
| 3000 – 3500 | 10.3 semitones |
| 5500 – 6000 | 16.7 semitones |
| 7500 – 8000 | 19.1 semitones |
Nineteen semitones is more than one and a half octaves between two voices of the same engine. The gap increases at higher RPM. Thus this fault usually seems to be a high-RPM problem.
This fault can also occur when nobody selects Legacy. Equal power needs an On clip on each layer and a different Ref (rpm) above 1 on each layer. RCCP sorts the references internally. If one of these conditions is not true, the full component goes back to Legacy. The Audio Inspector then shows a warning that the layers do not qualify.
In the test, one layer got the same Ref (rpm) as another layer. Equal power stopped, and the gap at the rev limiter was 17.6 semitones. The Blend running now readout in the Audio Inspector shows the blend that operates. The Engine blend dropdown shows only the blend that you request.
What to change
| Setting | Where | Change |
|---|---|---|
The RPM pair on each layer card (minRPM and maxRPM) |
RCCP Audio, Engine layers (engineSounds) |
Widen each window to the references of its neighbors. The lowest layer starts at 0. The highest layer ends at the maximum engine RPM. Each other layer goes from the Ref (rpm) below it to the Ref (rpm) above it. This change is the full correction for case one. |
Engine blend (engineBlendMode) |
RCCP Audio | Set the value to Equal power. Enter Play Mode. Open Live values at the bottom of the Audio Inspector, and examine Blend running now. If the readout shows Legacy, the layers do not meet the conditions in the next row. |
Ref (rpm) (referenceRPM) |
RCCP Audio, each layer card | Each layer needs a different value above 1. The standard Idle card can stay last, because RCCP sorts the references. Use the known recording RPM or the Measure button of the layer. Then listen to confirm the value. A reference is the engine speed of the recording, not the middle of the window. |
Off Ref RPM (referenceRPMOff) |
RCCP Audio, each layer card | Change this value only if the Off clip of the layer has a different recording speed from its On clip. At 0, the layer uses the on-throttle reference. Thus an Off clip with a different recording speed can need its own measured reference. Measure shows the value that it finds, and Apply writes that value. |
Settings that did not help in this test
- Pitch variation (
pitchRandomness): the test measured the gaps with the tested value and with 0. The gaps did not change. This setting makes repeated one-shot sounds different from each other. - The Pitch pair on the layer card: Equal power does not use these two values. Equal power sets the pitch from the reference. The Pitch pair operates only with Legacy, and with Legacy the pair is the cause of the fault.
- Vol (
maxVolume): this setting changes which voice is louder, not the note of each voice. A layer with an incorrect pitch is still incorrect at a lower volume, and it still beats against its neighbor. - Replacing the clips: on the same vehicle, the tested recordings agree above 5500 rpm, but have a gap of 8.4 semitones at 1800. Thus these results show a layer authoring fault in that setup.
Read more: Engine Audio · Field Reference
Other symptoms
For a vehicle that does not operate, use Troubleshooting. To find the related component, use How the vehicle drives.
Read next
- Wheels and tires: suspension, contact and tire tuning.
- Assists and Presets: prevent presets from replacing a test value.
- Field Reference: each setting and its tooltip.
- Engine Audio: measured recording references and blend validation.